Korg micro arranger Скачать руководство пользователя страница 18

15

Tutorial

Playing a Style (Automatic Accompaniment)

7. TUTORIAL

This


chapter


is


fully


devoted


to


step

by

step


instructions,


that

we


hope


may


be


useful


to


learn


the


basics—in


the


field.

PLAYING A STYLE 
(Automatic Accompaniment)

A


Style


will


be


your


virtual


band


for


your


best


solos.


Select

one


of


the


304


Styles


we


fitted


in


this


machine…

1

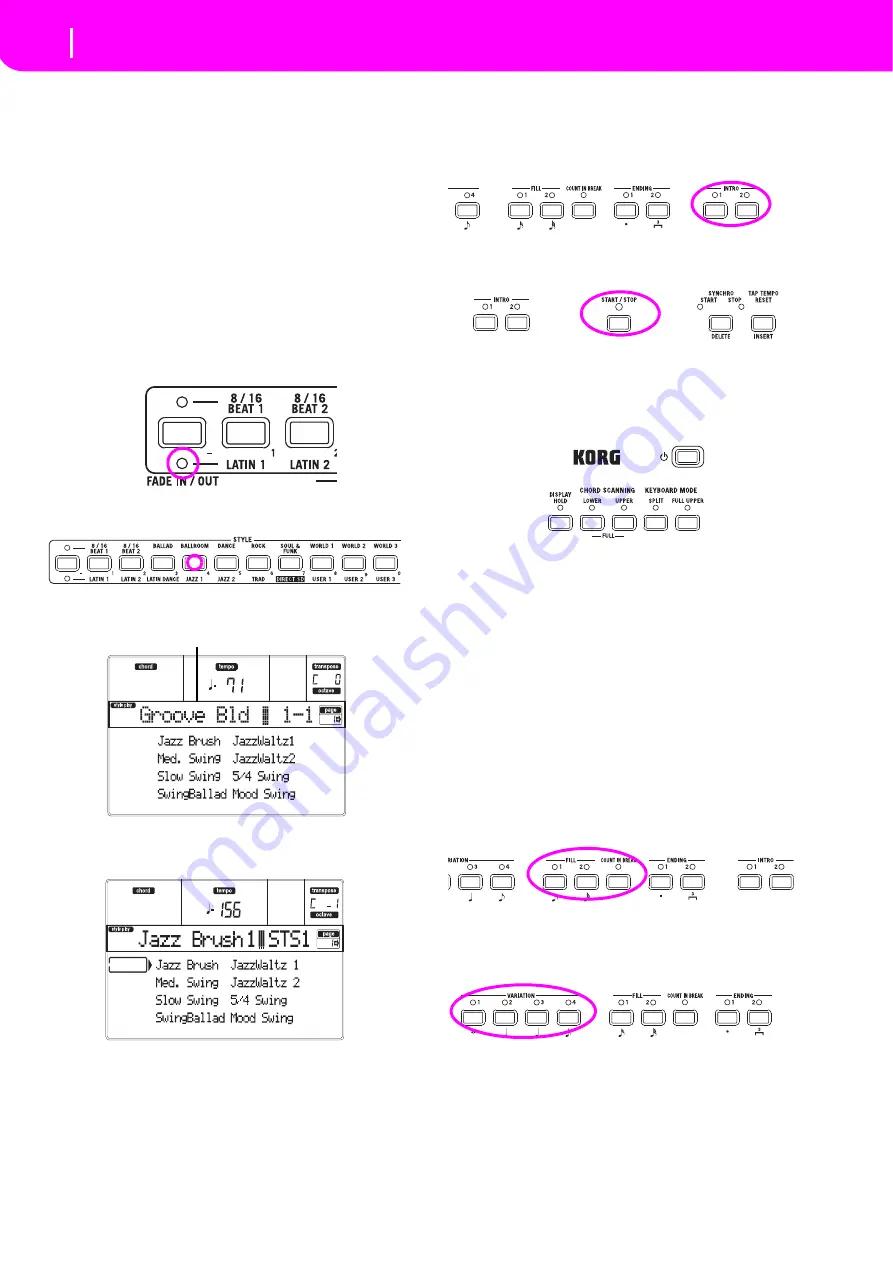
OK, select your favorite musical Style.

There


are


plenty


of


Styles


to


choose


from.


We


will


go


with


a

Jazz


Style—the


“Jazz


Brush”.

1.

Select


the


second


row


of


Styles.


Press


the


leftmost


STYLE

button


to


switch


the


lower


LED


on.

2.

Now,


you


are


free


to


press


button


number


4,


called

“JAZZ


1”.

The


Style


Select


window


appears.

3.

Press


one


of


the


A


VOLUME/VALUE


buttons


to


select

“Jazz


Brush”.

2

Call an Intro.

You


can


engage


an


Intro


to


be


played


before


the


Style.


Press

INTRO1


or


INTRO2.


The


former


plays


more


freely,


without

letting


you


decide


the


chords.


The


latter


lets


you


play


a


chord

progression


while


it’s


playing.

3

Start the Style!

Play


a


chord,


and


press


the


START/STOP


button.

Then


begin


playing.


Usually


(when


the


SPLIT


LED


is


on)


chords


are


recognized

under


the


split


point,


i.e.


on


the


Lower


part


of


the


keyboard.

With


the


UPPER


or


FULL


Chord


Scanning


mode,


you


must

play


three


or


more


notes


to


have


a


chord


recognized.

4

Play your chords and your melody.

Go


on


playing.


As


you


may


notice,


the


microARRANGER

features


a


very


sophisticated


chord


recognition


engine.


Rec

ognized


chords


are


shown


in


the


display.

5

Make a break—or should we say “a fill”?

During


your


playing,


you


are


free


to


call


a


one

bar


break.


Try

it:

PRESS BREAK

Do


you


see?


Music


stopped


for


one


bar.


Then,


it


is


back


again.

After


a


while,


let’s


go


for


something


different…

PRESS FILL1 OR FILL2

No


silence,


this


time.


microARRANGER


plays


a


complex


pas

sage


to


let


you


take


a


breath.


FILL1


is


the


simpler


one,


where

FILL2


is


more


sophisticated.


Usually,


you


will


use


FILL1

when


playing


with


Variations


1


and


2


(the


most


easy),


FILL2

when


working


with


Variations


3


and


4


(more


complex


ones).

6

Select other Variations.

There


are


four


VARIATION


buttons.


These


are


four


different

versions


of


the


same


Style.


Try


them


all!

You


can


go


to


a


Variation


after


a


Fill.


Just


press


a


FILL


button,

then,


immediately


after


press


a


VARIATION


button.

The selected Style

Содержание micro arranger

Страница 1: ...Quick Start Guide E 1 ...

Страница 2: ...is equipment does cause harmful interference to radio or television reception which can be determined by turning the equipment off and on the user is encouraged to try to correct the interfer ence by one or more of the following measures Reorient or relocate the receiving antenna Increase the separation between the equipment and receiver Connect the equipment into an outlet on a circuit differ ent...

Страница 3: ...lcome 1 Useful links 1 About this manual 1 Start up 1 Connecting the AC power adapter 1 Turning the instrument on and off 1 Controlling the Volume 2 The BALANCE slider 2 Headphones 2 Audio Outputs 2 Audio Inputs 2 MIDI connections 2 Damper Pedal 2 Demo 2 The music stand 2 Front panel 3 Display and User Interface 9 Display controls 9 Interface structure 10 Message windows 11 Symbols and Icons 11 Gr...

Страница 4: ...hree sections A Basic Guide containing an overview of the instru ment as well as a series of practical guides named Tutorials A Reference Guide with each page and parameter described in detail An Appendix with a list of data and useful information for the advanced user The quick start guide and PDF ownerʹs manual use the fol lowing abbreviations The parameter can be saved onto a Perfor mance by pr...

Страница 5: ...nternal speakers This is useful when record ing or when playing live AUDIO INPUTS You can connect the output of another electronic musical instrument an unpowered mixer or any audio device to the rear panel input jack INPUT stereo mini jack Since this is a line level input youʹll need to use a separately sold mic pre amp or mixer if youʹre connecting a mic Use the connected device s volume control...

Страница 6: ...F format directly from the memory card You can also play MID and KAR files directly from the memory card Since the microARRANGER is equipped with two sequencers you can even play two Songs at the same time and mix them with the BALANCE slider In addition to the Song tracks you can play one to four Realtime Keyboard tracks along with the Song s In the main page Realtime Keyboard tracks are shown on...

Страница 7: ...le or Perfor mance the memorized tempo value is auto matically selected 14 This button turns the Single Touch function on or off ON When a different Style or the same again is selected a Single Touch Setting STS1 is auto matically selected meaning that the Realtime tracks and effects will change together with the Style tracks and effects OFF When you select a different Style or the same again the ...

Страница 8: ...m the keyboard momentarily will stop the Style from playing If you play a chord again the Style starts again OFF All Synchro functions are turned off This button doubles as a DELETE function for the Backing Sequence and Song modes It is also used to delete the selected character during text editing 24 TAP TEMPO RESET INSERT This is a double function button acting in a different way depending on th...

Страница 9: ...creases it 31 TRACK SELECT Depending on the operating mode this button switches between the various tracks view STYLE PLAY MODE Switches between the Realtime tracks and the Style tracks SONG PLAY MODE Switches between the main page showing the Realtime Keyboard tracks Song tracks 1 8 and Song tracks 9 16 SONG MODE Switches between the main page Song tracks 1 8 and Song tracks 9 16 The TRACK SELECT...

Страница 10: ...yboard or Realtime tracks are positioned on the keyboard SPLIT The Lower track plays below the split point while the Upper 1 Upper 2 and Upper 3 tracks play above it By default selecting this key board mode automatically selects the Lower chord scanning mode FULL UPPER The Upper 1 Upper 2 and or Upper 3 tracks play on the whole keyboard range The Lower track does not play By default selecting this...

Страница 11: ...n the top right area of the display Press both buttons together to reset the Octave Transpose to zero Note The Octave Transpose has no effect on tracks set to Drum mode and even if set in a different status on the Drum and Per cussion tracks Lowers the selected track an octave Raises the selected track an octave 48 BALANCE slider In Song Play mode this slider balances the volume of the two on boar...

Страница 12: ...a VOLUME VALUE A H button Then select a column using the F 1 F 4 function button In the Card Edit environment the F 1 F 4 buttons can be used also to select one of the page commands appearing in the last line of the display See SINGLE TOUCH SETTING F 1 F 4 FUNCTION KEYS buttons on page 6 for more information PAGE The PAGE buttons select the previous or next edit page When selecting a Style or a Pr...

Страница 13: ...ode is divided into a main page the page where you usually play a Style a Song or a Program a menu and a series of edit pages Press MENU to access the Menu Use the MENU and PAGE buttons to browse across the various edit pages Press EXIT to go back to the main page Edit environment See diagram at the bottom When you press GLOBAL or SD CARD an edit environment overlaps the current operating mode Pre...

Страница 14: ...r a CD tape player line impedance The signal is automatically routed to the speakers the Audio Outputs and the Phones 3 OUTPUTS Use these unbalanced connectors to send the audio signal sound to a mixer a PA system a set of powered monitors or your hi fi system Set the output level with the MASTER VOLUME slider 4 DAMPER Use this to connect a Damper pedal like the KORG PS1 PS3 or DS1H 5 ASSIGN PDL S...

Страница 15: ...s the track doesn t play on the key board Solo While in the Style Play Song Play and Song modes you can solo one of the tracks Just keep the SHIFT button pressed and press both VOLUME VALUE buttons corresponding to the track you wish to solo To exit the solo mode keep the SHIFT button pressed again and press both VOLUME VALUE buttons corresponding to the soloed track SELECTING A PERFORMANCE A Perf...

Страница 16: ...e the Style tracks If you select a Program while grouped tracks Drum Percussion or ACC are selected the Program will be assigned to the last selected track Each Style Element Variations Fills can have different Programs so your selection might be automatically reset when selecting a different Element 1 Use the VOLUME VALUE E H buttons on the right side of the display to select the Realtime Keyboar...

Страница 17: ...altime tracks are changed Programs and the Keyboard Mode may change If the SINGLE TOUCH LED is off Realtime tracks don t change SELECTING A SINGLE TOUCH SETTING STS A Single Touch Setting STS contains Realtime Keyboard tracks settings Four STS are included in each Style and can be recalled by pressing the SINGLE TOUCH SETTING F 1 F 4 buttons under the display Note You can select a STS only when yo...

Страница 18: ...begin playing Usually when the SPLIT LED is on chords are recognized under the split point i e on the Lower part of the keyboard With the UPPER or FULL Chord Scanning mode you must play three or more notes to have a chord recognized 4 Play your chords and your melody Go on playing As you may notice the microARRANGER features a very sophisticated chord recognition engine Rec ognized chords are show...

Страница 19: ... on it is in Style Play mode and you can play it in realtime Please follow me 1 Play on the keyboard When you turn the microARRANGER on Performance 1 1 is automatically selected This sets the Realtime Keyboard tracks for you In this case you get the Upper 1 track playing on the full keyboard range with the Grand Piano Program selected As you may know there are four available Realtime tracks Upper ...

Страница 20: ...You will mute the Lower track Press them again to unmute the Lower track Try also with the Upper tracks using the E F and G VOL UME VALUE buttons You will notice the sound becomes more or less fuller sounding depending on the number of tracks muted or unmuted 8 Set the relative volume of the Realtime tracks Use each E H VOLUME VALUE button pair to set the vol ume of the Realtime tracks Press one o...

Страница 21: ...out changing the Performance or Single Touch Setting see Selecting a Performance on page 12 or Selecting a Sin gle Touch Setting STS on page 14 Here is a short recap for the Performances 1 Press the PERFORM button to set the PROGRAM PER FORMANCE section act as a Performance selector 2 Select one of the Performance Banks by pressing one of the buttons of the PROGRAM PERFORMANCE section 3 Select a P...

Страница 22: ... select the SD card SD 4 Move the folder where you wish to save your Song to the first line of the display using the E F Scroll Up and G H Scroll Down VOLUME VALUE buttons or the TEMPO VALUE controls Press F 3 OPEN to open it Close the current folder by pressing F 4 CLOSE 5 To create a new file move the NEW_NAME MID item to the first line of the display 6 When the NEW_NAME MID item is selected pre...

Страница 23: ...slider is all the way to the right Sequencer 1 is at the minimum volume and can t be heard If you wish to play a different Song on Sequencer 2 at the same time press the B S2 VOLUME VALUE but ton press it twice if a Song is already selected for Sequencer 2 and repeat the above procedure to select a Song for Sequencer 2 Use the right SEQ 2 PLAY STOP button to start stop the second Song Use the BALA...

Страница 24: ...atRock1 8BeatRock2 L A R B World 1 OberkrWaltz OberkrPolka Bavar Pop 1 Bavar Pop 2 Party Polka Pop Polka Flipper 6 8 Flipper 4 4 Schlager 1 Schlager 2 Schlager 3 Schlager 4 PopSchlager Trucker Cajun Zydeco 8 16 Beat 1 Soft Beat Pop Beat Stndrd8Beat Unplug8Bt 1 Love 8 Beat Half Beat UK 8 Beat 8BeatGroove UK RnB PopBallad 1 HipHop Beat LightRock 1 LightRock 2 Miami Beat ClassicBeat Unplug8Bt 2 8 16 ...

Отзывы: