background image

71

padKONTROL Bedienungsanleitung

5

Wenn Sie die Geräte ausschalten möchten, beginnen Sie

zuerst mit dem angeschlossenen externen MIDI-Sound-

modul und stellen Sie den Stromschalter des

padKONTROL anschließend auf STANDBY ein.

Schalten Sie den Strom niemals ab, wenn noch Einstellungen

gespeichert (geschrieben) werden. Dadurch können die inter-

nen Daten beschädigt werden.

Über den Beleuchtungsmodus

Dieser Modus lässt die LED-Leuchten der Auswahlpads in ei-

nem einzigartigen Muster blinken. Dadurch lässt sich in einer

Live-Performance auf einer schwach beleuchteten Bühne ein

besonders eindrucksvoller Effekt erzeugen; aber auch wenn

man im Studio sitzt, sieht es einfach cool aus.

Zur Auswahl eines Musters:

Muster A: Einschalten, während Sie die Tasten [SETTING/

ENTER] und [MESSAGE/EXIT] gedrückt halten.

Muster A erzeugt ein Muster einer „sich auswei-

tenden Box“, wann immer ein Auswahlpad be-

rührt wird.

Muster B: Einschalten, während Sie die Tasten [SETTING/

ENTER] und [FIXED VELOCITY/PRELOAD] ge-

drückt halten.

Muster B erzeugt ein Muster eines „Domino-

effekts“, wann immer ein Auswahlpad berührt

wird.

Muster C: Einschalten, während Sie die Tasten [SETTING/

ENTER] und [PROG CHANGE/WRITE/ALL PAD]

gedrückt halten.

Wenn das padKONTROL einige Minuten lang

nicht berührt wurde, beginnen die padKONTROL

in einer Vielzahl generierter Muster zu blinken.

Sobald Sie das padKONTROL berühren, hört das

Blinken auf.

Mode Off: Einschalten, während Sie die Tasten [SETTING/

ENTER] und [SCENE] gedrückt halten.

Die Beleuchtungsmoduseinstellung wird gespeichert, selbst wenn

der Strom abgeschaltet ist, so dass Sie diese wie üblich einschal-

ten können. Sie müssen diesen Parameter nicht jedes Mal neu ein-

stellen, wenn Sie das padKONTROL einschalten.

Schneller Start

Probieren Sie das padKONTROL!

Einschalten des Geräts

Schließen Sie das padKONTROL an Ihren Computer an

und schalten Sie das Gerät ein (S. 70 „Anschlüsse und

Einschalten des Gerätes“)

Wenn sich das Gerät einschaltet, ist das padKONTROL im

Play-Modus und Szene 1 wird geladen sein. Im Display

erscheint „

“.

Im Play-Modus ist die Taste [SETTING/ENTER] dunkel.

Abrufen einer Szene

Das padKONTROL ermöglicht es Ihnen, die von Ihnen

gewünschten Parameter den Auswahlpads, den X-Y-Pads

und den beiden zuweisbaren Knöpfen zuzuweisen, so dass

Sie Ihr externes MIDI-Soundmodul oder einen Software-

Synthesizer auf Ihrem Computer auf die Ihnen angenehm-

ste Art zu steuern. Ein Satz solcher Belegungen wird „Sze-

ne“ genannt.

Der interne Anwenderspeicher des padKONTROLs enthält

sechzehn Szenen und Sie können jede dieser Szenen so-

fort über die sechzehn Auswahlpads abrufen.

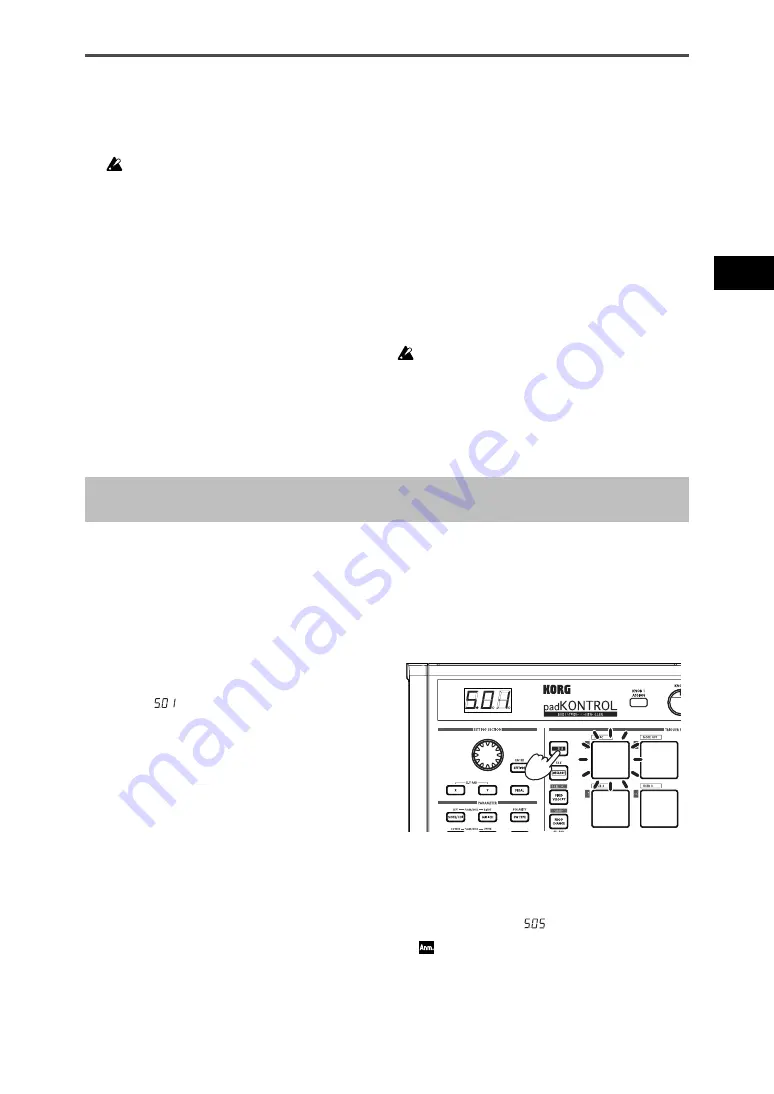
Als Beispiel geben wir hier an, wie Sie die Szene
Nummer 5 abrufen:

1

Drücken Sie die Taste [SCENE].

Die [SCENE]-Taste sowie das Auswahlpad, das der aktu-

ell gewählten Szene-Nummer entspricht, leuchten.

2

Während Sie die [SCENE]-Taste weiterhin gedrückt hal-

ten, drücken Sie Auswahlpad [05]. Die Anzeige „05“ ist

auf dem Auswahlpad oben links aufgedruckt.

Die Szene ändert sich und Auswahlpad [05] leuchtet auf.

Im Display erscheint „

“.

Solange Sie weiterhin die [SCENE]-Taste gedrückt halten,

können Sie fortfahren, über die Auswahlpads die Szenen zu

wechseln.

Содержание KPC-1 EFG

Страница 1: ...Owner s Manual Manuel d utilisation Bedienungsanleitung...

Страница 2: ......

Страница 3: ...Transmitting MIDI messages 17 Using a fixed velocity 17 The Flam function 18 The Roll function 18 The Hold function 18 Recalling a scene 18 Saving a scene 18 Shortcuts for assigning messages 19 Setti...

Страница 4: ...f this equipment does cause harmful interference to radio or television reception which can be determined by turning the equipment off and on the user is encouraged to try to correct the interference...

Страница 5: ...tural feeling way just as if a real kick drum was being used X Y pad A variety of control change messages may be assigned to this pad for example Pitch Bend to the X axis and Reverb Depth to the Y axi...

Страница 6: ...the X Y pad s X axis 7 MIDI CH RIGHT key This key is used to specify the MIDI channel that the selected trigger pad or foot pedal will transmit messages on When making settings for the Flam Roll funct...

Страница 7: ...ey In Play mode turning this key on lit will enable the Roll function In Setting mode pressing this key will al low you to adjust the settings for the Roll function 21 Trigger pads Each time one of th...

Страница 8: ...rt up automatically double click KorgSetup exe in the CD ROM 2 From the list select the applications that you want to install and click Install The selected applications will be installed successively...

Страница 9: ...ntinue to proceed 4 When driver installation is completed click Finish to complete the installation If you are asked to restart Windows choose Yes to restart Allowing driver installation without a dig...

Страница 10: ...operating systems Mac OS X ver 10 2 or later Proceed as follows to make your computer recognize the padKONTROL 1 Use a USB cable to connect the padKONTROL to your computer 2 Turn on the power of the...

Страница 11: ...in Mac OS X proceed as follows 1 Insert the included CD ROM into your CD ROM drive 2 In the CD ROM navigate to the padKONTROL folder which contains the Editor Librarian software and double click padK...

Страница 12: ...er than self powered power may not be supplied to the padKONTROL In this case use the optional AC adapter and set the power switch to the DC position 3 When you want to turn off the power set the powe...

Страница 13: ...hile holding down the SETTING ENTER and FIXED VELOCITY PRELOAD keys Pattern B produces a domino effect type of pattern each time a trigger pad is struck Pattern C Power on while holding the SETTING EN...

Страница 14: ...an also be recalled in Setting mode Using the Roll functionand Flam functions The Roll function makes it easy to simulate a roll rapidly repeated strikes on the same drum The Flam function simulates a...

Страница 15: ...luded CD ROM Restoring the factory settings The padKONTROL contains 30 preloaded scenes P 01 P 30 When the padKONTROL leaves the factory sixteen of these thirty two scenes are already loaded into the...

Страница 16: ...operate a pedal connected to the Pedal jack the assigned note data or control change will be transmitted If a note message is assigned the note message will be transmitted with the assigned velocity v...

Страница 17: ...tted on all MIDI channels The display will show a graphic indication of the transmission This message is transmitted to both port A and port B regardless of the port you specified p 21 26 USB MIDI Por...

Страница 18: ...key is on you can t play a roll unless your finger is on the X Y pad Expression Roll speed 3 To turn off the Roll function press the ROLL key once again to make it go dark The Hold function The Hold...

Страница 19: ...MIDI message 09 PITCH BEND 10 MAIN VOLUME 11 PAN 12 EXPRESSION 13 RESONANCE 14 BRIGHTNESS 15 DECAY TIME 16 REVERB SEND 1 Hold down the X key if you want to assign a message to the X axis of the X Y p...

Страница 20: ...t to specify The selected trigger pad will light 3 Use the encoder to specify the MIDI channel MIDI Channel 1 16 The note message will be transmitted on the MIDI chan nel you specified Disable No MIDI...

Страница 21: ...icate the USB MIDI transmit port 3 Use the encoder to select the USB MIDI transmit port USB Port A The MIDI message assigned to the trigger pad will be sent to port A USB Port B The MIDI message assig...

Страница 22: ...skip this step If you are done press the SETTING ENTER key The setting will be applied and you will return to Play mode USB MIDI Port You can specify the USB MIDI port from which the message will be...

Страница 23: ...lect the USB MIDI transmit port USB Port A The MIDI message assigned to the pedal will be sent to port A USB Port B The MIDI message assigned to the pedal will be sent to port B 3 If you want to set a...

Страница 24: ...xis and Y axis 1 To specify the trigger pads and or pedal for which the X axis of the X Y pad is enabled hold down the X key To specify the trigger pads and or pedal for which the Y axis is enabled ho...

Страница 25: ...1 2 will be enabled 1 To assign settings to assignable knob 1 hold down the KNOB 1 ASSIGN key To assign settings to assignable knob 2 hold down the KNOB 2 ASSIGN key 2 The trigger pads and or PEDAL k...

Страница 26: ...value at the left edge of the X Y pad LEFT value 2 Use the encoder to specify the value for when the left edge of the X Y pad is pressed LEFT value Lower values of this setting will shorten the time...

Страница 27: ...Play mode Y axis setting roll volume velocity 1 Press the REL VAL LOWER key The REL VAL LOWER key will light and the display will indicate the value at the lower edge of the X Y pad LOWER value 2 Use...

Страница 28: ...e settings of your computer software In Native mode the USB ports transmit the following messages Port A Special messages related to each key and controller Port B Note messages and Pitch Bend message...

Страница 29: ...t the connected device or software does not support the function you re attempting to use Refer to the owner s manual of the connected device or software and make sure that the function is supported T...

Страница 30: ...y and press the PROG CHANGE WRITE ALL PAD key Setting mode Key Trigger Pad Pedal X Y Pad Knob1 2 Flam Roll NOTE CC LEFT Note C 1 G9 Note C 1 G9 Message Type Message Type Interval Left Speed Left CC 0...

Страница 31: ...rogramme 45 Transmission de messages MIDI 45 Utilisation d une v locit fix e 46 Fonction Flam 46 Fonction Roll 46 Fonction Hold 46 Rappel d une sc ne 47 Sauvegarde d une sc ne 47 Raccourcis pour l ass...

Страница 32: ...r Si cela se produisait d branchez l adaptateur secteur de la prise de courant et contactez votre revendeur Korg le plus proche ou le magasin o vous avez achet l instrument Marque CE pour les normes e...

Страница 33: ...isse des motifs de tambour peuvent tre jou s avec naturel tout comme si un vrai tambour de basse tait utilis Pav tactile X Y Des messages de changement de commande vari s peuvent tre assign s ce pav p...

Страница 34: ...T Utilisez cette touche pour sp cifier le canal MIDI sur lequel les messages du pad assignable s lectionn ou de la p dale seront transmis Quand vous effectuez des r glages pour la fonction Flam Roll c...

Страница 35: ...para m tres de la fonction Flam 20 Touche ROLL En mode de lecture appuyez sur cette touche elle s al lumera pour activer la fonction Roll En mode de r glage appuyez sur cette touche pour r gler les pa...

Страница 36: ...xe dans le CD ROM 2 Dans la liste affich e s lectionner les applications que vous souhaitez installer et cliquez sur Install Les applications choisies seront successivement instal l es Suivez les inst...

Страница 37: ...inue 4 Quand l installation du pilote est termin e cliquez sur Fi nish Si un message vous demande de red marrer Windows choisissez Yes pour red marrer Autoriser l installation d un pilote sans signatu...

Страница 38: ...loitation support s Mac OS X ver 10 2 ou plus r cente Proc dez comme suit pour que votre ordinateur puisse recon na tre le padKONTROL 1 Utilisez un c ble USB pour relier le padKONTROL votre ordinateur...

Страница 39: ...ez de la fa on suivante 1 Ins rez le CD ROM inclus dans votre lecteur de CD ROM 2 Dans le CD ROM naviguez vers le dossier padKONTROL qui contient le logiciel Editor Librarian et double cliquez sur pad...

Страница 40: ...d utiliser un adaptateur secteur Cependant si l alimentation de votre ordi nateur est faible ou si vous utilisez un hub seulement aliment par le bus et non auto aliment le padKONTROL pourra ne pas tr...

Страница 41: ...uches SETTING ENTER et SCENE en fonc es L appareil reste r gl en mode clairage m me apr s la mise hors tension condition que vous le mettiez sous tension de la fa on habituelle Vous n aurez pas besoin...

Страница 42: ...sur la touche NOTE CC LEFT Vous pouvez maintenant sp cifier un message de note ou de changement de commande La touche NOTE CC LEFT s allumera Dans l affichage le num ro de note ou le num ro de changem...

Страница 43: ...termin Si vous d cidez d annuler avant d avoir termin la proc dure appuyez sur la touche MESSAGE EXIT Vous ne pourrez n anmoins pas annuler la proc dure pendant le chargement m me Chargementd unesc ne...

Страница 44: ...gn l afficheur indiquera la valeur de changement de commande Apr s un certain moment l afficheur indiquera de nouveau le num ro de sc ne P dale Chaque fois que vous utilisez une p dale branch e sur la...

Страница 45: ...1 Tout en maintenant la touche MESSAGE EXIT enfonc e appuyez sur le pad assignable 1 Les messages All Note Off All Sound Off et Reset All Controllers seront transmis sur tous les canaux MIDI Une indic...

Страница 46: ...FLAM de telle mani re qu elle s teigne Fonction Roll Un roll ou roulement est une technique dans laquelle un son est jou des intervalles de temps rapproch s sur un tam bour Vous pouvez activer la fon...

Страница 47: ...chaque contr leur sous la forme d une sc ne Pour des d tails sur la fa on d enregistrer une sc ne repor tez vous Sauvegarde d une sc ne p 42 Raccourcispourl assignementdemessages Huit messages MIDI fr...

Страница 48: ...nable dont vous souhaitez sp cifier le num ro Le pad assignable s lectionn s allumera 3 Utilisez l encodeur pour sp cifier le num ro de note Note Number C 1 G9 4 Si vous souhaitez r gler un autre para...

Страница 49: ...oduit la r ponse ou l effet souhait Force v locit MIDI ppp MIN V locit MAX 127 fff 1 127 1 Force v locit MIDI ppp MIN V locit MAX 127 fff 1 127 1 Force v locit MIDI ppp MIN V locit MAX 127 fff 1 127 1...

Страница 50: ...yez sur le pad assignable pour lequel vous souhai tez sp cifier le type de commutation Le pad assignable s lectionn s allumera 3 Utilisez l encodeur pour sp cifier le type de commutation Momentary La...

Страница 51: ...diff rente avant d enregistrer vos changements seront perdus p 42 Sauvegarde d une sc ne Le padKONTROL d termine automatiquement la polarit de la p dale la mise sous tension 1 Appuyez sur la touche PE...

Страница 52: ...IDI le type de commuta tion la valeur On et la valeur Release du message de change ment de commande transmis quand vous appuyez sur la p dale Si vous souhaitez garder les changements que vous avez eff...

Страница 53: ...une sc ne diff rente avant d enregistrer vos changements seront perdus p 42 Sauvegarde d une sc ne S lection des pads assignables et ou de la p dale qui seront affect s par le pav tactile X Y Pour ch...

Страница 54: ...ez sur la touche PORT l afficheur indiquera Au lieu de cela les messages seront transmis en fonction du port de transmission USB MIDI sp cifi pour chaque pad assignable et ou p dale activ pour le pav...

Страница 55: ...lis es pour produire deux sons quasi simultan sur une caisse claire etc L axe X du pav tactile X Y sp cifie l intervalle de temps entre le premier et le deuxi me coup du fla L axe Y sp cifie le vo lum...

Страница 56: ...e pad assignable et ou la touche PEDAL sur les quels vous souhaitez utiliser l effet Roll Ils s allumeront La fonction Flam sera aussi activ e pour les pads assignables ou la p dale pour lesquels la f...

Страница 57: ...yez sur la touche VELOCITY UPPER Vous pourrez ainsi acc der aux r glages de v locit La touche VELOCITY UPPER s allumera 2 Appuyez sur la touche FIXED VELOCITY PRELOAD La v locit fix e sera activ et la...

Страница 58: ...es vidages de donn es Fonctionne en mode natif Korg AproposdesprisesMIDIdupadKONTROL Sans liaison USB padKONTROL Prise MIDI OUT Prise MIDI IN Pads assignables Pav tactile X Y Boutons configurables 1 2...

Страница 59: ...d ne sup porte pas la fonction que vous essayez d utiliser Repor tez vous au mode d emploi de l appareil ou du logiciel raccord et assurez vous que la fonction est suppor t e La v locit du pad assigna...

Страница 60: ...ler pendant l dition Appuyez sur la touche MESSAGE EXIT Pour sauvegarder une sc ne Tout en maintenant la touche SCENE enfonc e appuyez sur la touche PROG CHANGE WRITE ALL PAD Mode de r glage Touche Pa...

Страница 61: ...on MIDI Meldungen 75 Verwenden einer festen Anschlagdynamik 76 Die Flam Funktion 76 Die Roll Funktion 76 Die Hold Funktion Halten 76 Abrufen einer Szene 77 Speichern einer Szene 77 Shortcuts zum Zuwei...

Страница 62: ...den Sie sich an Ihren Korg Fachh ndler oder an des Gesch ft in dem das Ger t gekauft wurde CE Kennzeichen f r europ ische harmonisierte Standards Das CE Kennzeichen dass an den mit Netzstrom betrieben...

Страница 63: ...t werden fast so als w rde ein echtes Kick Drum verwendet werden X Y Pad Eine Vielzahl von Steuer nderungsmeldungen k nnen diesem Pad zugewiesen werden beispielsweise Pitch Bend der X Achse und Reverb...

Страница 64: ...Roll Funktion legt diese Taste den Wert f r den lin ken Rand der X Achse des X Y Pads fest 7 MIDI CH RIGHT Taste Mit dieser Taste kann der MIDI Kanal festgelegt wer den ber den das ausgew hlte Auswah...

Страница 65: ...en Sie wenn Sie diese Taste dr k ken die Einstellungen f r die Flam Funktion anpassen 20 ROLL Taste Im Play Modus wird durch das Einschalten dieser Ta ste leuchtet die Roll Funktion aktiviert werden I...

Страница 66: ...CD ROM 2 W hlen Sie aus der Liste die Anwendungen die Sie in stallieren m chten und klicken Sie auf Install Die ausgew hlten Anwendungen werden nacheinander in stalliert Folgen Sie den Anweisungen au...

Страница 67: ...rinstallation beendet klicken Sie auf Finish um die Installation abzuschlie en Wenn Sie gefragt werden ob Sie Windows neu starten wollen w hlen Sie Yes um den Computer neu zu star ten Treiberinstallat...

Страница 68: ...pricht Unterst tzte Betriebssysteme Mac OS X ver 10 2 oder sp ter Gehen Sie wie folgt vor damit Ihr Computer das padKONTROL erkennt 1 Verwenden Sie ein USB Kabel zum Verbinden des padKONTROLs mit Ihre...

Страница 69: ...ehen Sie wie folgt vor 1 Legen Sie die beigef gte CD ROM in Ihr CD ROM Lauf werk ein 2 Navigieren Sie auf der CD ROM zum Ordner padKONTROL der die Editor Librarian Software enth lt und doppelklicken S...

Страница 70: ...en Wenn Ihr Computer jedoch nur mit wenig Strom versorgt wird oder Sie einen Hub mit Bus Strom anstatt einer eigenen Stromquelle verwenden kann es vor kommen dass das padKONTROL nicht mit Strom versor...

Страница 71: ...ENE gedr ckt halten Die Beleuchtungsmoduseinstellung wird gespeichert selbst wenn der Strom abgeschaltet ist so dass Sie diese wie blich einschal ten k nnen Sie m ssen diesen Parameter nicht jedes Mal...

Страница 72: ...wird ausgew hlt und leuchtet auf 3 Dr cken Sie die NOTE CC LEFT Taste Jetzt k nnen Sie einen Notenbefehl oder eine Steuer nderung festlegen Die NOTE CC LEFT Taste leuch tet auf Im Display blickt die N...

Страница 73: ...h rt das Blinken auf Der Lade vorgang ist beendet Wenn Sie sich zum Abbruch entschlie en bevor das Verfah ren abgeschlossen ist dr cken Sie die MESSAGE EXIT Ta ste Sie k nnen jedoch w hrend des eigent...

Страница 74: ...Display den Steuer nderungswert an Nach einer Weile wechselt das Display auf die Szenen nummer zur ck Pedal Jedes Mal wenn Sie ein Pedal bedienen das an der Pe dal Buchse angeschlossen ist werden die...

Страница 75: ...lpad 1 Die Meldungen All Note Off All Sound Off und Reset All Controllers werden auf allen MIDI Kan len bertragen Das Display zeigt eine graphische Anzeige der bertra gung an Diese Meldung wird sowohl...

Страница 76: ...3 Um die Flam Funktion auszuschalten dr cken Sie die FLAM Taste noch ein Mal damit diese erlischt Die Roll Funktion Ein Roll ist eine Spieltechnik bei der ein Sound mit schnell wiederholten Schl gen i...

Страница 77: ...in stellungen als Szene speichern schreiben Einzelheiten zum Speichern einer Szene siehe Speichern ei ner Szene S 72 ShortcutszumZuweisenvonMeldungen Acht h ufig verwendete MIDI Meldungen sind den Aus...

Страница 78: ...en soll Das gew hlte Auswahlpad leuchtet auf 3 Verwenden Sie den Encoder um die Noten Nummer fest zulegen Note Number C 1 G9 4 Wenn Sie einen anderen Parameter einstellen m chten berspringen Sie diese...

Страница 79: ...MIN MAX 127 fff 1 127 1 ppp MIN MAX 127 fff 1 127 1 ppp MIN MAX 127 fff 1 127 1 C 4 C 6 C 3 C 2 C 1 ppp MIN MAX 127 fff 1 127 1 C 5 Anschlag dynamik Strength MIDI Anschlagdynamik Anschlag dynamik Str...

Страница 80: ...fest gelegt werden soll Das gew hlte Auswahlpad leuchtet auf 3 Verwenden Sie den Encoder zum festlegen des Schalter Typs Momentary Der Ein Wert wird ausgegeben wenn Sie das Auswahlpad dr cken und der...

Страница 81: ...gew hlt und die PEDAL Taste leuchtet auf Noten Nummer So weisen Sie die Noten Nummer zu die bei Dr cken des Pedals ausgegeben wird 1 Dr cken Sie die NOTE CC LEFT Taste Die NOTE CC LEFT Taste leuchtet...

Страница 82: ...rtyp den Ein Wert und den Release Wert der Steuer nderung Meldung festlegen die beim Bet tigen des Pedals ausgegeben wird Wenn Sie die vorgenommenen nderungen beibehalten wollen m ssen Sie diese speic...

Страница 83: ...hlen von Auswahlpads und oder Pedal die vom X Y Pad beeinflusst werden F r jedes Auswahlpad k nnen Sie festlegen ob das X Y Pad aktiviert ist Sie k nnen auch festlegen ob das X Y Pad f r das Pedal akt...

Страница 84: ...dungen entsprechend dem USB MIDI bertragungsport ausgegeben der f r jedes Auswahlpad und oder Pedal festgelegt ist das f r X Y Pad aktiviert ist Zuweisbare Einstellungen von Knopf 1 2 Sie k nnen die M...

Страница 85: ...echnik bei der die St cke in beiden H nden gehalten werden um einen Doppelanschlag auf dem Snare usw mit leicht unterschiedlichem Timing zu produzieren Die X Achse des X Y Pads legt den Zeitintervall...

Страница 86: ...d oder das Pedal auf dem der Roll Effekt verwendet werden soll wodurch die Auswahlpads oder die PEDAL Taste aufleuchtet Die Flam Funktion wird auch f r die Auswahlpads oder das Pedal f r das die Roll...

Страница 87: ...ITY UPPER Taste Dies greift auf die Anschlagdynamik Einstellung zu Die VELOCITY UPPER Taste leuchtet auf 2 Dr cken Sie die FIXED VELOCITY PRELOAD Taste Festen Anschlagdynamik wird aktiviert und der We...

Страница 88: ...Data Dumps und wird im Korg nativen Modus verwendet berdieMIDI Anschl ssedespadKONTROLs Wenn nicht mit USB verbunden padKONTROL MIDI OUT Anschluss MIDI IN Anschluss Auswahlpads X Y Pad Zuweisbare Kn...

Страница 89: ...isungen des padKONTROL und der USB MIDI Ports Es kann sei dass das angeschlossene Ger t oder die Software eine Funktionalit t die Sie zu verwenden ver suchen nicht unterst tzt Siehe Dokumentation der...

Страница 90: ...ESSAGE EXIT Taste Speichern einer Szene Halten Sie die SCENE Taste gedr ckt und dr cken Sie die PROG CHANGE WRITE ALL PAD Taste Setting Modus Taste Auswahlpad Pedal X Y Pad Knob1 2 Flam Roll NOTE CC L...

Страница 91: ...ity SCENE 16 Note no Note No Hex C 1 0 00 C 1 1 01 D 1 2 02 D 1 3 03 E 1 4 04 F 1 5 05 F 1 6 06 G 1 7 07 G 1 8 08 A 1 9 09 A 1 10 0A B 1 11 0B C0 12 0C C 0 13 0D D0 14 0E D 0 15 0F E0 16 10 F0 17 11 F...

Страница 92: ...tain 065 41 Portamento Switch on off 066 42 Sostenuto 067 43 Soft Pedal 068 44 Legato Foot Switch 069 45 Hold 2 070 46 Sound Controller 1 Sound Variation 071 47 Sound Controller 2 Resonance 072 48 Sou...

Страница 93: ...nnel Velocity Note On Note Off Note Number True Voice Mode Memorized Messages Altered 0 127 1 127 64 Memorized MIDI STUDIO CONTROLLER Trigger Pad Pedal Panel Control Pitch Mod Panel Control Pitch Mod...

Страница 94: ...OFF POLY Mode 4 OMNI OFF MONO No Aux Messages Local On Off All Notes Off Active Sense Reset 0 127 1 3 1 3 1 1 1 3 Notes 1 Can be transmitted by the message transmission functionality in Play mode 2 F...

Страница 95: ...4015 2 Yanokuchi Inagi city Tokyo 206 0812 Japan C 2005 KORG INC...

Отзывы: