


4.Pattern mode
○ ○ ○ ○ ○ ○ ○ ○ ○ ○ ○ ○ ○ ○ ○ ○ ○ ○ ○ ○ ○ ○ ○ ○ ○ ○ ○ ○ ○ ○ ○ ○ ○ ○ ○ ○ ○ ○ ○ ○ ○ ○
30
To cancel without executing, press the Stop/Cancel key.
The Move Data operation applied to all steps of the selected
part. Data that is moved beyond the last step of the pattern will
"wrap around" to the first step. For example if 64-step data is
moved for "5" steps, the data that was in steps 60 through 64
will be moved to steps 1 through 5. Likewise, data that is moved
earlier than the first step of the pattern will "wrap around"to
the last step. For example if 48-step data is moved for "–3 " steps,
the data that was in steps 1 through 3 will be moved to steps 46
through 48.
Step
1
Step
2
Step
3
Step
4
Step
5
Step
6
Step
7
Step
8
Step
9
Step
10
Step
11
Step
12
Step
13
Step
14
Step
15
Step
16
Step
1
Step
2
Step
3
Step
4
Step
5
Step
6
Step
7
Step
9
Step
10
Step
11
Step
12
Step
13
Step
14
Step
15
Step
16
Step
1
Step
2
Step
3
Step
4
Step
5
Step
6
Step
7
Step
8
Step
9
Step
10
Step
11
Step
12
Step
13
Step
14
Step
15
Step
16
Step
1
Step
2
Step
3
Step
4
Step
5
Step
6
Step
7
Step
8
Step
9
Step
10
Step
11
Step
12
Step
13
Step
14
Step
15
Step
16
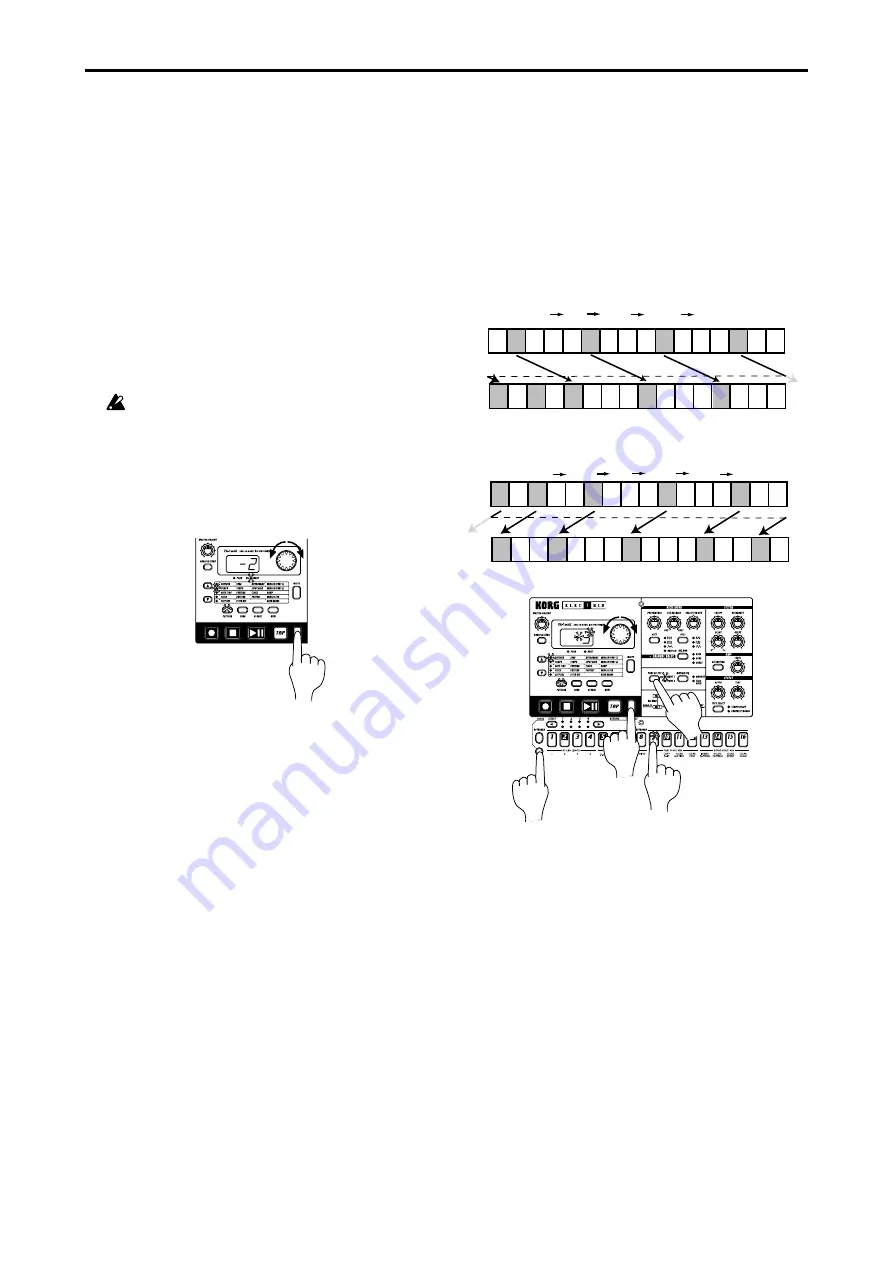
With a setting of 3
The data of each step will be moved three steps toward
the end of the pattern.
Example: 2
5, 6
9, 10
13, 14
1
Step
1
Step
2
Step
3
Step
4
Step
5
Step
6
Step
7
Step
8
Step
9
Step
10
Step
11
Step
12
Step
13
Step
14
Step
15
Step
16
Step
1
Step
2
Step
3
Step
4
Step
5
Step
6
Step
7
Step
8
Step
9
Step
10
Step
11
Step
12
Step
13
Step
14
Step
15
Step
16
Step
1
Step
2
Step
3
Step
4
Step
5
Step
6
Step
7
Step
8
Step
9
Step
10
Step
11
Step
12
Step
13
Step
14
Step
15
Step
16
Step
1
Step
2
Step
3
Step
4
Step
5
Step
6
Step
7
Step
8
Step
9
Step
10
Step
11
Step
12
Step
13
Step
14
Step
15
Step
16
With a setting of Ð2
The data of each step will be moved two steps toward
the beginning of the pattern.
Example: 1
15, 3
1, 6
4, 10
8, 14
12
2
2,6
5
3
4
Pitch Shift
–24...24
Use this when you want to shift the pitch data of all steps in a part.
1. If the pattern is playing, press the Stop/Cancel key to stop
playback.
2. Hold down the SHIFT key and press step key 9 (MOVE
DATA
). (Key 9 will blink.)
3. Turn on the TRANSPOSE key (the LED will blink).
4. Use the PART SELECT Key to select the part whose pitch
you wish to shift. If you wish to select both parts 1 and 2,
press the key several times to make both LEDs blink.
5. A number will blink in the display. Rotate the dial to select
the amount of pitch shift. +/–1 transposes the pitch by a
semitone, +/–2 by a whole tone, +/–7 by a fifth, and +/–12 by
one octave.
6. Press the blinking step key 9 to execute the Move Data op-
eration.
Transposing a phrase
(TRANSEPOSE)
TRANSPOSE
–24...24
This operation lets you transpose a phrase.
1. While you continue pressing the TRANSPOSE key, the dis-
play will indicate the current transposition status.
2. While holding down the TRANSPOSE key, rotate the dial to
transpose the phrase in semitone steps. +/–1 transposes the
pitch by a semitone, +/–2 by a whole tone, +/–7 by a fifth, and
+/–12
by one octave.
While holding down the TRANSPOSE key you can also use
the step keys or SELECT keys to transpose.
When you hold down the TRANSPOSE key and use the step
keys to specify the transposition, step key 4 will correspond to
the C pitch.
To transpose an individual part, use the Pitch Shift opera-
tion described below.
When you transpose the pitch, the TRANSPOSE key will
light. If the value is set to 0, the key will go dark.
The Transpose value is not saved. The next time that the
power is turned on, the value will be 0.
2
1,2
Moving data within a part
(MOVE DATA)
The Move Data operation lets you move the phrase pattern and
motion sequence data of a part backward or forward, or to shift
the pitch of an entire part.
Move Data
–16...16
Use this when you want to change the starting location of a
pattern.
1. If the pattern is playing, press the Stop/Cancel key to stop
playback.
2. Hold down the SHIFT key and press step key 9 (MOVE
DATA
). (Key 9 will blink.)
3. Turn off the TRANSPOSE key (the LED will go dark).
4. Use the PART SELECT key to select the part whose data you
wish to move. If you wish to select both parts 1 and 2, press
the key several times to make both LEDs blink.
5. A number will blink in the display. Rotate the dial to select
the number of steps and the direction (positive or negative)
in which the data will be moved.
6. Press the blinking step key 9 to execute the Move Data op-
eration.


