background image


51 


RADIUS Settings 

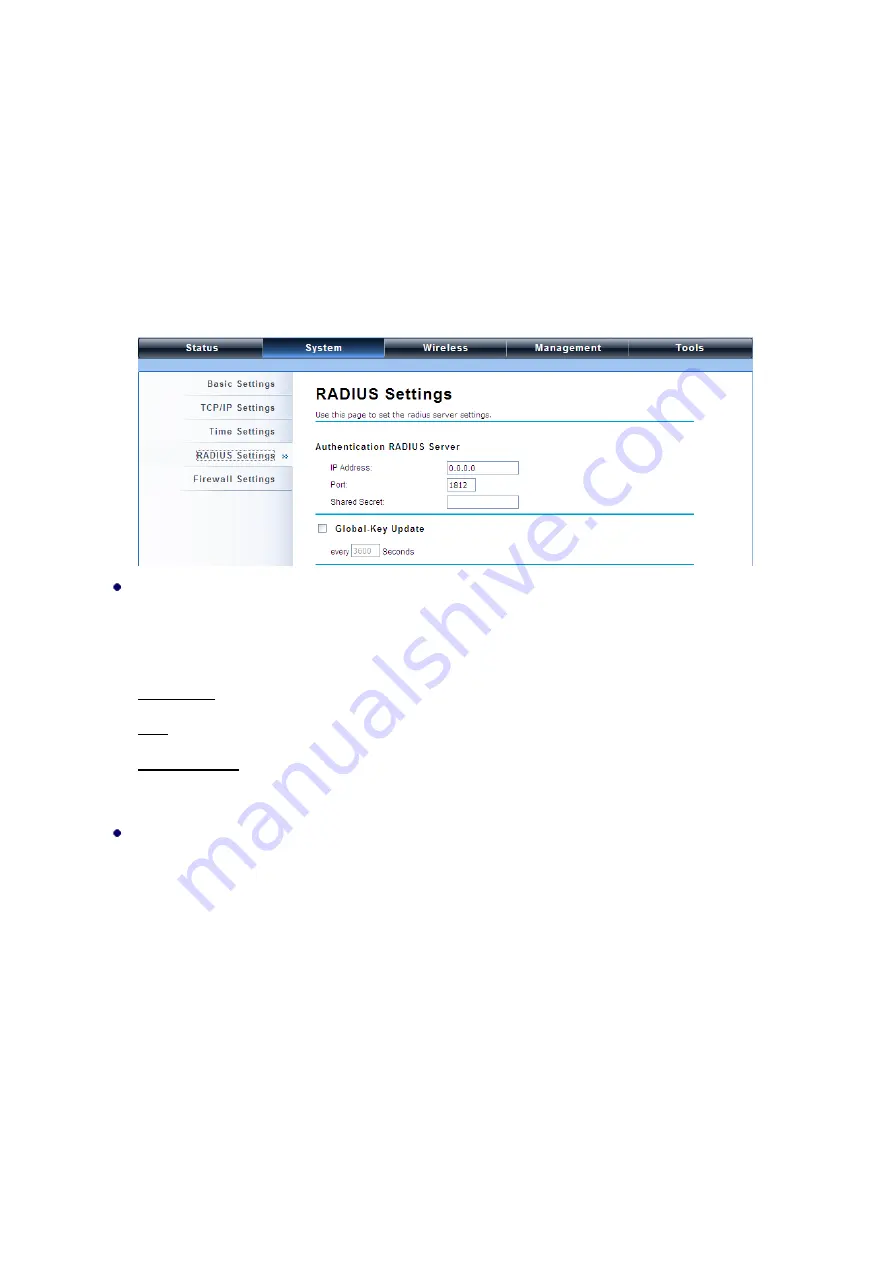
RADIUS (Remote Authentication Dial-In User Service) is a server for remote user authentication and 

accounting;  playing  a  central  role  in  the  network  in  providing  the  capabilities  of  authenticating, 

authorizing, accounting, auditing, alarming and etc. It allows an organization to maintain user profiles 

in  a  central  database  that  all  remote  servers  can  share.    If  802.1X,  WPA(2)  is  used,  you  need  to 

configure radius settings. 

Open “

RADIUS Settings

” in “

System

” to make RADIUS configuration. 


Authentication RADIUS Server 

This is for RADIUS authentication. It can communicate with RADIUS through IP Address, Port and 

Shared Secret. 

IP Address

: Enter the IP address of the Radius Server; 

Port

: Enter the port number of the Radius Server; 

Shared Secret

: This secret, which is composed of no more than 31 characters, is shared by the 

IEEE 802.11n JetWave 2450v2 and RADIUS during authentication. 


Global-Key Update 

Check this option and specify the time interval between two global-key updates.    Default is 3600 

seconds. 


Содержание JetWave 2450 v2

Страница 1: ...1 JetWave 2450 v2 User s Manual V1 0 Aug 2017...

Страница 2: ...ed to guide professional installer to install the IEEE 802 11n JetWave 2450v2 and how to build the infrastructure centered on it It includes procedures to assist you in avoiding unforeseen problems Co...

Страница 3: ...reception which can be determined by turning the equipment off and on the user is encouraged to try to correct the interference by one of the following measures Reorient or relocate the receiving ant...

Страница 4: ...a distance of at least 100cm between you and the antenna of the installed equipment This transmitter must not be co located or operating in conjunction with any other antenna or transmitter The availa...

Страница 5: ...R BE LIABLE TO YOU OR ANY OTHER PARTY FOR ANY DIRECT INDIRECT GENERAL SPECIAL INCIDENTAL CONSEQUENTIAL EXEMPLARY OR OTHER DAMAGE RISING OUT OF THE USE OR INABILITY TO USE THE PRODUCT INCLUDING WITHOUT...

Страница 6: ...lation 13 Preparation before Installation 13 Professional Installation Required 13 Safety Precautions 13 Installation Precautions 14 Product Package 14 Pole Mounting Ring 15 Ferrite Suppression Core 1...

Страница 7: ...ers 36 View DHCP Client Table 36 Wireless Settings 37 Wireless Networks VAP Profiles Settings 37 Wireless Protocols 42 Thin AP Mode 45 Information 45 Basic Settings 45 System 47 Basic System Settings...

Страница 8: ...gement 70 Password 70 Upgrade Firmware 70 Backup Retrieve Settings 71 Restore Factory Default Settings 71 Reboot 72 Remote Management 72 SNMP Management 73 Certificate Settings 75 Tools 76 System Log...

Страница 9: ...network In addition the easy to install JetWave 2450v2 is also a high performance last mile broadband solution that provides reliable wireless network coverage for broadband application Key Features C...

Страница 10: ...10 Hardware Overview Front View Back View Bottom cover...

Страница 11: ...device has the Ethernet connection Off The device has no Ethernet connection Blinking Transmitting receiving Ethernet packets WLAN Green On The WLAN is active Off The WLAN is inactive Blinking Transmi...

Страница 12: ...0v2 in AC mode When a thin AP mode joins a wired network it will start to look for a JetWave 2450v2 in AC mode If the thin AP founds the AP controller on the network it will send the registration requ...

Страница 13: ...f you are installing the JetWave 2450v2 for the first time for your safety as well as others please seek assistance from a professional installer who has received safety training on the hazards involv...

Страница 14: ...OVERED UNDER WARRNTY 2 Users MUST use the Power cord PoE Injector shipped in the box with the JetWave 2450v2 Use of other options will likely cause damage to the unit Product Package The product packa...

Страница 15: ...Ferrite Suppression Core 24VDC Power Cord PoE Injector Users MUST use the Power cord PoE Injector shipped in the box with the ZAC Wireless Access Point Use of other options will likely cause damage t...

Страница 16: ...tWave 2450v2 is a movable cover Grab the cover and pull it back harder to take it out as the figure shown below 2 Plug a standard Ethernet cable into the RJ45 port 3 Slide the cover back and press dow...

Страница 17: ...ctor must be properly connected to earth ground during normal use against surges or ESD 1 Remove the screw on the grounding point at the bottom of the JetWave 2450v2 2 Put the grounding wire on the gr...

Страница 18: ...e as the following right picture shows 2 Mount the JetWave 2450v2 steadily to the pole by locking the pole mounting ring tightly Power Up 1 Connect power cord to the PoE injector as the following righ...

Страница 19: ...ave surface 2 Lay the Ethernet cable into the core usually within 2 to 3 inches of the connector You may have to experiment with the final location depending on the effectiveness of the high frequency...

Страница 20: ...20 5 Connect the Ethernet cable with suppression core to the Data In port of the PoE injector 6 Connect the other end of Ethernet cable to a PC or a switch hub The hardware installation is complete...

Страница 21: ...terface to easily manage the access point Configure the computer with a static IP address of 192 168 1 x as the default IP address of the JetWave 2450v2 is 192 168 1 1 X cannot be 0 1 nor 255 Open Web...

Страница 22: ...Default admin and password Default password respectively and click Login to login the main page of the JetWave 2450v2 The username and password are case sensitive and the password should be no more th...

Страница 23: ...go to Basic Settings From Device Mode drop down list select Virtual AC mode If you would like the Access Point to perform as a virtual controller and access point concurrently please select Virtual A...

Страница 24: ...SSID for configuration After the configuration is made click Save to save the settings A dialog message will pop up to remind you changes will also apply to other managed Thin APs Click Apply to apply...

Страница 25: ...Install the Managed Thin AP Install and connect the rest of managed Access Points to your network with Ethernet cables Power them up respectively They will automatically discover the JetWave 2450v2 i...

Страница 26: ...ell as upload download speed Moving the mouse over MAC address of each managed AP will also display relevant RF information such as channel mode current channel antenna being used together with transm...

Страница 27: ...controller mode and go to Management AP Management the following screen shows up The JetWave 2450v2 AP in Virtual AC Thin AP mode on the list is highlighted in bold font By selecting it and hitting Ra...

Страница 28: ...u may choose to upgrade the selected managed AP by hitting Upgrade Selected or do the group upgrade by hitting Upgrade All Before upgrading the managed AP you need to locate the new firmware in the Je...

Страница 29: ...MAC address IP address and FW version you may also monitor the wireless clients that are currently associated with the managed APs as well as packets statistics Wireless Client Mode 1 Go to Wireless...

Страница 30: ...pressed the wireless client will scan all the available access points within coverage Select the one you prefer to connect and click Select AP to establish the connection 3 If the AP you connect to re...

Страница 31: ...iation with the Access Point has been successfully made go to Status Connections If the connection is established it will display association information of the Access Point including MAC address wire...

Страница 32: ...1 field and click Apply Bridge uses the WDS protocol that is not defined as the standard thus compatibility issues between equipment from different vendors may arise Moreover Tree or Star shape netwo...

Страница 33: ...enter 3000 in the field Click Apply to save configuration 5 Use ping to check whether the link between the two bridges is OK 6 To check the wireless connectivity go to Status Connections If the conne...

Страница 34: ...To establish point to point bridge connection please follow the procedures described in Bridge mode To connect the wireless client to the AP please follow the procedures described in Wireless Client m...

Страница 35: ...ly Information includes system information IP settings and wireless network setting Click Refresh at the bottom to have the real time information View Managed APs Open Managed APs in Status to check i...

Страница 36: ...naged APs that are associated with signal strength connection up time and uploaded downloaded packets All is read only Click Refresh at the bottom to update the list View DHCP Client Table Open DHCP C...

Страница 37: ...he other managed APs Wireless Networks VAP Profiles Settings The IEEE 802 11n JetWave 2450v2 allows up to 8 virtual SSIDs on a single BSSID and to configure different profile settings such as security...

Страница 38: ...eal way to enhance the security of network transmission By enabling Wireless Separation can prevent the communication among associated wireless clients WMM Support WMM Wi Fi Multimedia is a subset of...

Страница 39: ...identity centralized authentication as well as dynamic key management it controls the security risk of wireless network to the lowest To serve the 802 1x at least one EAP type should be supported by t...

Страница 40: ...PSK Available in AP mode it provides options of WPA TKIP or WPA2 AES encryption for the client If it is selected the data encryption can only be TKIP AES and the passphrase is required Data Encryption...

Страница 41: ...41 JetWave 2450v2 and wireless clients can the communication be established...

Страница 42: ...work mode It includes Bridge and Router When switch to Router mode the LAN IP address for web page access will become 192 168 0 99 Wireless Protocols Allow the user to change country code 802 11 mode...

Страница 43: ...or compromise of a long distance by fixing the data rate Advanced Settings A MPDU A MSDU Aggregation The data rate of your AP except wireless client mode could be enhanced greatly with this option ena...

Страница 44: ...agmentation Threshold Specify the maximum size in byte for a packet before data is fragmented into multiple packets Setting it too low may result in poor network performance Leave it at its default of...

Страница 45: ...may see some Managed AP s basic information such as model name firmware version MAC address current up time registration status as well as MAC address Basic Settings Allows you to configure device and...

Страница 46: ...signment Obtain IP Address Automatically If a DHCP server exists in your network you can check this option thus the IEEE 802 11n ZAC Access Pioint is able to obtain IP settings automatically from the...

Страница 47: ...work mode including Bridge and Router It is easy to configure parameters in Bridge Mode however users must pay extra attention to the way they configure the device when it is set to Router Mode For de...

Страница 48: ...e settings for IP Address Subnet Mask and DHCP Server Obtain IP Address Automatically If a DHCP server exists in your network you can check this option thus the IEEE 802 11n JetWave 2450v2 is able to...

Страница 49: ...enter WAN IP Address Subnet Mask Gateway settings provided by your ISPs LAN Settings When DHCP Server is disabled users can specify IP address and subnet mask for the JETWAVE 2450V2 manually Make sur...

Страница 50: ...when device is set to Router mode WAN is on wired port and LAN is on wireless port Thus users must also connect the JetWave 2450v2 with another wireless device before it is set to Router mode and acce...

Страница 51: ...d to configure radius settings Open RADIUS Settings in System to make RADIUS configuration Authentication RADIUS Server This is for RADIUS authentication It can communicate with RADIUS through IP Addr...

Страница 52: ...e only under Router Mode Source IP Filtering You may create and activate a rule that filters a packet based on the source IP address from your local network to Internet Check Enable Source IP Filterin...

Страница 53: ...ck the Delete Selected button You may delete all the IP addresses in the list by clicking Delete All Source Port Filtering You may create and activate a rule that filters a packet based on the source...

Страница 54: ...added in the list To delete the restricted destination ports click Select checkbox of the designated ports and click the Delete Selected button You may delete all the IP addresses in the list by clic...

Страница 55: ...through the firewall Note that opening all the UDP ports will be very likely to expose the network to intruders DMZ A Demilitarized Zone is used to provide Internet services without sacrificing unaut...

Страница 56: ...11n JetWave 2450v2 establishes a wireless coverage and receives connectivity from other wireless devices Wireless Client The IEEE 802 11n JetWave 2450v2 is able to connect to the AP and thus join the...

Страница 57: ...divided into HT STA and Non HT STA among which the one with HT protect enabled gets higher throughput Frequency Channel Channel varies much as the available band differs from country to country Select...

Страница 58: ...of CTS RTS is much lower Enable MAC Clone Available only under wireless client mode it hides the MAC address of the AP while displays the one of associated wireless client or the MAC address designat...

Страница 59: ...ity settings Hit Apply to active the profile Basic Setting Profile Name Name of the VAP profile Wireless Network Name Enter the virtual SSID for the VAP Broadcast SSID In AP mode hiding network name i...

Страница 60: ...2450v2 provides you with rock solid security settings Network Authentication Open System It allows any device to join the network without performing any security check Shared Key Data encryption and k...

Страница 61: ...or the client If it is selected the data encryption can only be TKIP AES and the passphrase is required Data Encryption If data encryption is enabled the key is required and only sharing the same key...

Страница 62: ...page of the IEEE 802 11a n JetWave 2450v2 you need to enable Enable 802 1Q VLAN and assign a management VLAN ID for your device Make sure the assigned management VLAN ID is identical to your network V...

Страница 63: ...t mode could be enhanced greatly with this option enabled however if your wireless clients don t support A MPDU A MSDU aggregation it is not recommended to enable it Short GI Under 802 11n mode enable...

Страница 64: ...livery Traffic Indication Message is contained in the data packets It is for enhancing the wireless transmission efficiency The default is set to 1 Enter a value between 1 and 255 Preamble Type It def...

Страница 65: ...ong distance the IEEE 802 11n JetWave 2450v2 can automatically adjust proper ACK timeout value by specifying distance of the two nodes Flow Control It allows the administrator to specify the incoming...

Страница 66: ...list will not be able to connect the AP MAC Address Enter the MAC address of the wireless client that you would like to list into the access control list click Apply then it will be added into the tab...

Страница 67: ...Shaping Check this box to control the overall bandwidth for a specific VAP network Incoming Traffic Limit To specify maximum incoming bandwidth to a certain rate in kbit s Incoming Traffic Burst To s...

Страница 68: ...rt number for authentication Radius Acct Port Enter the port number for billing Radius Shared Secret Enter the secret key of the radius server Radius NAS ID Enter the name of the radius server if any...

Страница 69: ...s WDS Settings is available only under Bridge and AP Repeater Mode Bridge uses the WDS protocol that is not defined as the standard thus compatibility issues between equipment from different vendors m...

Страница 70: ...ord again for confirmation The password is case sensitive and its length cannot exceed 19 characters Upgrade Firmware Open Firmware Upload in Management and follow the steps below to upgrade firmware...

Страница 71: ...e a dialog box will pop up Save it then the configuration file ap cfg will be generated and saved to your local computer Load Settings from File By clicking Browse a file selection menu will appear se...

Страница 72: ...and then release it until the PWR LED gives a blink Reboot You can reboot your IEEE 802 11n JetWave 2450v2 from Configuration File in Management as below Click Reboot and hit Yes upon the appeared pro...

Страница 73: ...2450v2 and the SNMP manager The IEEE 802 11n JetWave 2450v2 supports SNMP v2 v3 Server Port Change the server port for a service if needed however you have to use the same port to use that service for...

Страница 74: ...ying this user name are allowed to access the IEEE 802 11n JetWave 2450v2 Password Specify a password for the SNMPv3 administrator or user Only the SNMP commands carrying this password are allowed to...

Страница 75: ...trust The Server can trust all certificates issued by a given CA To import a user certificate from Import User Certificates click Browse and specify the location where the user certificate is placed C...

Страница 76: ...tem Log in Tools as below Remote Syslog Server Enable Remote Syslog Enable System log to alert remote server IP Address Specify the IP address of the remote server Port Specify the port number of the...

Страница 77: ...emote unit to ping Ping Interval Specify the interval time to ping the remote unit Startup Delay Specify the startup delay time to prevent reboot before the IEEE 802 11n JetWave 2450v2 is fully initia...

Страница 78: ...ivalent ASCII Character Hex Equivalent ASCII Character Hex Equivalent ASCII Character Hex Equivalent 21 9 39 Q 51 i 69 22 3A R 52 j 6A 23 3B S 53 k 6B 24 3C T 54 l 6C 25 3D U 55 m 6D 26 3E V 56 n 6E 2...

Отзывы: