background image

8

TRADITIONELLE DEUTSCHE QUALITAT

· ·

1. Using the screws that are in 

attachment, gather the bottom of 

the handle.

INSTALLATION

2. Install the attachment for 

the power cord, as shown in the 

illustration.

3. Fix the handle with the screws. 

Install the mounting wire on 

the handle as shown in the 

illustration.

4. Set the supporting wheels 

and adjust them to the required 

height with a screw. Firmly 

tighten the fixing screws after 

installing wheels.

Fastening

Screws

Содержание KS 1000T E

Страница 1: ...Please read this manual before use Owner s Manual Electric Tiller KS 1000T E KS 1500T E ENG...

Страница 2: ...11 EXPLANATION OF SYMBOLS KS K nner S hnenproduction T tiller E electric 1500 modelname Read carefully these instructions Pay special attention to information that begins with these characters words...

Страница 3: ...to make alterations into the tillers which may not be reflected in this manual Pictures and photos of the product may vary from its actual appearance ELECTRICTILLER OVERVIEW K nner S hnen tiller is d...

Страница 4: ...W 1200W Frequency 50 Hz 50 Hz Voltage 230V 230V Tilling blade diameter 22 cm 22 cm Tilling Depth 22 cm 22 cm TillingWidth 36 cm 45 cm Noiselevel 93 dB 93 dB NetWeight 8 0 kg 12 0 kg GrossWeight 10 0 k...

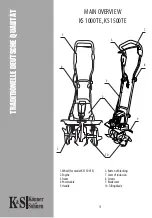
Страница 5: ...E DEUTSCHE QUALITAT MAIN OVERVIEW KS1000 KS1500 1 Wheel for model KS 1500 2 Engine 3 Frame 4 Powercable 5 Handle 6 Button of blocking 7 Lever of inclusion 8 Screws 9 Bladecover 10 Tilling blade 9 10 1...

Страница 6: ...orks aswellasplants care and treatment Do not use tiller for other goals not provided in this manual Failuretofollowtheseinstructionsmayleadtoseriousinjuries electricshockorfire ELECTRICAL SAFETY K nn...

Страница 7: ...ordertokeepthebalanceofthedevice 5 Keeptrackonusingtimeofthetiller becauseexcessivevibrationcanadversely affect your health WORKINGWITH ATILLER 1 Turn on the engine observng the instructions in this m...

Страница 8: ...otorisoffandthedeviceiscompletelystoppeddeforeputting the device for storage a Pleasecarefullyreadthismanual beforeoperation b Thenoiselevelwithinaradiusof 7m c Otherpeopleshouldkeepadistance fromtheo...

Страница 9: ...stall the attachment for the power cord as shown in the illustration 3 Fix the handle with the screws Install the mounting wire on the handle as shown in the illustration 4 Set the supporting wheels a...

Страница 10: ...d the tiller with two arms The device moves forward due to the action of mills that are slowly sinking into the ground If you need to perform deep tillage would be efficient to move the tiller forward...

Страница 11: ...of dirt MILLS Please look after the condition of mills If they are worn or broken contact the servicecentertoreplacethem Allmillsarereplacedatonceasoneset Theuseof oldorbrokencuttersmyleadtooverloado...

Страница 12: ...operty of the service center WARRANTY EXCLUSIONS If the user has failed to comply with the instructions in this manual If the product features damaged or missing identification stickers or labels seri...

Страница 13: ...as caused by natural factors such as dirt dust humidity high or low temperature natural disasters To quick wear parts and components spark plugs nozzles pulleys filter and safetyelements batteries rem...

Страница 14: ......

Страница 15: ...Germany ks power de info dimaxgroup de Poland ks power pl info pl dimaxgroup de Ukraine ks power com ua sales ks power com ua CONTACTS...

Отзывы: