Konix 3328170281812 Скачать руководство пользователя страница 12

12


A

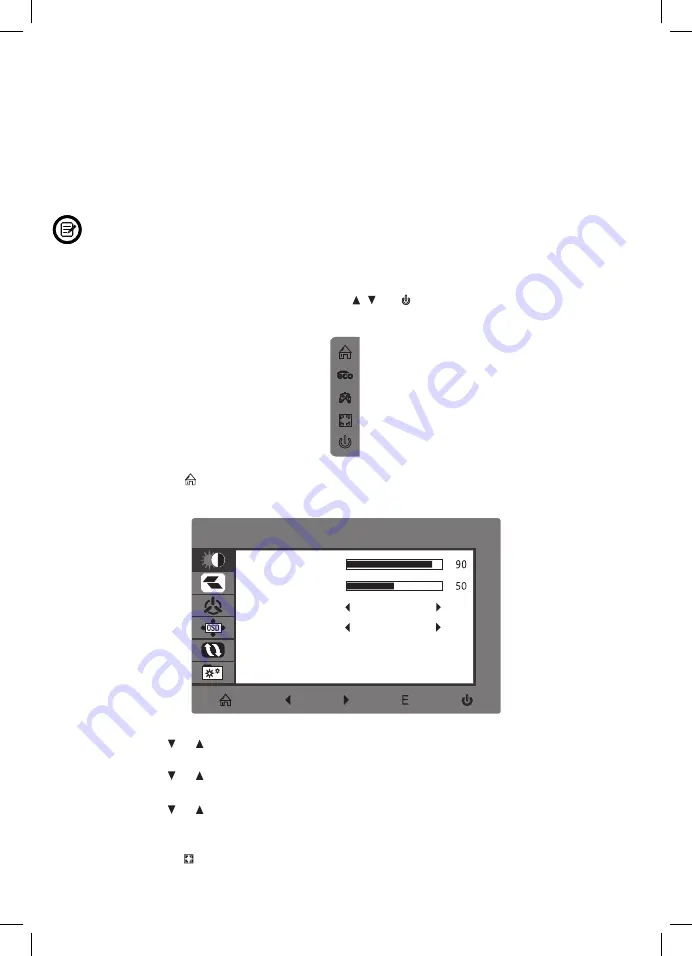
The On-Screen Display (OSD) Menu may be used to adjust your monitor’s 
settings and appears on screen alter turning on the monitor and pressing the 

M

 button.

OPERATION

When using the monitor for the fi rst time, settings will automatically


adjust to optimal settings according to your computer’s configuration 

and parts etc.

1.


Press any one of the buttons ( 

M

,   ,   , 

E

,    ) 


to activate the navigation window.

2.

 Press 

M

     to enter the OSD menu.

3.


Press   or    to browse functions.

       •  Highlight the desired function, then press 

M

 to enter the sub-menu.

       •  Press   or    to browse sub-menus, then press 

M

 to highlight the desired 

 function.
       •  Press   or    to highlight an option, then press 

M

 to confirm the settings 


and exit the current screen.

4.

 Press 

E

     to exit the current screen.

LIST OF FUNCTIONS

DCR

STANDARD

LUMINOSITÉ

LUMINOSITÉ

CONTRASTE

ECO

MARCHE

eco

DCR

STANDARD

LUMINOSITÉ

LUMINOSITÉ

CONTRASTE

ECO

MARCHE

eco

Main Menu 

Sub-Menu

Options

Description

BRIGHTNESS

BRIGHTNESS 0~100

Adjust display brightness 

CONTRAST

0~100

Adjust display contrast

ECO

Standard, 
Game, RTS, 
FPS, Movie, Text

Set visual mode

DCR

On

Turn On DCR function

Off

Turn Off DCR function

IMAGE

ASPECT

Wide, Auto, 4:3

Set aspect ratio

COLOR TEMP. 

COLOR TEMP. 

Adjust color temperature

RED

0~100

0~100

0~100

0~100

0~100

Customize RGB components

GREEN

0~100

BLUE

0~100

OSD SETTING LANGUAGE

English,


Español, 

Русский

, Français, 

한국

Português, 

Deutsch, Türkçe,


�体中文

,


Polski, Italiano, 

Nederlands

Set OSD language

OSD H. POS.

0-100

Adjust the OSD horizontal 
position 

OSD V. POS  0-100

Adjust the OSD vertical position

OSD TIMER

0~60

Set how long the OSD remains 
open after non-use

TRANSPARENCY

0-100

Set the OSD overall 
transparency

,

日�

H. POSITION

V. POSITION

Adiust horizontal position of the

picture of source.

Adiust picture clock to reduce the

vertical line noise.
Adiust picture phase to reduce

the level of noise.

Adiust vertical position of the

picture of source.

PHASE

CLOCK

Warm, Cool,
User

Содержание 3328170281812

Страница 1: ...USER MANUAL FREYJA Borderless wide screen 165 Hz 1MS ULTRAFAST 165 Hz 1MS ULTRAFAST...

Страница 2: ...Re 1 2 3 4 5 6 7 8 9 10...

Страница 3: ...or other harsh cleaners 4 This monitor is designed with ventilation holes on the back of the casing Do not caver or black tnem 5 Avoid placing the monitor near heaters stoves fireplaces or other sourc...

Страница 4: ...r B Stand Stem C Stand Base D CM4 23mm Screws x 4 E KM4 12mm Screws x 2 F VESA connectors x 4 G Power Adapter H HDMI Cable I User Guide COMPONENTS O M M User Guide 24 FreeSync Monitor D24IP144A A B C...

Страница 5: ...our monitor HDMI Connector lnsert one end of the HDMI cable into the computer s HDMI output and connect the other end to the monitor s HDMI port DisplayPort Connector Insert one end of the DisplayPort...

Страница 6: ...ing the stand STAND ASSEMBLY 1 Open the packaging gently take out the foam and monitor 2 Remove the upper foam keep the monitor laying on nether foam 3 Take out stem and base Lock them with 2pcs KM4 1...

Страница 7: ...7 A 4 Insert the stem to the slot of back cover them lock them with 4pcs CM4 23mm screws Screws are in the accessory bag 1pcs buffer 5 Gently have the monitor stand up and enjoy using it...

Страница 8: ...t the foam and monitor 2 Remove the upper foam keep the monitor laying on nether foam 3 Take out 4pcs VESA Connector 25mm height in the accessory bag and lock them in back cover with straight screwdri...

Страница 9: ...tor If your earphones are connected to the monitor and audio devices are connec ted to your computer at the same time the audio devices will not produce sound Earphones and other audio devices not inc...

Страница 10: ...P In order for the monitor to receive DP signals from the computer use the DP cable to connect the monitor to the computer DP Cable lncluded B So Fl in is fu 1 2 3 F Th to pa co yo do gr fo IN DP OUTP...

Страница 11: ...onnect the other end to your power source lt is recommended that you use a surge protector with adequate voltage if a wall cannot be reached directly plug 3 Locate the power button on the monitor and...

Страница 12: ...s any one of the buttons M E to activate the navigation window 2 Press M to enter the OSD menu 3 Press or to browse functions Highlight the desired function then press M to enter the sub menu Press or...

Страница 13: ...GREEN 0 100 BLUE 0 100 OSD SETTING LANGUAGE English Espa ol Fran ais Portugu s Deutsch T rk e Polski Italiano Nederlands Set OSD language OSD H POS 0 100 Adjust the OSD horizontal position OSD V POS...

Страница 14: ...ions AUTRES SIGNAL SOURCE HDMI VGA OFF Normal Flicker High Middle Low Off Display the input signal VOLUME LED EFFECT OVER DRIVER LOW BLUE RAY FREESYNC 0 100 0 100 Adjust audio volume Set blue light fi...

Страница 15: ...Cable 75x75 16 7M YES YES NO YES YES YES YES H V Model Screen Size Aspect Ratio Backlight Brightness Panel Resolution Refresh Rate Response Time Viewing Angle Contrast Ratio VESA Mounting Signal Inpt...

Страница 16: ...NOTES Li 1 2 3 4 5 6 7 8 9 10...

Страница 17: ...t s d orifices de ventilation l arri re du bo tier Ne les couvrez pas et ne bloquez pas le passage de l air 5 vitez de placer le moniteur proximit d un radiateur d une cuisini re d un feu de chemin e...

Страница 18: ...de support C Base de support D Vis CM4 23mm x2 E Vis KM4 12mm x2 F Connecteurs VESA x4 G Adaptateur lectrique H C ble DP I Guide de l utilisateur COMPOSANTS P C P User Guide 24 FreeSync Monitor D24IP...

Страница 19: ...udio dans la sortie audio de l ordinateur pour transmettre les signaux audios de votre moniteur Connecteur HDMI Branchez le c ble HDMI la sortie HDMI de l ordinateur et connectez l autre extr mit au p...

Страница 20: ...E DU SUPPORT 1 Ouvrez l emballage retirez doucement la mousse et sortez le moniteur 2 Retirez la mousse du haut laissez le moniteur pos sur la mousse du bas 3 Retirez la tige et la base verrouillez le...

Страница 21: ...Relevez doucement le moniteur en position verticale Bonne utilisation Z 4 Ins rez la tige dans la rainure du panneau arri re et verouillez la avec 4 vis CM4 23 mm Les vis sont dans le sachet d accesso...

Страница 22: ...sur la mousse du bas 3 Sortez 4 connecteurs VESA hauteur 25 mm dans le sachet d accessoires et utilisez les pour verrouiller le couvercle arri re l aide d un tournevis droit 3 Suivez les instructions...

Страница 23: ...os de votre moniteur Si vos couteurs sont connect s au moniteur et que les p riph riques audios sont connect s votre ordinateur en m me temps les p ri ph riques audios ne produiront pas de son couteur...

Страница 24: ...Pour que le moniteur re oive les signaux DP de l ordinateur utilisez le c ble DP pour connecter le moniteur l ordinateur F V C ble DP Inclus SORTIE DP PC Le te so riz as co 1 2 3 F La ch di pi vo de n...

Страница 25: ...e extr mit votre source d alimentation Il est recommand d utiliser un parasurtenseur avec une tension ad quate si une prise murale ne peut pas tre atteinte directement 3 Localisez le bouton d alimenta...

Страница 26: ...boutons M E pour activer la fen tre de navigation 2 Appuyez sur M pour acc der au menu OSD 3 Appuyez sur ou pour parcourir les fonctions Mettez en surbrillance la fonction souhait e puis appuyez sur...

Страница 27: ...ish Espanol Fran ais Portugu s Deutsch T rk e Polski ltaliano Nederlands R glage de la langue de l OSD OSD H POS 0 100 R glage de la position horizontale de l OSD OSDV POS 0 100 R glage de la position...

Страница 28: ...Le mode standard convient la plupart des activit s Main Menu Sub Menu Options Description RESET RESET N A Reset monitor configurations AUTRES SIGNAL SOURCE HDMI VGA OFF Normal Flicker High Middle Low...

Страница 29: ...V Mod le Taille d cran Format d image R tro clairage Luminosit Panneau R solution Fr quence de rafra chissement Temps de r ponse Angle de vue Rapport de contraste Fixation VESA Entr e de signal Alime...

Страница 30: ...R A Z E R O Y U REMARQUES...

Страница 31: ...uenta que Los residuos de pro ductos electricos no se tienen que tirar con la basura domestica Reciclelo en las instalaciones disponibles Consulte a las Autoridades Locales o al distribuidor para que...

Страница 32: ...ed trademarks of HDMI Licensing Administrator Inc in the United States and other countries 2020 Konix Innelec Multimedia Konix 45 rue Delizy 93692 Pantin Cedex FRANCE Les marques et logos Konix et Dra...

Отзывы: