EXTEND
THE TUBES
CABLE ASSEMBLY
ADJUST
CLAMPING FORCE
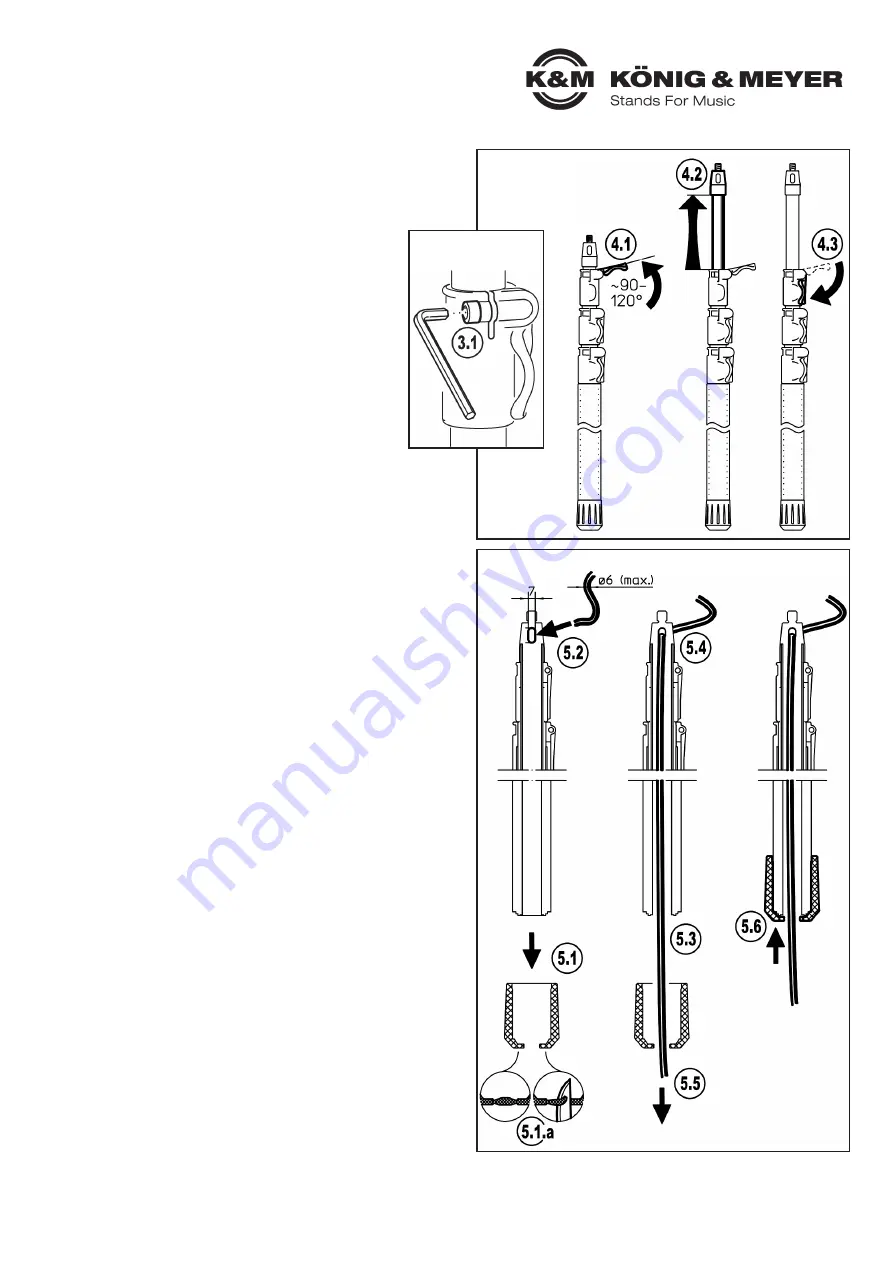
3. TENSION CLAMPS / ADJUST CLAMPING FORCE
The clamping force of each tension clamp can be adjusted individually
3.1
Place an Allen key SW4 on the cylinder screw of the clamping gap
3.1
and open or loosen the screw as required
3.1
- often a fraction of a turn is enough.
4. HANDLING - WIRING OUTSIDE / WITHOUT CABLE
CABLE ASSEMBLY
- is done when the tube combination is fully extended
- wrap the cable around the tube combination and secure it
-
(e.g. with tape)
EXTEND THE TUBES
4.1
Open a clamp lever (the respective highest)
4.2
Extend the tube as far as desired,
4.3
Close the clamp lever (must touch the bracket)
NOTE: Never open all clamp levers at once,
NOTE:
but repeat steps
4.1-4.3
for each clamp lever
NOTE:
one after the other.
RETRACT TUBES
- First unscrew the microphone i.e. remove it from the clamp,
- then remove/wind up the cable.
- Now open ONE clamp lever, retract the tube and close the clamp
-
lever again.
- Repeat these steps with the other clamp levers.
5. HANDLING - WIRING INSIDE
CABLE ASSEMBLY
- is done when the tube combination is fully retracted
5.1
Remove the end cap and remove central rubber plug
5.1.a
.
5.2
Insert the cable into the upper opening of the microphone sleeve and
5.2
push it through...
5.3
...until it appears on the base tube and can be pulled through carefully.
5.4
Gently guide the cable along the opening of the microphone sleeve.
5.5
Push the cable through the end cap at the bottom.
5.6
Place the end cap back on the tube.
NOTE: After installation, the cable should be secured at the opening of the
NOTE:
microphone sleeve against unintentional pulling in and against pressure
NOTE:
and kinking. To do this, attach strain relievers to the cable or use suitable
NOTE:
adhesive tape.
BEXTEND THE TUBES
4.1
Open a clamp lever (the respective highest)
4.2
Extend the tube as far as desired, where it may be helpful to feed the cable
4.2
through the end cap
4.3
Close the clamp lever (must touch the bracket)
NOTE: Never open all clamp levers at once, but repeat steps
4.1-4.3
for
NOTE:
each clamp lever one after the other.
RETRACT TUBES
- First unscrew the microphone i.e. remove it from the clamp,
- open the respective lowest clamping lever
4.1
.
- Grip the cable under the end cap and pull gently until the tube is retracted
-
(if necessary, grap the tube directly).
-
NOTE: The cable should not be crushed at the opening of the
NOTE:
microphone sleeve
5.2
.
- Close the clamp lever
4.3
.
- repeat these steps with the other clamp levers.
- Wind up the cable and store it.
F: The tubes are difficult to extend
F:
R: NOTE: There is a risk of injury if tubes are damaged.
F:
R: NOTE:
In this case contact K&M.
F:
R: Open the clamping lever sufficiently wide (90-120°), only then is
F:
R:
smooth adjustment possible (see
4.2
).
F:
R: Re-adjust the clamp lever
F:
R: Clean the tubes
F: Tubes cannot be clamped properly
F:
R: Re-adjust the clamp lever
F: Cable is "crosswise" when the tubes are retracted
F:
R: HHold the cable at the base tube opening and pull gently until tubes retract
FAULT-FINDING (F) and REPAIR (R)
- Included with the delivery is a shoulder bag that fits the pole perfectly.
- If needed you can purchase different sizes of KÖNIG & MEYER
-
microphone clamps, that can be screwed onto the connector thread of the
-
fishing pole microphone:
-
Microphone Clamp No. 85035: microphone size ø 17 - 22 mm,
-
Microphone Clamp No. 85050: microphone size ø 22 - 28 mm,
-
Microphone Clamp No. 85055: microphone size ø 28 - 34 mm,
-
Microphone Clamp No. 85060: microphone size ø 34 - 40 mm (cone form),
-
Microphone Clamp No. 85070: microphone size ø 34 - 40 mm (parallel)
ACCESSORIES


