KÖNIG & MEYER
GmbH & Co. KG
Kiesweg 2, 97877 Wertheim, www.k-m.de
26775-000-55 Rev.04 03-79-935-00 10/21
TECHNICAL DATA
Material
Base, tubes, catch, link plate, tray:
Steel, black powder coated
Threads: Steel, galvanized
Bracket, shell, caps: PA-6
Load capacity
max 25 kg centered load
Dimensions
Base: W x D x H: 210 x 250 x 20.5 mm
Tray: W x D 205 x 245 mm
Height setting: 350, 375, 400, 425, 450, 475, 500 mm
Box
L x W x H: 430 x 315 x 80 mm
Weight
net.: 3.6 kg, gross: 4.1 kg
USAGE NOTES / FUNCTION
NOTE!
- Do not underestimate the weight of the monitor.
- The monitor is placed on the stand only if:
-
a. the position of the extension tube has been
-
a.
secured using the catch
4.4
and in addition
-
a.
to that the wing nut
4.5
has been tightened.
-
b. the screw connection between the extension tube and
-
b.
the tray is firmly tightened
3.5
.
- The stand (base, extension tube, tray) is NEVER to
-
be moved with the monitor on it, rather always only
-
after the monitor has been removed from the tray.
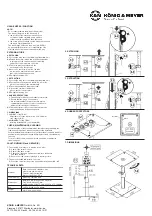
EXTENSION TUBE
4. EXTENSION
4.1
Loosen the wing nut of the clamping bracket
b.2
a bit
4.2
Extend the extension tube
b.3
to the desired height,
4.2
in this process the catch unlocks automatically
4.2
and will not catch into place on its own.
4.3
The catch must be pressed into the
4.3
desired groove by the operator.
4.4
As soon as the catch is in place, the tube
4.4
lowers itself 2 mm, and the catch ensures
4.4
that it is not unwittingly unlocked.
4.5
Re-tighten the wing nut
5. RETRACTION
5.1
Loosen the wing nut of the clamping bracket
b.2
a bit
5.2
First pull up on the extension tube
b.3
a bit, in this
5.2
process the catch unlocks automatically.
5.3
Then let the extension tube retract and...
5.4
...press the catch into the desired
5.4
groove until it clicks into place
5.5
Re-tighten the wing nut
6. RUBBER PROTECTORS
6.
a. The delivery includes 4 round rubber protectors
h
6.
b. Ensure that the tray is clean and dry.
6.
c. We recommend that the protectors are placed
6.
c.
symmetrically at the four corners of the tray at a
6.
c.
distance from the edge or the monitor.
6.1
The rubber protectors are to be removed from the
6.1
paper and adhered to the desired spots.
7. DIMENSIONS
7.1
HEIGHT of the TRAY:
7.1
Adjustable in 7 steps á 25 mm von 350 - 500 mm;
7.1
(see chapter
4
-
5
)
7.2
ALIGNMENT of the TRAY:
7.2
Infinitely rotatable 360° (see chapter
3.5
)
4. EXTENSION
5. RETRACTION
6. RUBBER PROTECTORS
7. DIMENSIONS
monitor
plate
F: The stand is not sturdy i.e. is leaning to one side:
F:
R: Check if the surface is even
F:
R: Check if the base is level
F:
R: Check and, if needed, tighten the screw
e
on the base
a
F:
R:
and base tube
b.1
F:
R: Ensure, the load center of gravity is in central position
F: The extension tube
b.3
retracts on its own:
F:
R: Press the catch into the groove and tighten the wing nut
4.3
-
4.5
FAULT-FINDING (F) and REPAIR (R)
- Careful handling of the stand maintains the telescoping capability, the
-
load-bearing capacity as well as the safety of the installation
- Perform workstation maintenance only without the monitor and watch for
-
eventually risks (wedged of hands, bumping into stand, the stand may
-
fall over)
- To care for the product, use a damp cloth and and a non-abrasive
-
cleaning agent.
CHECK, MAINTENANCE, CLEANING


