background image

Chapter 1   Basic Functions 

1-28


4. 1 

Cleaning


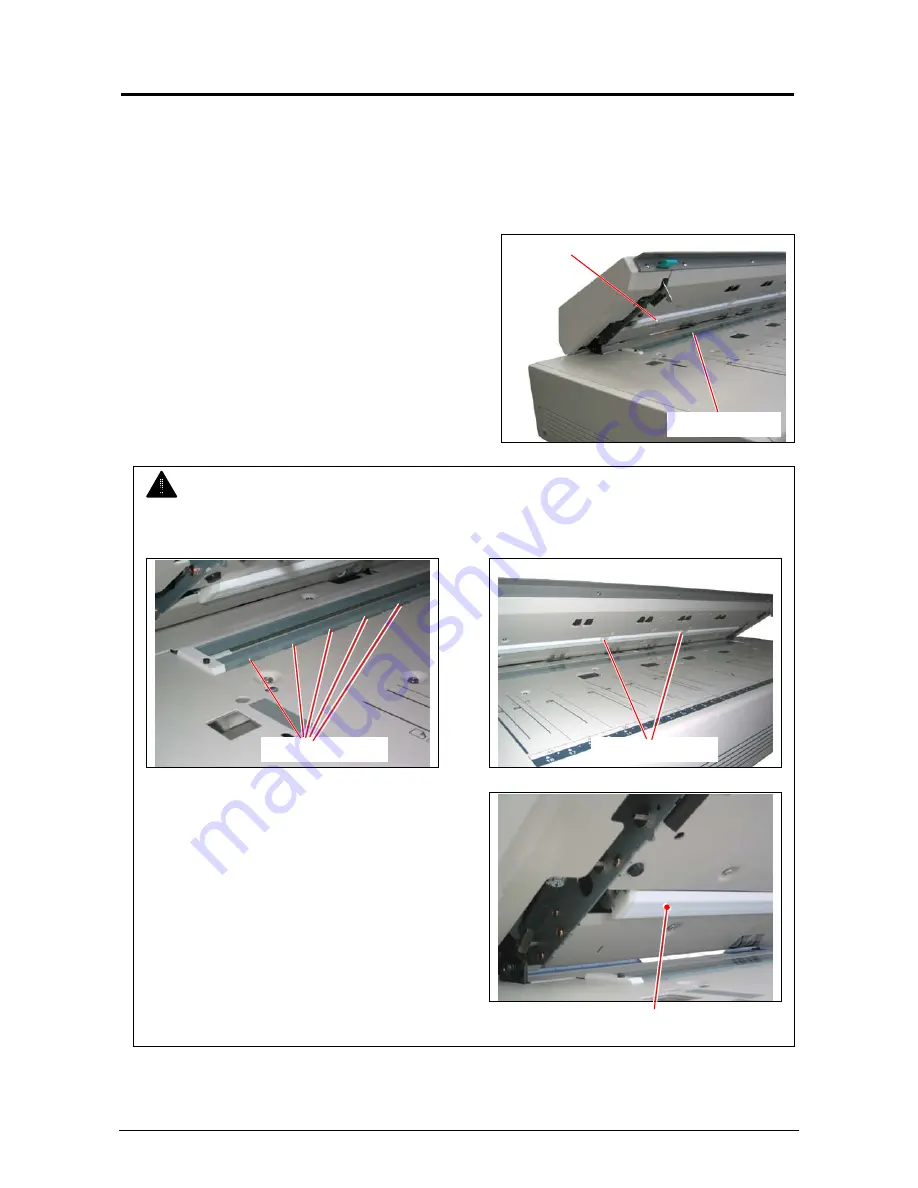
Clean the following parts once a week or as needed (if dirty copies or scans appear). 


4. 1. 1  Original Glass and Platen 

 
Wipe the Original Glass and the Platen with a soft  
cloth impregnated with a little water or neutral  
detergent, and then wipe it with a dry soft cloth. 


NOTE 

 
(1) When Cleaning, be careful not to damage the plastic sheets beside Original Glasses and 
Platen. 


(2) Carefully clean the dents on the Platen. 


                                                                                                                  Dent 

Platen

Original Glass

Plastic sheets 

Plastic sheets 

Содержание KIP 2100

Страница 1: ...KIP 2100 User Guide A 1...

Страница 2: ...r vibration while operation If Machine is installed near electronics equipment such as TV or radio interference to equipment such as noise or flickering may be occurred Use separate power line and ins...

Страница 3: ...noring this USER S MANUAL WARNING This caution mark denotes that the failure to follow given instructions in handling the machine could result in a death or serious injury CAUTION This caution mark de...

Страница 4: ...anything heavy on the power cord It may cause a fire or you may receive an electric shock 3 Do not step on the power cord and do not damage or process it It may also cause a fire or you may receive a...

Страница 5: ...ged and may result in a fire or you may receive an electric shock 2 If no one operates the scanner in the night time make sure to turn it off for safety 3 If no one operates the machine for a long tim...

Страница 6: ...s 1 13 2 0 Basic Operation 1 15 2 1 Turning on the KIP 2100 1 15 2 2 Turning off the KIP 2100 1 17 2 3 Positioning Original 1 18 2 4 Cancelling the Current Scan 1 21 2 5 Cancelling Power Saving Mode 1...

Страница 7: ...ompletely disconnect the equipment from the power source please draw the power plug from the outlet The outlet must be easily accessible near the equipment 4 The temperature must be within the range f...

Страница 8: ...or Europe This equipment complies with the requirements in Pub 22 of CISPR Rules for a Class B computing device Operation of this equipment in a residential area may cause unacceptable interference to...

Страница 9: ...replica from said Governments 4 Do not copy Government issued revenue stamps certificate stamps that are prescribed by Liquor Tax Act or the Commodity Tax Act Special items which require your attentio...

Страница 10: ...12 11 8 5 High resolution Scanner Head KIP 2100 is equipped with a 600dpi CCD Heads which produces fine and distinct scans and copies Various operations 1 Color Monochrome scans Mono Copies to a KIP p...

Страница 11: ...rrent 6A Frequency 50 60Hz Power consumption 240W Environmental conditions 10 32 5 C 50 90F 20 85 percent RH No condensing Acoustic noise Less than 60db Outer dimension 1 368mm Width x 489mm Depth x 2...

Страница 12: ...ce down 3 Tray These Trays receive the original ejected from the scanner after the scan 4 Power Switch Press I side of the Power Switch to turn on the KIP 2100 and press O side to turn it off 5 Origin...

Страница 13: ...Chapter 1 Basic Functions 1 8 1 5 2 Rear view No Name Function 1 Earth Connect the earth wire here 2 USB 2 0 Terminal Connect the USB Cable here to connect to the KIP IPS or Scan PC 1 2...

Страница 14: ...Power Save Mode 2 Stop Eject key Stops the current scan Ejects an original remained in the scanner 3 POWER LED Lighting green Turned on and ready to scan Not lighting Turned off Blinking green Startin...

Страница 15: ...antity of prints and sets designation 6 Advanced Settings Invert mirror stamps folds and edge adjustments preformed displayed in this button sub screen 7 Reset Clears the image buffer and resets the s...

Страница 16: ...ginal to copy Also select Eng Arch Mode selected here Color Scan is selected here if enabled 4 Quality Select Auto or Manual Image adjustments 5 Resolution Scroll through image resolution DPI of the s...

Страница 17: ...Type and amount remaining per roll deck 4 Status Shows the current status of a job and media selection 5 Type Displays a copy or network print job 6 Total Displays the total number of prints and curr...

Страница 18: ...inter model 3 KIP Contact Shows the contact information for the KIP Service and KIP Supplies provider 4 User Guide User Guides for details on system functions and operations 5 Configurations Allows us...

Страница 19: ...ght From 0 05mm to 1 6mm 50g to 120g centare Width 210mm 8 5 to 940mm 37 Length 210mm 8 5 to 16 000mm 50 Do not scan the following kinds of original because you may damage the original or scanner itse...

Страница 20: ...r 1 Basic Functions 1 15 So much curled Irregular shape Not square Wet Ink is not dried Made of metal or cloth Patched Clipped or stapled K I P K I P K I P K I P K I P K I P Wet Metal Cloth Clipped St...

Страница 21: ...Chapter 1 Basic Functions 1 16 Rough surface Carbon paper for example Punched Rough surface...

Страница 22: ...tly the original should be removed manually by hand 1 Pull Lever 1 upward to lift up Upper Unit fully 2 Carefully pull the original from the front and remove it If not possible pull it from the rear 3...

Страница 23: ...ginal Misfeed Some errors occur on the KIP printer Follow the instruction on the printer s UI See the KIP printer s manuals for further information 3 2 2 Both ERROR LED and POWER LED light red If ERRO...

Страница 24: ...KIP printer model 3 4 1 Top Cover Open If the scanner lid is open the UI Screen will display the following Press down Top Cover to close firmly 3 4 2 Replacing Toner Cartridge The UI Screen will disp...

Страница 25: ...inter s User Guide or by following the help on the Touch Screen 3 4 4 Color Printer Configuration If the below dialog appears on the UI Screen the KIP 2100 requires Color Printer Configuration Remove...

Страница 26: ...laten Wipe the Original Glass and the Platen with a soft cloth impregnated with a little water or neutral detergent and then wipe it with a dry soft cloth NOTE 1 When Cleaning be careful not to damage...

Страница 27: ...with a little water or neutral detergent and then wipe them with a dry soft cloth Front Counter Rollers Rear Counter Rollers Front Original Feeding Rollers Rear Original Feeding Roller NOTE 1 Do not...

Страница 28: ...Chapter 1 Basic Functions 1 30 NOTE 2 When you clean the Rear Original Feeding Rollers be careful not to damage the plastic sheets beside them Plastic sheets...

Страница 29: ...2 9 2 3 2 Threshold 2 10 2 3 3 Density 2 10 2 3 4 Sharpness 2 10 2 3 5 Dither 2 10 2 4 Copy Count 2 11 2 4 1 Arrows Count Increase Decrease 2 11 2 4 2 Number Pad Count Increase Decrease 2 11 2 4 3 Set...

Страница 30: ...et Percentages 2 25 2 8 2 Percentage Key Pad 2 25 2 8 3 Page Size Zoom 2 26 2 8 4 Auto Zoom 2 27 2 8 5 Clear 2 27 2 9 Start 2 27 2 10 View Last 2 27 2 11 Recall Job 2 27 2 12 Stop Reset 2 28 2 13 Inte...

Страница 31: ...ets designation 6 Advanced Settings Invert mirror stamps folds and edge adjustments preformed displayed in this button sub screen 7 Reset Clears the image buffer and resets the system to default setti...

Страница 32: ...can change to modify the copies as required 1 2 1 Select Copy Mode On the lower region of the Operator Panel select COPY 1 2 2 Select Size Mode Select whether the document is an engineering or archit...

Страница 33: ...d for a combination of lines photos documents Grayscale used for a combination of lines areas of shade CAD originals Photo used for photographic originals This will allow automatic image quality adjus...

Страница 34: ...a Selects automatic for best possible fit or manual roll selection 1 2 6 Length Select Auto for automatic cut length to the length of the original or Standard Cut for a manual length A number pad will...

Страница 35: ...ugh presets ratios or c press on the Zoom number to enter a ratio on the key pad 1 2 8 Insert Original Using the guides on the feed table center the original face up and push forward until the KIP 210...

Страница 36: ...he copy mode parameters to achieve the required result 2 2 Original This region allows the setting of the Size Mode Engineering or Architectural and the original image type 2 2 1 Original Size Mode Th...

Страница 37: ...he desired original setting from one of the four diagrams This will allow automatic image quality adjustments for the next scan Please note that the selection will be highlighted with a black circle a...

Страница 38: ...ill suppress or enhance the background from the original 2 3 4 Sharpness To override the Automatic settings Sharpness can be adjusted Deselect Auto to enable Sharpness Pressing the arrows manually adj...

Страница 39: ...er Pad Count Increase Decrease Press the number of copies value which is a button to set the desired number of copies using a number pad This will allow the quick entry of larger numbers a Press the n...

Страница 40: ...e until the set is closed To close a set press the start button The set with the total number of copies will be printed An example of Set Copy 3 originals with 3 sets or copies 2 4 4 Clear Press the c...

Страница 41: ...ent When any of the adjustments selections is selected the selections will now be displayed on the main Copy screen 2 5 1 Mirror Select this button to mirror a scan This can be utilized on originals t...

Страница 42: ...ct a desired fold from the list b The fold selected will be displayed in the button c Select OK NOTE The list of Folds is loaded into Copy Mode by the system administrator or key operator They can not...

Страница 43: ...s to scroll through the available stamps and select the desired stamp from the list b The Stamp button will now display the stamp selected c Select OK NOTE The list of Stamps is loaded into Copy Mode...

Страница 44: ...a scan or b image can be removed such as a binding strip or a file hanger To adjust the Leading Edge use the arrows to denote the quantity you wish to add or remove Touch the value displayed area to r...

Страница 45: ...or remove Touch the value displayed area to reset the quantity Make any of the required adjustments selections and press OK to accept The selections will now be displayed on the main Scan screen 2 6...

Страница 46: ...o prevent surplus media consumption applies to the option two or more roll model Example 22 original 36 and 24 bond media installed Original is 22 wide 36 installed 24 Installed excess non imaged medi...

Страница 47: ...in the bottom left corner of the user interface 2 Select the Configuration button from the Info Help screen 3 Using the Left Right arrows located at the bottom of the page scroll to page four 4 4 Cha...

Страница 48: ...eriod of time the Printer will beep notifying the user to insert the cutsheet into the Cutsheet feeder the Job Info button will also be flashing 3 Once the cutsheet has been printed there will be a sh...

Страница 49: ...inter s manual for the procedures to replace a roll of media a If no changes are required press cancel b If changes are required from the currently settings displayed select the correct media type and...

Страница 50: ...ements or reductions that are applied to an image as well to prevent excess media without image 2 7 2 Standard This mode allows the media length to be determined by a standard length or a length set m...

Страница 51: ...requesting the length b Once the roll is determined if so required the length can now be set Standard Length Auto Length Custom Length c Standard Length use an industry standard length Select the len...

Страница 52: ...ess enter f The cut length will now be displayed in the main Copy screen in the Standard Cut button 2 8 Size Zoom Image size Zoom can be altered in this region on the UI This includes automatic zoomin...

Страница 53: ...ess with the arrow buttons The pre programmed percentages are 2 8 2 Percentage Key Pad To enter a percentage directly into the UI a Press on the Percentage value displayed the number is a button b Thi...

Страница 54: ...the value b Select Standard button c Select the original page size by pressing onto the original page size button d Please note either Engineering or Architectural mode can be utilized by pressing on...

Страница 55: ...used then it will use the values set in the Cut Sheet button in Media 2 8 5 Clear To reset the percentage value to default press the C button 2 9 Start The copier is always set to Auto Start That is w...

Страница 56: ...eeded right away and there is a job in the queue that has 20 sheets and 10 sets are being printed this can be interrupted when one of the sets finishes printing After the urgent file is printed the se...

Страница 57: ...e Graphic Mode 3 8 2 3 2 Draft Normal High Quaility 3 8 2 4 Copy Count 3 9 2 4 1 Arrows Count Increase Decrease 3 9 2 4 2 Number Pad Count Increase Decrease 3 9 2 4 3 Set Copy 3 10 2 4 4 Clear 3 10 2...

Страница 58: ...vanced Settings Invert mirror stamps folds and edge adjustments preformed displayed in this button sub screen 7 Reset Clears the image buffer and resets the system to default settings 8 View Last The...

Страница 59: ...ust first be calibrated in the screen under the Color Config button Please see the Section 1 2 1 Select Copy Mode On the lower region of the Operator Panel select COPY and then press the Color button...

Страница 60: ...for color photographic originals This will allow automatic image quality adjustments for the scan 1 2 4 Print Quality The model of third party color printer will determine on the available Print Qual...

Страница 61: ...unt Press the arrow buttons to scroll through the number of copies required or press on the actual number to set the quantity with the number pad 1 2 6 Original Size This selects automatic for best po...

Страница 62: ...presets ratios or c Press on the Zoom number to enter a ratio on the key pad 1 2 8 Insert Original Using the guides on the feed table center the original face up and push forward until the KIP 2100 a...

Страница 63: ...ub screen that can be used to adjust the color copy mode 2 2 Original This region allows the setting of the Size Mode Engineering or Architectural and the original image type 2 2 1 Original Size Mode...

Страница 64: ...te that the selection will be highlighted with a black circle and the icon will become white as in the above example Line Photo 2 3 Print Quality This region is used to change the image quality settin...

Страница 65: ...n In this example the arrow was press five times to reach 6 copies 2 4 2 Number Pad Count Increase Decrease Press the number of copies value which is a button to set the desired number of copies using...

Страница 66: ...ustment d Trail Edge Adjustment When any of the adjustments selections is selected the selections will now be displayed on the main Copy screen 2 5 1 Mirror Select this button to mirror a scan This ca...

Страница 67: ...scan or b image can be removed such as a binding strip or a file hanger To adjust the Leading Edge use the arrows to denote the quantity you wish to add or remove Touch the value displayed area to res...

Страница 68: ...To adjust the Trailing Edge use the arrows to denote the quantity you wish to add or remove Touch the value displayed area to reset the quantity Make any of the required adjustments selections and pr...

Страница 69: ...2 6 1 Auto This default setting allows the KIP 2100 to automatically detect the width and length of the original Please note the correct Original Size Mode in 2 2 1 must be select prior to the copy 2...

Страница 70: ...number pad a Set the width of the scan Note that these are only Standard Sizes b Set a Standard Length or Custom Length set the Custom length in the key pad and press enter Standard Length Custom Leng...

Страница 71: ...hes to scan the document 24 and then select a 270 degree or 90 degree rotation to print 36 width rather than 24 this can save media Rotation available 2 7 Size Zoom Image size Zoom can be altered in t...

Страница 72: ...utton b This will show a keypad to enter the value please note that the button Manual on the side is a default c Press the desired zoom value and press enter 2 7 3 Page Size Zoom To enter a zoom perce...

Страница 73: ...Engineering or Architectural mode can be utilized by pressing on the button below the original page size e Select the desired Copy page size Again please note either Engineering or Architectural mode...

Страница 74: ...riginal will be ejected automatically If not open Top Cover to remove the original 2 Press the Reset button to restore the default settings in Copy Mode Some of the default settings are determined in...

Страница 75: ...ual Size 4 9 2 3 3 Hard Drive Space Monitor 4 10 2 3 4 Rotation 4 11 2 4 Quality 4 11 2 4 1 Automatic 4 11 2 4 2 Threshold 4 11 2 4 3 Density 4 12 2 4 4 Sharpness 4 12 2 4 5 Dither 4 12 2 5 DPI 4 12 2...

Страница 76: ...here 4 Quality Select Auto or Manual image adjustments 5 DPI Scroll through final image resolution DPI 6 Format Scroll through formats the scanned file will be saved to 7 Advanced Settings Invert mirr...

Страница 77: ...ers that the user can change to modify the scans 1 2 1 Select Scan Mode On the lower region of the UI select SCAN 1 2 2 Select Size Mode Select whether the document is an engineering or architectural...

Страница 78: ...will scan The selections are Line used for simple line documents Line Photo used for a combination of lines photos documents Grayscale used for a combination of lines areas of shade CAD originals Pho...

Страница 79: ...4 tif format Group 4 level compressed TLC KIP format compressed CAL G4 Cals Group 4 level PDF PDF Level 3 DWF Design Web Format AutoCAD Multipage TIF G4 Tif format Group 4 level compressed Multipage P...

Страница 80: ...for your reference 1 2 7 Retrieve the File Depending on the Mailbox you may now access your scan from a PC connected to the LAN This includes a from a FTP site using Microsoft Windows Internet Explor...

Страница 81: ...meters to achieve the required result 2 2 Original This region allows the setting of the Size Mode Engineering or Architectural and the Original Document type 2 2 1 Original Size Mode This button is u...

Страница 82: ...ginal setting from one of the four diagrams This will allow automatic image quality adjustments for the next scan Please note that the selection will be highlighted with a black circle and the icon wi...

Страница 83: ...4 9 2 3 2 Manual Size To select an original size manually select Manual and a sub screen displays all current standard page sizes a Select a desired size of the sheet b Or use Custom to select a widt...

Страница 84: ...ual image size g The main Scan screen will now display the custom or manual size settings for the next image 2 3 3 Hard Drive Space Monitor Located on the main screen of the KIP printer Scan mode the...

Страница 85: ...is used to change the image quality settings from the automatic setting 2 4 1 Automatic For most scans Auto should be selected This will allow the KIP 2100 to automatically determine the best image se...

Страница 86: ...the arrows manually adjusts the line sharpness to remove rough lines or when photos are scanned to allow for smoother graduations 2 4 5 Dither To override the Automatic settings Dither can be adjuste...

Страница 87: ...DF Level 3 DWF Design Web Format AutoCAD Multipage TIF G4 Tif format Group 4 level compressed Multipage PDF PDF Level 3 Multipage DWF Design Web Format AutoCAD Select the file type required to save th...

Страница 88: ...djustments selections and press OK to accept The selections will now be displayed on the main Scan screen 2 7 1 Mirror Select this button to mirror a scan This can be utilized on originals that have t...

Страница 89: ...Arrow buttons to scroll through the available stamps and then select the stamp from the list b The Stamp button will now display the stamp selected NOTE The list of Stamps is loaded into Scan Mode by...

Страница 90: ...a scan or b image can be removed such as a binding strip or a file hanger To adjust the Leading Edge use the arrows to denote the quantity you wish to add or remove Touch the value displayed area to r...

Страница 91: ...r To adjust the Trailing Edge use the arrows to denote the quantity you wish to add or remove Touch the value displayed area to reset the quantity Make any of the required adjustments selections and p...

Страница 92: ...eys to scroll through the list as needed b Select the location by pressing on it 2 8 2 Removing a Mailbox a Press the button on the main Scan screen b Select which Mailbox you wish to remove NOTE The...

Страница 93: ...Section 4 Scan Mode Monochrome 4 19 c Press Remove 2 8 3 Creating a New Mailbox a Press the Mailbox Button b The Mailbox Setup screen is displayed...

Страница 94: ...o configure and load FTP locations into the KIP printer Scan Mode Administrator Service Functions of the KIP printer Please see your network administrator for access to your FTP and the retrieval of t...

Страница 95: ...sword Password for supplied username on destination workstation server Test SMB Maps a network drive to the destination workstation server Within the SCAN screen press the Mailbox button to create an...

Страница 96: ...als stored on a central authorization server Domain Controller Active Directory Server that will grant connection access to the KIP IPS for shared resources If the KIP IPS is connecting to a workstati...

Страница 97: ...the destination workstation must be accessible by the user as supplied in the Username setting b These permissions should include the ability to write and modify on this shared folder f Username and...

Страница 98: ...multi page documents PDF DWF and TIFF the images are scanned to a temporary location on the IPS and then transferred to the SMB location once the Close File button has been pressed 2 8 4 3 FTP Site T...

Страница 99: ...ord required use the arrow keys at the bottom until Import Settings is shown this will appear grayed out at first touch the button labeled Touch This will import any new FTP settings and will be displ...

Страница 100: ...restore the default settings in Scan Mode Some of the default settings are determined in the Information Help Screen of the UI see Scan Mode Configurations chapter 2 11 Re Scan If the scanned image wa...

Страница 101: ...2 Original Type 5 6 2 3 Original Size 5 7 2 3 1 Automatic Size 5 7 2 3 2 Manual Size 5 7 2 3 3 Hard Drive Space Monitor 5 8 2 3 4 Rotation 5 9 2 4 DPI 5 9 2 5 Format 5 9 2 6 Advanced Settings 5 10 2...

Страница 102: ...y Select the original image type to be scanned 5 DPI Scroll through the image resolution DPI 6 Format Scroll through formats the file will be saved to 7 Advanced Settings Invert mirror and edge adjust...

Страница 103: ...the upper left corner 1 2 2 Select Size Mode Select whether the document is an engineering or architectural size document This will allow the automatic width detection to function Engineering widths...

Страница 104: ...F Color Select a desired file format 1 2 5 Select Mailbox Select the location to where the file will be saved Use the Page Arrows to view other choices currently available NOTE The Mailboxes are prede...

Страница 105: ...e will be displayed on the Operator Panel for your reference 1 2 7 Retrieve the File Depending on the Mailbox you may now access your scan from a PC connected to the LAN This includes a from a FTP sit...

Страница 106: ...Size Mode Engineering or Architectural and the Original Document type 2 2 1 Original Size Mode This button is used to select the Size Mode of Engineering or Architectural This will allow the automati...

Страница 107: ...ple Line Photo 2 3 Original Size This region is used to select the image size of original being scanned 2 3 1 Automatic Size For most scans Automatic should be selected This will allow the KIP 2100 to...

Страница 108: ...tandard Length Custom Length e The cut length will now be displayed in the Manual button In this example 18 width and a custom length of 25 8 2 3 3 Hard Drive Space Monitor Located on the main screen...

Страница 109: ...inals when they are archived Press the Rotation button to select either one of four settings 2 4 DPI Scroll through the DPI button to select the required scan resolution Choices are 200 300 400 or 600...

Страница 110: ...ave the actual image on the reverse side such as older sepia or film documents 2 6 2 Invert Select this button to change a region of white to black and visa versa of a scanned document This is normall...

Страница 111: ...scan or d image can be removed such as a binding strip or a file hanger To adjust the Trailing Edge use the arrows to denote the quantity you wish to add or remove Touch the value displayed area to r...

Страница 112: ...keys to scroll through the list as needed b Select the location by pressing on it 2 7 2 Removing a Mailbox a Press the button on the main Scan screen b Select which Mailbox you wish to remove NOTE The...

Страница 113: ...Section 5 Scan Mode Color 5 13 c Press Remove 2 7 3 Creating a New Mailbox a Press the Mailbox Button b The Mailbox Setup screen is displayed...

Страница 114: ...configure and load FTP locations into the KIP printer Scan Mode Administrator Service Functions of the KIP printer Please see your network administrator for access to your FTP and the retrieval of the...

Страница 115: ...a network drive to the destination workstation server Within the SCAN screen press the Mailbox button to create an SMB connection a Touch the SMB button to display the SMB Mailbox creation dialog b Pr...

Страница 116: ...r that will grant connection access to the KIP IPS for shared resources If the KIP IPS is connecting to a workstation WS01 that is a part of the Acme com domain then the user would enter Acme in the D...

Страница 117: ...he destination workstation must be accessible by the user as supplied in the Username setting b These permissions should include the ability to write and modify on this shared folder f Username and Pa...

Страница 118: ...lti page documents PDF DWF and TIFF the images are scanned to a temporary location on the IPS and then transferred to the SMB location once the Close File button has been pressed 2 7 4 3 FTP Site To l...

Страница 119: ...required use the arrow keys at the bottom until Import Settings is shown this will appear grayed out at first touch the button labeled Touch This will import any new FTP settings and will be displaye...

Страница 120: ...e default settings in Scan Mode Some of the default settings are determined in the Information Help Screen of the UI see Scan Mode Configurations chapter 2 10 Re Scan If the scanned image was not sati...

Страница 121: ...des 6 7 4 0 Configuration 6 8 4 1 Printer Density 6 8 4 2 Power Save Settings 6 9 4 3 Default Mode 6 9 4 4 Master Lead Trail Adjustment 6 10 4 5 Test pattern 6 10 4 6 Options 6 11 4 7 Network 6 11 4 8...

Страница 122: ...ration screen press on the on the bottom right of the KIP printer user interface Some of the configurable settings include a Language b Sleep Timers c Energy Star Mode d Reset Timer for Memory and Def...

Страница 123: ...Displays the contact information for technical support and printer supplies 4 User Guide Enters the Graphical Users Guides 5 Configuration Enters the settings and configurations modes 6 Print This Sc...

Страница 124: ...Meters in all other countries when printer set to metric mode English mode 1 count one square foot Metric Mode 1 count one square meter NOTE If this counter differs from the hard counter on the printe...

Страница 125: ...2 If the 36 wide original was scanned in at a 24 wide manual setting the size will be recorded as 24x24 or 2 square feet 2 1 5 Scan Count Temp This counter can be reset at any time to count the units...

Страница 126: ...t information for KIP printer supplies and service This region should display your local Authorized KIP dealers information If this information is incorrect please contact your KIP dealer NOTE If this...

Страница 127: ...The User guides cover the most basic functions of the system operations including media toner replacement on the KIP printer For comprehensive details please consult this User Manual a Select this fun...

Страница 128: ...6 8 Section 6 Screen 4 0 Configuration There are five pages in the Configuration Page 1 of 5 4 1 Printer Density Sets the printer density for all images including copy and print jobs...

Страница 129: ...locked by default in the Services settings 1 Warm Cold Sleep Timers This timer can be set to put the printer into a warm cold sleep mode after a predetermined period of inactivity 2 Sleep Time This t...

Страница 130: ...Test pattern A variety of test patterns may be printed from the KIP printer operator panel on an on demand basis The following four predefined test patterns are available to assist in pen table selec...

Страница 131: ...From this screen users must enter a username and password before use if required by system administrator NOTE Incorrect codes will prevent your system from functioning Please do not enter or modify th...

Страница 132: ...10English or Metric Units Set the system from English Mode to Metric Mode by pressing the English or Metric button This will effect the entire KIP printer System including Scan Print and Copy Please n...

Страница 133: ...er operators may designate features to be active when the system is powered on to ensure efficient use 1 Set up Copy or Scan Modes in their main menu to the desired features 2 Access the configuration...

Страница 134: ...ration of this feature 4 13 Cut Sheet Enables Disables the cut sheet function which may not be required in certain installation 4 14 Interrupt Allows the Interrupt button to function in Copy Mode a En...

Страница 135: ...and then to Configuration Select the Reset Job Info button An identification sheet will print out and the print queue can now continue printing 4 16 Reboot IPS This button will restart the IPS when th...

Страница 136: ...alibrated to the printer and media type This is a simple closed loop calibration 5 1 Manufacturer For color mode operation copy scan select from the list your third party color printer s manufacturer...

Страница 137: ...edia to be set If displayed select the media type that is loaded and will be copied onto 5 4 Color Printer Destination IP The specified printer will have an IP address assigned to spool data to it Ple...

Страница 138: ...ocks will start to print from the device e After the target is printed and has time to dry completely from inkjet or bubble jet process trim the target with a scissor to 8 5 x 11 size remove any exces...

Страница 139: ...n finished all of the modes turn the KIP 2100 off and back on again 6 0 Other Buttons 6 1 Service This button is used to access service technician functions of the IPS It is password protected to prev...

Страница 140: ...nthly Meter Reports 7 8 3 2 Process for Configuration of Monthly Meter Reports 7 9 3 3 Different Types of Meters 7 9 3 4 Report Schedule 7 9 3 5 Email Address Report 7 9 3 6 IPS Log Data 7 9 3 7 Macro...

Страница 141: ...and accounting data on a daily weekly or monthly time cycle Reports include detailed authorization accounting and meter information Reports can be opened into Notepad or exported as an ASCII file form...

Страница 142: ...counting fields entered into the Request software installed on the Web server host pc being utilized by KIP PrintNet will also be transferred to the to users accessing the PrintNet via the intranet or...

Страница 143: ...ily weekly monthly or custom time frame The Productivity reports can be accessed by doing the following a On the Request main screen select Manage from the menu bar and then select Print Reports b The...

Страница 144: ...q Feet The information for Requester and Job Number shown below are gathered from all KIP printing applications The user can select the Start Date and the End Date of the report along with where to pr...

Страница 145: ...at and Sq Feet The information for Requester shown below is gathered from all KIP printing applications The user can select the Start Date and the End Date of the report along with what to do with thi...

Страница 146: ...should closely match the actual meter reading on the KIP 5000 printer The user can select the Start Date and the End Date of the report along with what to do with this data This report is calculated o...

Страница 147: ...Users area of PrintNET Important Note If the admin account and password are not part of the accounting data that is configured in KIP Request and pushed to the IPS then the login will not be possible...

Страница 148: ...e 1st 15th or last calendar day of the month and time At this setting 1 report will be automatically generated per month on the scheduled date 3 5 Email Address Support The Monthly Meter Report can be...

Страница 149: ...ample if today is 8 23 at 4 pm the Copy volume will cover from 7 23 at 4 pm up to 8 23 a 4 pm This measurement includes all copying functions performed via the touch screen of the KIP IPS Data reporte...

Страница 150: ...adings and details of copy scan to file and network printing volume The email was sent to a local email account as well as to a cell phone PDA A PDF of the report is automatically included The raw log...

Страница 151: ...address of the KIP printer using a web browser b Login as admin select the icon to enter the Email Settings area c Configure the SMTP email settings in the Email Setting area Important Note The email...

Страница 152: ...ime Date and Time the message was generated by the IPS Event Message generic term for any of the three issues that could occur 1 Printer out of toner 2 Printer paper jam 3 Printer of out media Printer...

Страница 153: ...d by Katsuragawa Electric Co Ltd 21 1 Shimomaruko 4 Chome Ohta ku Tokyo 146 8585 Japan All rights reserved Please note that some articles illustrations and photographs may different from the actual ma...

Отзывы: