Konica Minolta DiMAGE Z2 Скачать руководство пользователя страница 53

53

Number of frames in
bracketing series

Frame counter

When using exposure compensation (p. 41), the bracketing series will be made in relation to the
compensated exposure. Under extreme conditions, one of the bracketed exposures may be inaccu-
rate because it is outside the exposure control range of the camera.

The remaining number of frames in the bracket series is dis-
played on the monitor next to the bracketing indicator. If the
memory is filled or the shutter button is released before the
series has completed, the camera will reset and the entire
bracket must be made again. If the red low-battery indicator
appears, the bracketing drive mode is disabled. The flash can-
not be used with the bracketing drive mode.

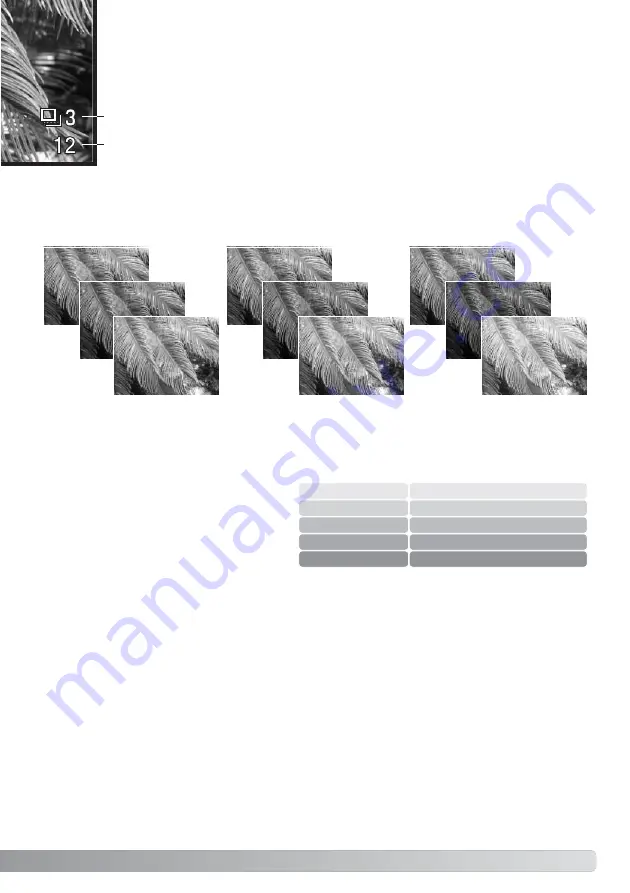
The order of the bracket series is normal exposure, underexposure, and overexposure. The expo-
sure bracket can be made in 0.3, 0.5, or 1.0 Ev increments. The larger the number, the greater the
difference in exposure between the images in the bracketed series.

0.3 Ev
bracket

0.5 Ev
bracket

1.0 Ev
bracket

Normal

Under

Over

What is an Ev? 

Ev stands for exposure value. A change of
one Ev adjusts the exposure calculated by
the camera by a factor of two. 

+2.0 Ev

+1.0 Ev

±0.0 Ev

–1.0 Ev

–2.0 Ev

4X as much light

2X as much light

1/2 as much light

1/4 as much light

Calculated exposure

Содержание DiMAGE Z2

Страница 1: ...INSTRUCTION MANUAL E 9222 2725 11 SY A402 0402...

Страница 2: ...ibuted by Konica Minolta Using accessories or equipment not endorsed by Konica Minolta may result in unsatisfactory per formance or damage to the product and its accessories Before you begin Konica Mi...

Страница 3: ...with your skin or clothing wash the area thoroughly with water Tape over battery contacts to avoid short circuiting during disposal always follow local regulations for battery disposal Use only the sp...

Страница 4: ...mmable products such as alcohol benzine or paint thinner to clean the prod uct The use of inflammable cleaners and solvents may cause an explosion or fire When unplugging the AC adapter do not pull on...

Страница 5: ...r it to cool Do not fire the flash while it is in contact with people or objects The flash unit discharges a large amount of energy which may cause burns Do not apply pressure to the LCD monitor A dam...

Страница 6: ...ries 13 Battery condition indicator 14 Auto power save 14 Connecting the optional AC adapter 15 Changing the memory card 16 Turning on the camera and displays 17 Setting the date and time 18 Setting t...

Страница 7: ...ontinuous advance notes 49 Using the progressive capture modes 50 Progressive capture notes 51 Bracketing 52 What is an Ev 53 Image size and image quality 54 Auto DSP 56 Digital zoom 56 Focus modes 57...

Страница 8: ...84 DPOF setup 84 Date print 85 Index print 85 Viewing images on a television 86 Setup menu 87 Opening the setup menu 87 Navigating the setup menu 88 LCD monitor brightness 90 Auto power save 90 Instan...

Страница 9: ...XP 104 Macintosh 105 Changing the memory card 106 Uninstalling the driver software Windows 107 PictBridge 108 Notes on printing errors 109 Navigating the PictBridge menu 110 Appendix 114 Troubleshooti...

Страница 10: ...s in the back of this manual p 116 Names of parts Shutter release button Lens Self timer lamp p 47 Flash p 26 Strap eyelet p 12 The USB port and AV out terminal are located behind the card slot door T...

Страница 11: ...s lamp Exposure mode dial p 21 29 36 40 Accessory shoe p 43 Controller Zoom lever p 20 Menu button Quick View Delete button p 30 31 Information button p 28 32 Mode switch Main switch DC terminal Flash...

Страница 12: ...sing your thumb and index finger pinch the outside tabs of the lens cap to remove or attach When the camera is not in use always replace the lens cap Pass one of the small loops of the lens cap strap...

Страница 13: ...release the safety catch Lift the door to open 3 This digital camera uses four AA size alkaline or Ni MH batteries Do not use other types of AA bat teries The camera should be off when replacing batte...

Страница 14: ...ower the camera turns off displays and unnecessary functions if an operation is not made within a minute To restore power press any button or key or turn the exposure mode dial to another position The...

Страница 15: ...adapter into the DC termi nal 1 Insert the AC adapter plug into an electrical outlet Always turn off the camera before changing between power supplies The External High power Battery Pack Kit EBP 100...

Страница 16: ...ard If the card does not fit check that it is oriented correctly 3 To eject a memory card press the card into the slot and release The card can then be pulled out Take care when removing the card as i...

Страница 17: ...monitor is viewed directly Playback mode Monitor display images can be played back and edited The monitor is viewed directly To use the viewfinder in the playback mode press and hold the flash mode bu...

Страница 18: ...recording If the clock and calendar have not been set a message is displayed for a few seconds each time the camera is turned on This message is also displayed if the clock and calen dar reset when th...

Страница 19: ...he controller 2 move the cursor and change set tings on the menu The central button of the controller selects menu options and sets adjustments Digital Use the right key of the controller to highlight...

Страница 20: ...ion of this camera Thoroughly familiarize yourself with the operations in this section before moving on to the other sections in the manual Using the zoom lens The zoom lever controls the lens 1 Slidi...

Страница 21: ...lash mode focus area or drive mode are reset when the exposure mode dial is turned to another position Multi segment fixed Camera sensitivity ISO Flash mode Focus area Focus control Drive mode Auto fi...

Страница 22: ...e An AF sensor a is displayed to indicate the subject Automatic Digital Subject Selection will choose the appropriate exposure mode see the facing page The focus signal b on the monitor will confirm f...

Страница 23: ...splay will indi cate Automatic Digital Subject Selection is active Place the subject in the focus frames the procedure is the same as the basic record ing operation described on page 22 Press the shut...

Страница 24: ...ure Focus lock Focus range 0 57m inf 1 9ft inf All distances are measured from the CCD See page 35 for the marco focus range Approximate location of CCD plane Wide angle position 2 07m inf 6 8ft inf T...

Страница 25: ...frame The subject is near a very bright object or area When using the sports action digital subject program the camera continually focuses when the shutter release button is pressed partway down the...

Страница 26: ...se in low light conditions when taking photographs of people or animals The pre flashes contract the pupils of the subject s eyes Fill flash the flash fires with each exposure regard less of the amoun...

Страница 27: ...ash range Distance is given from the CCD plane Because of the optical system the flash range is not the same at the lens wide angle position as it is at the telephoto position 0 23 6 1m 0 75 20ft Appr...

Страница 28: ...urn the mode switch to the appropriate position Press and hold the information i button to open the LCD brightness screen Use the left right keys of the controller to adjust the brightness the monitor...

Страница 29: ...jects such as with a portrait of a person When using the flash ask your subjects not to move after the burst the shutter will still be open for the background exposure Landscape optimized to produce s...

Страница 30: ...BASIC PLAYBACK BASIC PLAYBACK Single frame playback and histogram display Date of capture Frame number total number of images Lock indicator p 75 DPOF indicator p 78 Image size p 54 Image quality p 5...

Страница 31: ...vertical image press the down key to cycle through the three positions 90 counterclock wise 90 clockwise and horizontal To return to the recording mode from Quick View press the menu button or shutte...

Страница 32: ...of the screen The highlighted image can be delet ed using the QV delete button p 31 or a movie clip can be played by pressing the central button of the controller When the display button is pressed ag...

Страница 33: ...rged playback mode press the menu button The information i button switches between showing the full display and the image only With the image to be magnified displayed slide the zoom lever to the righ...

Страница 34: ...zoom display p 56 19 Drive mode indicator p 46 17 Date imprinting indicator p 93 18 Frame counter p 55 25 Color mode indicator p 63 23 Image size display p 54 22 Image quality indicator p 54 2 Mode i...

Страница 35: ...de The modes cycle among standard macro Super Macro and off The following chart lists the Super Macro and standard macro ranges All distances are measured from the CCD 10 107cm 4 3 42 1 in Super Macro...

Страница 36: ...re values of the exposure are displayed on the monitor when the shutter release button is pressed partway down If shutter speed and aperture displays turn red the scene is beyond the exposure control...

Страница 37: ...y is selected the shutter speed on the monitor turns blue and a double arrow indicator appears next to it The shutter speed can be set between 1 1000 and 15 seconds If the shutter speed is beyond the...

Страница 38: ...rexposed or overex posed If the monitor is black increase the exposure until the image is visible decrease the expo sure if the monitor is white When the shutter release button is pressed partway down...

Страница 39: ...e made The use of a tripod is recommended The camera s exposure system cannot be used to calculate time exposures A separate light meter can be used to determine the exposure 39 Time exposures Use the...

Страница 40: ...se button all the way down and release to start recording Recording indicator Remaining time Movie recording The camera continues to focus during recording The camera will continue to record until the...

Страница 41: ...n or the camera is turned off In P A and S exposure modes exposure compensation remains in effect until reset Exposure compensation When adjusting the exposure the amount of compensation is shown in E...

Страница 42: ...it will remain active even after the pic ture has been taken Press and hold the central button of the con troller to return to the standard focus frames Press and hold the central button of the contr...

Страница 43: ...00HS D Maxxum Program Flash 5600HS D System Accessories When using an accessory flash the camera uses pre flash TTL metering to determine expo sure The flash modes available when using an optional fla...

Страница 44: ...l through the menu options Highlight the option whose setting needs to be changed With the menu option highlighted press the right controller key the settings are dis played with the current setting h...

Страница 45: ...alColor Normal Normal Sharpness Auto recording menu Digital Subject Program menu Movie menu P A S and M exposure mode menu Focus mode 57 Frame rate 66 Full time AF 60 Image size 54 Image size movie 66...

Страница 46: ...e each time the shutter release button is pressed p 22 Continuous advance to take up to five images images when the shutter release button is pressed and held Self timer to delay the release of the sh...

Страница 47: ...3 will start to blink and is accompanied by an audio signal A few seconds before the exposure the self timer lamp will blink rapidly The lamp will glow steadily just before the shutter fires To stop t...

Страница 48: ...eration with out changing the drive mode Drive mode Image size Key func Self timer Single Progressive Bracketing Quality Continuous Compose the picture as described in the basic recording operation se...

Страница 49: ...action digital subject pro gram with autofocus or the continuous AF focus mode with the P A S or M exposure modes focus is fixed with the first frame of the series When the red low battery warning is...

Страница 50: ...ntroller to select the progressive mode Press the central button of the controller to set the drive mode Pressing the menu button cancels the operation without changing the drive mode Compose the pict...

Страница 51: ...with the P A S or M exposure modes focus is fixed when the shutter release button is pressed all the way down During recording the live image can be seen When a series is captured a thumbnail of each...

Страница 52: ...bracket ing increment Press the left right keys of the controller to select the brack eting increment Press the central button of the controller to set the value To change the increment select the bra...

Страница 53: ...e entire bracket must be made again If the red low battery indicator appears the bracketing drive mode is disabled The flash can not be used with the bracketing drive mode The order of the bracket ser...

Страница 54: ...mode will produce the highest quality image and the largest image files Image size and quality must be set before the picture is taken Changes are displayed on the LCD monitor Changes made on one men...

Страница 55: ...icates the approximate number of images that can be stored on the memory card at the camera s image quality and size settings If the settings are changed the frame counter adjusts accordingly Because...

Страница 56: ...telephoto position of the optical zoom by up to 4X in 0 1X increments The transition between the optical zoom and digital zoom is seamless When the digital zoom is active the image magnification is d...

Страница 57: ...tter release button is held partway down In movie recording focus is locked when the shut ter release button is partway down but it is continually adjusted during recording Focus modes When using the...

Страница 58: ...ing conditions When the built in flash is used the white balance is set for the color temperature of the flash Fluorescent for fluorescent lighting office ceiling lights Tungsten for incandescent ligh...

Страница 59: ...age area with a white object the object does not need to be in focus Press the central button of the con troller to make the calibration or press the menu button to cancel the routine The live view sh...

Страница 60: ...de button see page 65 on the custom key function For more on flash modes refer to page 26 Focus mode Full time AF Flash mode Metering mode Single AF On Autoflash 0 MultiSegment Flash comp Flash compen...

Страница 61: ...ntire image area with emphasis given the central region Spot metering uses a small area within the image to calcu late the exposure A small circle appears in the middle of the live image indicating th...

Страница 62: ...m 0 75 28ft 1 27 3 3m 4 2 10 8ft 1 27 4 6m 4 2 15 1ft 1 27 6 5m 4 2 21 3ft Flash range wide angle Sensitivity Digital zoom Color mode Contrast Auto Off NaturalColor Normal Normal Sharpness The auto se...

Страница 63: ...This mode uses no monitor indicator when active Vivid Color increases the saturation of the colors in the scene Black White produces neutral monochrome images The sepia mode creates warm tone monochr...

Страница 64: ...section 3 of the P A S and M menus p 44 Any changes made are applied to the live image but may be diffi cult to see However when viewed with a computer the changes will be evident If any level except...

Страница 65: ...hanges the function set in the menu Press the central button of the controller or press the shut ter release button partway down to apply the setting select enter When selecting the continuous advance...

Страница 66: ...an be recorded with the installed memory card The total time that can be stored on a memory card is determined by the size of the card and the recording rate The actual file size is determined by the...

Страница 67: ...corded Standard produces a normal movie clip Night Movie uses high camera sensitivity to record under low light levels camera sensitivity will automatically increase in low light Image quality can be...

Страница 68: ...ocus and the furthest object in focus The larger the aperture value the greater the depth of field The smaller the aperture value the shallower the depth of field The required shutter speed for the ex...

Страница 69: ...terfall The use of a tripod is recommended with slow shutter speeds The change in aperture and shutter speed is not apparent in the live image Unlike film cameras test photographs can be taken and imm...

Страница 70: ...display button to view the movie with or without the guidance bar During playback the up down keys adjust the volume and the left right keys rewind and fast forward the recording The basic functions i...

Страница 71: ...at the point to capture the frame When the movie is paused the left right keys can be used to jog the clip to display the correct frame Play Rew Fwd Press the up key of the controller to capture the f...

Страница 72: ...settings are dis played with the current setting highlighted If Enter is displayed press the center of the controller to continue Use the up down keys to highlight the new setting Once a setting has...

Страница 73: ...y back images automatically p 82 To select the images for the Slide Show p 82 To specify how long each image is played back p 82 To repeat the Slide Show presentation automatically p 82 To select imag...

Страница 74: ...e screen and any operation made The garbage can indicates the image is selected for deletion The key indicates the image is locked or selected to be locked The check indicates the image is selected fo...

Страница 75: ...rames To delete multiple files When this setting is chosen the frame selection screen is displayed Use the left right keys of the controller to highlight the first file to be delet ed Pressing the up...

Страница 76: ...No cancels the formatting operation A screen appears to indicate the card has been format ted 76 ADVANCED PLAYBACK Format When a memory card is formatted all data on the card is erased A memory card...

Страница 77: ...Marked frames To lock or unlock multiple files When this setting is chosen the frame selection screen is displayed Use the left right keys of the controller to highlight the file to be locked Pressing...

Страница 78: ...ve step in the editing pro cedure The up down key selects functions Find 1st frame of cut function find Find last frame of cut function find Use the left right keys of the controller to display the fi...

Страница 79: ...d points To cancel the edit operation press the menu button Save edit function save Press the center controller button to save the edit a confirma tion screen is displayed Select Yes to continue Save...

Страница 80: ...ed in the playback mode This frame Marked frames To copy single or multiple files When selected the frame selection screen will appear highlight the file to be copied with the yellow border and then p...

Страница 81: ...rocedure E mail Copy The copy unsuccessful message appears when one or all of the images could not be copied Check the memory card to see which files were copied and then repeat the procedure for the...

Страница 82: ...ion When this setting is chosen the frame selection screen is dis played Use the left right keys of the controller to highlight the image to be included in the presentation Pressing the up key will ma...

Страница 83: ...tation The presentation can be viewed without image information Before opening the play back menu press the information i button to turn off the information display Camera Notes The controller can be...

Страница 84: ...age This frame All frames Marked frames To chose a group of images to be printed or when the number of copies of each image varies When selected the frame selection screen appears Use the left right k...

Страница 85: ...print of all the images on the card select Yes in the index print option in section 3 of the playback menu To can cel an index print simply change the setting to No If an index print order is created...

Страница 86: ...mera s AV out terminal The triangular mark on the plug should face the back of the camera 3 Plug the other end of the AV cable into the video and audio input terminals on the television The yellow plu...

Страница 87: ...ive m LCDbrightness Power save Inst Playback Lens acc Language 1 min Off None English Setup menu The setup menu is opened from the other menus It can be accessed from any of the recording or playback...

Страница 88: ...l through the menu options Highlight the option whose setting needs to be changed With the menu option highlighted press the right controller key the settings are dis played with the current setting h...

Страница 89: ...91 To activate file number memory p 91 To select the folder name format p 92 To set the camera s clock and calendar p 93 To reset camera functions p 94 To change or turn off audio signals p 95 To chan...

Страница 90: ...to a computer the auto power save period is fixed at ten minutes Auto power save is set in section 1 of the setup menu p 88 An image can be displayed on the monitor after it is captured When used with...

Страница 91: ...al zoom and Super Macro are disabled Language The language used in the menus can be changed in section 1 of the setup menu If file number memory is selected when a new folder is created or a new memor...

Страница 92: ...with the day s date is created All images recorded that day are placed in that folder Images recorded on a different day are placed in a new folder with the corresponding date If the file number memo...

Страница 93: ...e date of recording can be printed directly on the image The imprinting function must be activated in section 2 of the setup menu p 88 before the image is taken Once activated the date will con tinue...

Страница 94: ...set default This function affects all modes When selected a confirmation screen appears choosing Yes resets the following functions and settings No cancels the operation p 22 Focus area Wide frames p...

Страница 95: ...6 Shutter FX 1 p 85 Index print No p 80 Image size E mail copy 640 X 480 p 85 Date print Off p 93 Noise reduction On Date imprinting Off p 92 p 96 Focus signals 1 p 96 Transfer mode Data storage Audio...

Страница 96: ...e pinnacle of the development of the Leitz Minolta CL Volume The volume of the audio signals and shutter FX can be increased or decreased in section 3 of the setup menu p 88 This affects the camera s...

Страница 97: ...camera and have installed the Windows 98 driver software must repeat the installation procedure The updated version of the driver software included on the supplied DiMAGE Viewer CD ROM is required for...

Страница 98: ...ra is connected to a computer see page 106 3 Slide open the card chamber door Attach the smaller plug of the USB cable to the camera The triangular mark on the plug should face the back of the camera...

Страница 99: ...em requests the Windows 98 CD ROM insert it into the CD ROM drive and follow the accompanying instructions on the screen No special driver software is required for other Windows or Macintosh operating...

Страница 100: ...CD ROM drive at Win98 USB When the location is shown in the window click Next Manual Installation To install the Windows 98 driver manually follow the instruc tions in the connecting the camera to a...

Страница 101: ...ver in the system One of three drivers may be located MNLVENUM inf USBPDR inf or USBSTRG inf The last window confirms the driver has been installed Click Finish to close the add new hardware wizard Re...

Страница 102: ...Misc 100KM004 10140801 102KM_CP 103KM_EM From left to right standard folder date folder copy folder e mail copy folder Copy images p 80 are placed in a folder with a name ending in CP E mail Copy imag...

Страница 103: ...ting the original data the Exif tag information is erased Some Exif compatible applications rewrite the Exif data preventing the DiMAGE Viewer from reading it When using software other than the DiMAGE...

Страница 104: ...dition When more than one external device are connected to the computer repeat the procedure above except right click on the unplug or eject hardware icon This will open the unplug or eject hardware w...

Страница 105: ...evice icon and drop it into the trash Turn the camera off and then disconnect the USB cable A confirmation screen will appear to indi cate the devices to be stopped Clicking OK will stop the device A...

Страница 106: ...USB connection using the unplug or eject hardware routine p 104 2 Turn off the camera 3 Change the memory card 4 Turn on the camera to remake the USB connection 1 Stop the USB connection by dragging...

Страница 107: ...located in the universal serial bus controller or other devices location of the device manager Click on the locations to display the files The driver should be indicated with the camera name Under cer...

Страница 108: ...enu navigation section on page 110 The information i button switches between the single frame and index playback formats on the PictBridge screen Enlarged playback activated with the zoom lever can be...

Страница 109: ...y is exhausted before the print run is complete printing is canceled Use a fully charged battery or the optional AC adapter If a minor problem occurs during printing such as the paper runs out follow...

Страница 110: ...settings are dis played with the current setting highlighted If Start is displayed press the center of the controller to continue Use the up down keys to highlight the new setting Once a setting has b...

Страница 111: ...on screen is displayed before the print routine starts The options that can be changed vary with the printer Batch print in section 1 selects all still images on the memory card for printing Two optio...

Страница 112: ...th the printer The fine quality can be specified with the camera Data print Data can be printed with the image The printer setup option uses the options set with the printer The date of capture and th...

Страница 113: ...ayed an index print is counted as one Press the central button of the controller to begin printing or press the menu button to return to the PictBridge menu Once printing begins the operation can be c...

Страница 114: ...he camera and a live electrical outlet p 15 The section covers minor problems with basic camera operation For major problems or damage or if a problem continues to reoccur frequently contact a Konica...

Страница 115: ...bject or change the camera sensitivity to a higher setting p 62 Focus signal is red While using flash the pic tures are too dark The camera temperature rises with extended periods of use Care should b...

Страница 116: ...hemicals For long periods of disuse store the camera in an airtight container with a silica gel drying agent Remove the batteries and memory card from the camera when not in use for extended periods D...

Страница 117: ...coat Batteries can recover their power when they warm up If batteries have been exhausted when used in the camera do not reload them even if their charge seems to recover over time These batteries wil...

Страница 118: ...necessary The response time is longer with MultiMediaCards compared with SD Memory Cards This is not a defect but rather due to the specifications of the cards When using large capacity cards some op...

Страница 119: ...or duplication of such material may be contrary to copyright laws Taking pictures or images of performances exhibitions etc is prohibited without approval and can infringe on copyright Images protecte...

Страница 120: ...uirements Pentium III 450 processor or equivalent Pentium III 700 recommended Windows 98 Me 2000 or XP 32MB of RAM 128MB recommended 16 bit or higher color display at 800 x 600 DirectX 8 1 or above Ap...

Страница 121: ...in accordance with the instructions may cause harmful interference to radio communications However there is no guarantee that interference will not occur in a particular installation If this equip me...

Страница 122: ...Recording media SD Memory cards and MultiMediaCards File formats JPEG Motion JPEG mov DCF 2 0 and DPOF compliant Printing output control Exif print PRINT Image Matching II PictBridge Menu languages J...

Страница 123: ...utions to your problems You are in good hands www konicaminoltaphotoworld com Curious After free registration into Konica Minolta Photo World the whole world of the Konica Minolta photography is open...

Страница 124: ...ltaphotoworld com Become a member of the Konica Minolta Photo World today It is free for registered customers of Konica Minolta Werden Sie noch heute Mitglied der Konica Minolta Photo World Die Mitgli...

Отзывы: