background image

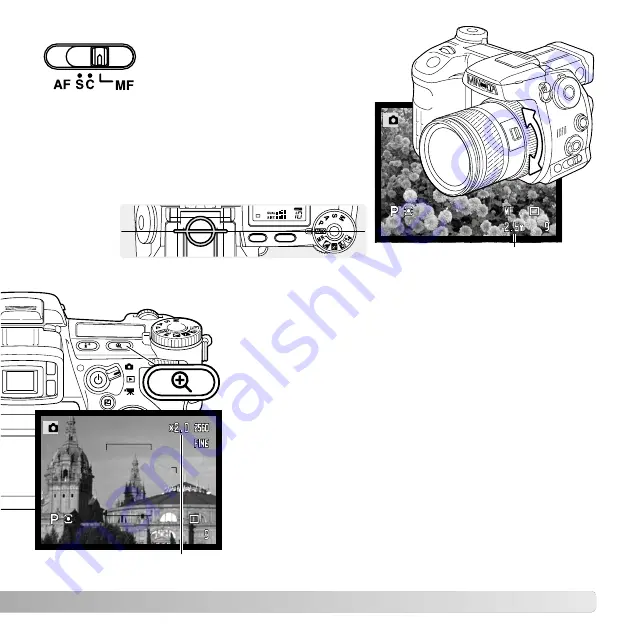
DIGITAL ZOOM

The digital zoom doubles the lens magnification. The
digital zoom cannot be used with RAW image quality or in
movie recording.

Press the magnification button on the back of the camera.
The effect is immediate and X2.0 is displayed in top right
corner of the live image. Pressing the magnification button
a second time cancels the digital zoom.

When an image is taken with the digital zoom, the final
image size depends on the image-size setting on the
camera. 2560 X 1920, 2080 X 1560, and 1600 X 1200
size images are resized to 1280 X 960. The pixel
dimension of 640 X 480 size images do not change.

Magnification display

47

Manual focus

- the MF indicator is

displayed in the lower right corner of the
monitors to indicate the focus mode.

Approximate location of the CCD plane

Use the focusing ring at the rear of the lens barrel to
focus. Always use the monitor image to confirm
focus. The approximate object distance from the
CCD is displayed near the frame counter. The Flex
Digital Magnifier (p. 105) can be used to enlarge the
live image to judge sharpness.

Object distance

Содержание Dimage A1

Страница 1: ...INSTRUCTION MANUAL...

Страница 2: ...mode is set in section 3 of the recording menu p 80 The live image on the monitors will reflect the selected color mode For more on the color mode see page 102 Natural Color and Adobe RGB reproduces t...

Страница 3: ...Corporation Microdrive is a trademark of the International Business Machines Corporation QuickTime is a trademark used under license Adobe is a registered trademark of Adobe Systems Incorporated All...

Страница 4: ...leak Do not store the battery near or in metallic products Do not use the battery with any other products Only use the specified charger An inappropriate charger may cause damage or injury through fi...

Страница 5: ...in injury The continued use of a damaged product or part may cause injuries or fire Keep the battery memory card or small parts that could be swallowed away from infants Contact a doctor immediately i...

Страница 6: ...y heat or place heavy objects on the AC adapter or charg er cord A damaged cord may cause damage or injury through fire or electric shock If these products emits a strange odor heat or smoke discontin...

Страница 7: ...monitor A damaged monitor may cause injury and the liquid from the monitor may cause inflammation If liquid from the monitor makes contact with skin wash the area with fresh water If liquid from the m...

Страница 8: ...camera 28 Handling the camera 28 Adjusting the viewfinder and monitor 29 Diopter adjustment 29 Setting the date and time 30 Basic recording 32 Setting the camera to record images automatically 32 EVF...

Страница 9: ...ately 57 Digital Subject Programs 58 Exposure and flash compensation 59 Using the function dial 60 Drive modes 61 Bracketing 62 Standard and high speed continuous advance 64 Interval 66 Self timer 68...

Страница 10: ...rinting 98 Electronic keyboard 99 Instant playback 100 Voice memo 101 Color mode 102 About Adobe RGB 103 Noise reduction 103 Monitor amplification 104 Magnification button 105 Flex Digital Magnifier 1...

Страница 11: ...g the setup menu 129 Navigating the setup menu 130 LCD brightness 132 Shortcut help 132 Transfer mode 134 EVF auto switch 135 Video output 135 Language 135 Custom setup 136 File number memory 136 Fold...

Страница 12: ...ond edition 154 Windows Me 2000 Professional and XP 154 Macintosh 155 Changing the memory card data transfer mode 156 Removing the driver software Windows 157 Troubleshooting 158 When using filters 16...

Страница 13: ...ill not occur in a particular installation If this equipment does cause harmful interference to radio or television reception which can be determined by turning the equipment off and on the user is en...

Страница 14: ...ring p 46 Focal length index Zooming ring Lens Card slot door p 26 Self timer lamp p 68 Built in flash p 36 Strap eyelet p 20 Microphone NAMES OF PARTS The focal length scale on the zooming ring is gi...

Страница 15: ...e mode p 38 112 Manual exposure p 56 Display information button p 45 Shutter priority p 55 Aperture priority p 54 Program exposure p 51 Auto recording p 52 Memory recall p 73 Portrait subject program...

Страница 16: ...pod socket Memory set p 72 Metering modes p 69 Drive modes p 61 White balance p 70 Camera sensitivity p 74 Function dial p 60 Digital Effects Controller p 77 Flash sync terminal p 76 Accessory shoe Sp...

Страница 17: ...for clarity The single frame advance and continuous advance indicators are displayed in the same area of the data panel The frame counter cannot exceed 999 When the number of recordable images exceeds...

Страница 18: ...Shutter speed display 23 Manual focus indicator p 46 18 Macro mode indicator p 49 22 Drive mode indicator p 61 19 Focus signal p 35 21 Frame counter p 83 27 Digital zoom display p 47 26 Image size di...

Страница 19: ...mpensation p 59 14 Folder name p 137 13 Folder number image file number Histogram 3 Date of capture The dark area of the histogram shows the luminance distribution of the recorded image from black lef...

Страница 20: ...ies ATTACHING THE CAMERA STRAP REMOVING THE LENS CAP Using your thumb and index finger pinch the inside or outside tabs of the lens cap to remove When the camera is not in use always replace the lens...

Страница 21: ...e With one of the large petals to the top slide the hood onto the end of the lens Turn it 90 clockwise until it it clicks into place The lens hood can be attached or removed with the lens cap on the c...

Страница 22: ...on the bottom of the battery with the tabs on the charger unit Slide the battery into the unit Plug the power cord into the back of the charger unit 1 Plug the other end of the cord into a live house...

Страница 23: ...Push the battery into the chamber until the latch clicks into place This digital camera uses one NP 400 lithium ion battery Before using the battery read the safety warnings on pages 4 of this manual...

Страница 24: ...n the display until the batteries are changed AUTO POWER SAVE To conserve battery power the camera will turn off the monitors and unnecessary functions if an operation is not made within three minutes...

Страница 25: ...y Pack Kit EBP 100 is a portable power source and significantly extends the operating time of the camera The kit contains a high power lithium ion battery holder and charger The battery holder and cha...

Страница 26: ...card care and handling see page 163 Open the card slot door in the direction indicated Always turn off the camera and confirm the access lamp is not lit before inserting or removing a memory card oth...

Страница 27: ...slot door 4 A memory card used in another camera may have to be formatted before being used If the unable to use card message appears the card should be formatted with the camera A memory card can be...

Страница 28: ...old the camera steadily HANDLING THE CAMERA TURNING ON THE CAMERA Access lamp Press the main switch to turn on the camera The access lamp glows briefly and an audio signal sounds to indicate the power...

Страница 29: ...iewfinder can be tilted between 0 and 90 Simply grip the finder between your fingers and move it to the position desired DIOPTER ADJUSTMENT ADJUSTING THE VIEWFINDER AND MONITOR Always store the camera...

Страница 30: ...o change the language see the camera notes on the following page Turn on the camera While holding down the function button 1 press the menu button 2 to open the setup menu The central button of the co...

Страница 31: ...e of the menu Date Time setting screen Use the up and down keys to adjust the item For customers in certain areas the menu language must also be set Highlight the language option in section 1 of the s...

Страница 32: ...ography effortless The Auto exposure mode acts like the program mode except that the many of the recording functions are reset each time it is selected see page 52 for more information Metering mode i...

Страница 33: ...the focus is set an AF sensor will briefly appear in the live image to indicate the point of focus The focus signals p 35 on the monitors will confirm that the image is in focus If the focus signal i...

Страница 34: ...When the focus is set an AF sensor will briefly appear on the live image to indicate the point of focus Without lifting your finger from the shutter release button recompose the subject within the ima...

Страница 35: ...another object at the same distance as your main subject and then the image can be recomposed to take the picture 35 If the AF system cannot focus on a certain subject focus lock can be used with an o...

Страница 36: ...on Wide angle position Telephoto position 0 5m 3 8m 1 6 ft 12 5 ft 0 5m 3 0m 1 6 ft 9 8 ft Flash warning In backlit situations a yellow indicator appears appears to recommend the use of the flash When...

Страница 37: ...e of a tripod is recommended Anti shake is not effective with a tripod mounted camera turn off the Anti shake function to conserve power The Anti shake system minimizes the affect of camera shake a sl...

Страница 38: ...an be recorded 38 BASIC RECORDING MOVIE RECORDING Recording indicator Recording time in seconds Shooting digital video is simple Place the subject in the center of the live image and press the shutter...

Страница 39: ...the image is easier to see in the EVF than on the LCD monitor LCD monitor display the live image will only be displayed on the LCD monitor Located on the back of the camera the display mode switch con...

Страница 40: ...Frame number total number of images Image size p 82 Image quality p 82 Time of capture Sensitivity setting p 74 Degree of exposure compensation p 59 Folder name p 137 Folder number image file number H...

Страница 41: ...ontroller to execute the command on the confirmation screen The camera will return to playback mode DELETING SINGLE IMAGES Use the left right keys to highlight Yes No will cancel the operation Confirm...

Страница 42: ...f recording voice memo indicator the lock and printing status and the frame number of the image are displayed at the bottom of the screen The highlighted image can be deleted using the QV delete butto...

Страница 43: ...ral button of the controller to switch between the zoom and scroll functions The scroll arrows or magnification display will turn blue to indicate the active function Use the four way key to scroll th...

Страница 44: ...ack press the menu button VIEWING MOVIES Press the controller to pause the movie pressing the controller again will resume the playback Play Rwd Vol Fwd Pause Use the left right keys of the controller...

Страница 45: ...e built in or a compatible Minolta flash unit is used The histogram of a recorded image may not show the same distribution as the real time histogram ADVANCED RECORDING This section contains detailed...

Страница 46: ...the controller can be used to move the area anywhere in the live image for off center subjects Press the shutter release button partway down to engage the subject lock the focus signal will confirm fo...

Страница 47: ...ge size setting on the camera 2560 X 1920 2080 X 1560 and 1600 X 1200 size images are resized to 1280 X 960 The pixel dimension of 640 X 480 size images do not change Magnification display 47 Manual f...

Страница 48: ...Flex Focus Point in the live image Press and hold the center button of the controller to activate the Flex Focus Point the wide focus frames are replaced with a central cross Press the shutter releas...

Страница 49: ...stments to image size The macro indicator is displayed in the lower right corner of the monitors Make sure the subject is within the macro focusing range MACRO MODE Wide angle position Telephoto posit...

Отзывы: