background image

16

5

mm+

-2

122mm+-2

36

37

EXIT:MENU                        CHANGE:

DELETE
SLIDE SHOW                     1  SEC
PROTECT                           LOCK

PRINT                                     XO

PLAY

EXIT:MENU                        CHANGE:

DELETE
SLIDE SHOW                     1  SEC
PROTECT                           LOCK

PRINT                                     XO

PLAY

   Printing Out Images without a PC(Preset : X0)


Note

After the above steps have been completed check that the icon (      ) appears 
in the bottom left corner. If it is not shown, please repeat the steps.
The "PRINT" function does not appear on the TFT LCD Monitor if no 
memory card is inserted. 

Step       :To enter the setting mode

Step       :To select and confirm the option

Step       :To select and enter the option

Step       :To exit  from the setting

PLAY

  EXIT:MENU                               SET:

PRINT


XO


PLAY

  EXIT:MENU                               SET:

PRINT


XO


Advanced Functionality Settings

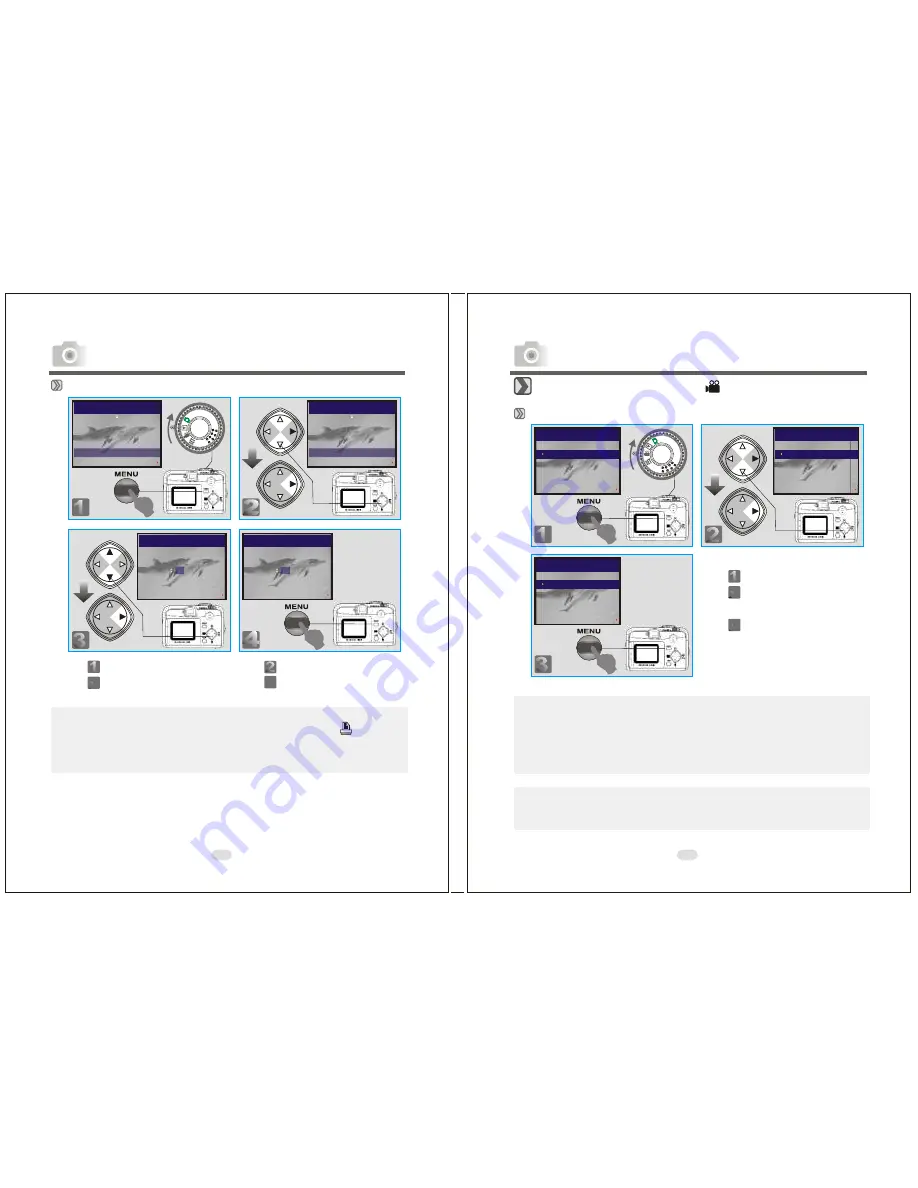
Under Movie Clip Mode(     )(Preset :10 SEC)

   Setting the Recording Time of a Movie Clip

Note

1. Once the Shutter Button is pressed,  the camera will start and end the 
    recording automatically according to the time you select. 
2. If  "Manual"  is selected, press the Shutter Button to start the recording 
    and press the Shutter Button again to stop the recording.

Note

The TFT LCD Monitor will show "Low Light!" as a warning to remind you
that the video that you are going to record is in a low light environment.  
 

Step       :To enter the setting mode

Step       :To select and confirm the 

               option

Step       :To exit from the setting

EXIT:MENU                                SET:

MOVIE CLIP

TIME
    
    20  SEC              
    30  SEC                             
    MANUAL


10  SEC

EXIT:MENU                                SET:

MOVIE CLIP

TIME
    
    20  SEC              
    30  SEC                             
    MANUAL


10  SEC

EXIT:MENU                                SET:

MOVIE CLIP

TIME
    
    20  SEC              
    30  SEC                             
    MANUAL


10  SEC

Advanced Functionality Settings

Содержание Digital Still Camera KD-30M

Страница 1: ...ect usage of this product please read this User s Manual and warranty card carefully and keep them in a safe place for future reference Before accepting the warranty card please make sure that the dat...

Страница 2: ...Explorer 61 Under Macintosh Operating System Mac 9 X or later 62 Downloading Images from Removable Disk 62 Downloading Images through Ulead Photo Explorer 62 Appendix 63 65 Error Message Table 63 Spe...

Страница 3: ...egistered trademarks of Microsoft Corporation in the U S and other countries Apple Macintosh Mac OS QuickTime and Power PC are trademarks or registered trademarks of Apple Computer in the U S and othe...

Страница 4: ...dings etc Do not use the camera on unstable ground Serious injury and even death may occur as a result especially when falling from high places Important Safety Precautions 6 7 Warning Do not directly...

Страница 5: ...well A location exposed to lampblack steam high humidity vdust or vibration If dust or liquid enters the camera or if the internal parts are damaged by strong vibration overheating fire or electrical...

Страница 6: ...Cable Wrist Strap SENS D O C R C LE 9 N 2 S 1 f m 5 1m Quick Start Guide SENS D O C R C LE 9 N 2 S 1 f m 5 1m Overall Introduction External View Mode Dial Shutter Button Tripod Socket Battery Memory C...

Страница 7: ...ight Direction Button Icon Display Memory Card Exposure Digital Zoom Focus Range Macro Date Battery Status Battery full Battery half drained Battery drained Image Size 2048x1536 1600x1200 1280x960 256...

Страница 8: ...witch onthe camera Repeat the actionabove to switchoff the camera 1 Check ifthe camera isswitched off 2 Slide theBattery MemoryCard Cover outto open it 3 Load 2x AAbatteries into thebattery chamber fo...

Страница 9: ...se batteries as they cannot supply sufficient power to support the camera s operation o 5 Batteries may not work normally under 0 C 6 It s normal that the temperature of the camera body rises after be...

Страница 10: ...6 MB of memory installed but if you would like to use additional memory the following cards are compatible SD Memory Card About the SD Memory Card Caution SD Memory Cards are manufactured using precis...

Страница 11: ...r Fill in Flash to ensure that there is sufficient light Getting Started 20 21 Getting Started Important In the event of malfunction or damage it is possible that data may be lost Konica can not accep...

Страница 12: ...cro 0 2m Normal 0 8m infinity The flash fires automaticallyas required by the shooting mode If the subjects eyeswill appear in thepicture using this modecan effectively minimize thelikelihood of the r...

Страница 13: ...canbe stored in thebuilt in flash memoryor the memorycard Step To enter thesetting mode Step To select andconfirm the option EXIT MENU CHANGE STILL IMAGE 1 2 IMAGESIZE QUALITY VOICEMEMO 10SEC EXPOSUR...

Страница 14: ...EMEMO 10SEC VOICEMEMO 10SEC Step To enter thesetting mode Step To select andconfirm the option STILL IMAGE 1 2 STILL IMAGE 1 2 Step To select andenter the option Step To exit from the setting EXIT MEN...

Страница 15: ...ting White Balance Preset Auto Five White BalanceModes can beselected as follows It is recommendedthat beginners leavethe White Balancesetting on AUTOmode Auto Adjusting the whitebalance automatically...

Страница 16: ...U 100 0002 EXIT MENU Advanced Functionality Settings Displaying Information aboutan Image Note Press the Up andDown Direction Button tosearch for themovie clip you recordedand press theRight Direction...

Страница 17: ...Insert an SDCard before beginning Follow the abovesteps selecting FORMAT in step3 YES in step 4 EXIT MENU CHANGE DELETE SLIDESHOW 1SEC PROTECT LOCK PRINT XO PLAY EXIT MENU CHANGE DELETE SLIDESHOW 1SEC...

Страница 18: ...option Step To exit from the setting Advanced Functionality Settings Setting Image Protection EXIT MENU CHANGE DELETE SLIDESHOW 1 SEC PRINT XO PROTECT LOCK PLAY EXIT MENU CHANGE DELETE SLIDESHOW 1 SEC...

Страница 19: ...dvanced Functionality Settings Under Movie Clip Mode Preset 10 SEC Setting the Recording Time of a Movie Clip Note 1 Once theShutter Button ispressed the camerawill start andend the recording automati...

Страница 20: ...ON DATE STAMP ON DATE TYPE YMD POWER OFF 2 MIN CHANGE Advanced Functionality Settings Advanced Functionality Settings Setting Date Type Setting Date Stamp Preset On Step To enter the setting mode Ste...

Страница 21: ...GE ENGLISH RESET QUICKVIEW ON Advanced Functionality Settings Default Setting Setting Language Step To enter the setting mode Step To select and enter the option Step To select and confirm the option...

Страница 22: ...keyin CD ROM Drive Auto Run exe where CD ROM Driveis the letterof your CD ROM drive e g D AutoRun exe Clickthe OK Button Step A welcomewindow appears Click Next tothe next step Step The computer star...

Страница 23: ...tX8 1if necessary Note If the computerhas DirectX 8 0 orlater already the computer willskip steps 3 and4 above andgo directly tothe following window Please complete thedriver installation byclicking O...

Страница 24: ...ase go to page 51 for installation of Ulead Photo Explorer or go to page 62 to download the stored images onto the PC PC Connection Under Windows Operating System Windows 98 98SE 2000 ME XP Step Inser...

Страница 25: ...r Step Please enter yourname and your company s name clicking Next Step Click Next to go to next step Step Set up the default TV system Please select the country you are in Step Select the file associ...

Страница 26: ...n and restartthe computer PC Connection Under Macintosh Operating System Mac 9 X or later Step Turn onthe computer Step Insert the CDinto the CD ROM Drive The computerwill create an iconnamed Driver C...

Страница 27: ...be Microsystems Ulead logo are trademarks of Ulead any registered and trademarks mentioned in this manual are for purposes only and remain the exclusive property respective owners Technicalsupports Re...

Страница 28: ...drives and foldersin your computerat the lefthand side anddisplays the filesin a selected folderat the right What s special aboutPhoto Explorer s Browseris that multimedia filescan be shownas visual t...

Страница 29: ...Show Pane Export PC Connection 56 57 Using the Ulead Photo Explorer Browser Area Icon Function Describe Open viewer Open new viewer Back Forward Rotate left Rotate right Delete Digit al ca mera wizar...

Страница 30: ...ing onto your desired image editor Rotate flip and edit images and then save the changes Create wallpapers and screen savers using your images A standaloneimage viewer the Instant Viewer also comes wi...

Страница 31: ...hecamera to thePC with USB cable underany working mode Please make surethe USB cableis well connected tothe PC andcamera 4 When theUSB cable isconnected to the PC itwill create anew hard disk named Re...

Страница 32: ...ICON The environment is too darkin Flash Off or Night Scene mode Set the flash mode toAuto Flash or Fill in Flash LENS COVER The lens cover is closed Please open the lens cover before taking pictures...

Страница 33: ...nge Type Speed Control Compensation ISO Equivalent Modes Range Recharging Still Image Movie Clip Media File Format Image Size Camera Driver Application Image Sensor Lens LCD Display Viewfinder Focusin...

Страница 34: ...s subject to the following two conditions 1 this device may not cause harmful interference and 2 this device must accept any interference received including interference that may cause undesired opera...

Страница 35: ...122mm 2 68 CANADA ONLY Industry Canada s Compliance Statement This Class B digital apparatus complies with Canadian ICES 003 Warranty and After sales Service...

Отзывы: