267
Chapter 7
7 .8
CR stitching cassette exposure
7 .8 .1 Screen structure
z
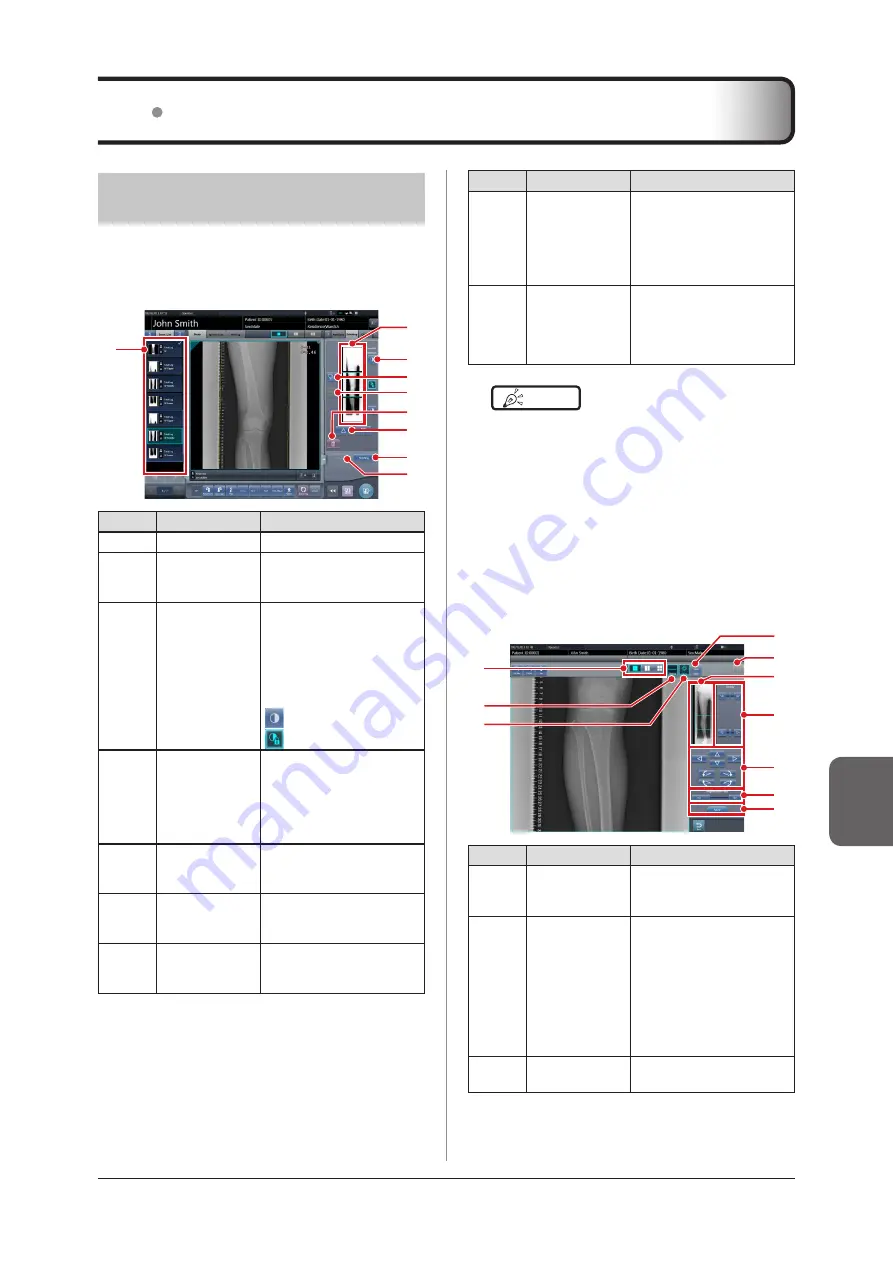
Exposure screen
This is the screen for stitching exposure with CR stitch
-
ing cassette .
(3)
(1)
(2)
(8)
(7)
(9)
(5)
(4)
(6)
Number
Name
Functions
(1)
Order list
List of exposures
(2)
Combined image
display area
The images for combination
are displayed . Focus is dis-
played on selected images .
(3)
Standard grada-
tion button
This button is for select-
ing the image which will be
the image shade standard
among the images displayed
in the combined image
display area . You can only
select 1 image .
: Not selected
: Selected
(4)
Selection button
(batch selection)
Gathers multiple exposure
images associated with the
images selected in the order
list and displays them in the
combined image display
area .
(5)
Selection button
(individual selec-
tion)
Displays the selected images
in the order list in the com-
bined image display area .
(6)
Delete button
Deletes the images selected
in the combined image dis-
play area .
(7)
Combination
sequence switch
button
Moves the position of the
images selected in the com-
bined image display area .
Number
Name
Functions
(8)
Stitching button
Combines the images dis-
played in the combined im-
age display area . Press this
button to display the stitching
combination position adjust-
ment screen .
(9)
Adjust button
Performs re-adjustment
of the combination posi-
tion . This button cannot be
pressed when combined
images are not displayed .
HINT
•••••••••••••••••••••••••••••••••••••
• Adjustments to the combination position of the stitch-
ing exposure images are performed on the viewer
screen (for stitching combination position adjustment) .
For details, refer to "7 .8 .3 Image combination" .
•••••••••••••••••••••••••••••••••••••••••••••••••••••
z
Viewer screen (for stitching combination
position adjustment)
This is the screen for adjusting combined position of
images taken with stitching exposure
with CR stitching
cassette .
(4)
(3)
(2)
(1)
(5)
(9)
(10)
(7)
(8)
(6)
Number
Name
Functions
(1)
Display layout
toggle button
Selects the screen display
format from 1×1, 2×1, and
2×2 display options .
(2)
Overlap button
(Standard/
Inversion)
Switches and displays the
plate overlap sequence when
checking the combination
position . Switches to stan-
dard or reversed every time
it is pressed . The switching
is for display only and does
not affect the overlapping se
-
quence during combination .
(3)
Adjust button
Displays and hides the stitch-
ing adjustment panel .
Содержание CS-7
Страница 1: ...0197 Operation Manual EN 15 DIRECT DIGITIZER Version 1 30 ...
Страница 2: ......
Страница 8: ...8 ...
Страница 9: ...9 Introduction ...
Страница 18: ...18 ...
Страница 30: ...30 ...
Страница 31: ...31 Chapter 2 Product Overview This chapter describes the overview of this device ...
Страница 34: ...34 ...
Страница 74: ...74 ...
Страница 75: ...75 Chapter 4 General Operations This chapter describes general operation methods of this device ...
Страница 84: ...84 ...
Страница 120: ...120 ...
Страница 121: ...121 Chapter 6 Functions of each screen This chapter describes the functions of each screen of this device ...
Страница 197: ...197 Chapter 7 Various Functions This chapter describes the functions of this device ...
Страница 282: ...282 7 9 SIGMA stitching exposure 2 Press Return when image adjustment is completed The exposure screen is displayed ...
Страница 353: ...353 Chapter 8 Displayed Messages This chapter describes the displayed messages and the countermeasures ...
Страница 375: ...375 Chapter 9 Troubleshooting This chapter describes the countermeasures when the problems occur ...
Страница 383: ...383 Chapter 10 Error Codes This chapter describes the error codes and countermeasures ...
Страница 413: ...413 Chapter 11 Maintenance This chapter describes the items that require periodic maintenance ...
Страница 416: ...416 ...
Страница 417: ...417 Chapter 12 Specifications This chapter describes the specifications of this device ...
Страница 422: ...422 ...
Страница 423: ......
Страница 424: ...A47FBA01EN15 2017 01 12 JD ...


