Konica Minolta AccurioLabel 230 Скачать руководство пользователя страница 80

4-12

AccurioLabel 230

Setting media

4

4.2

4.2.4

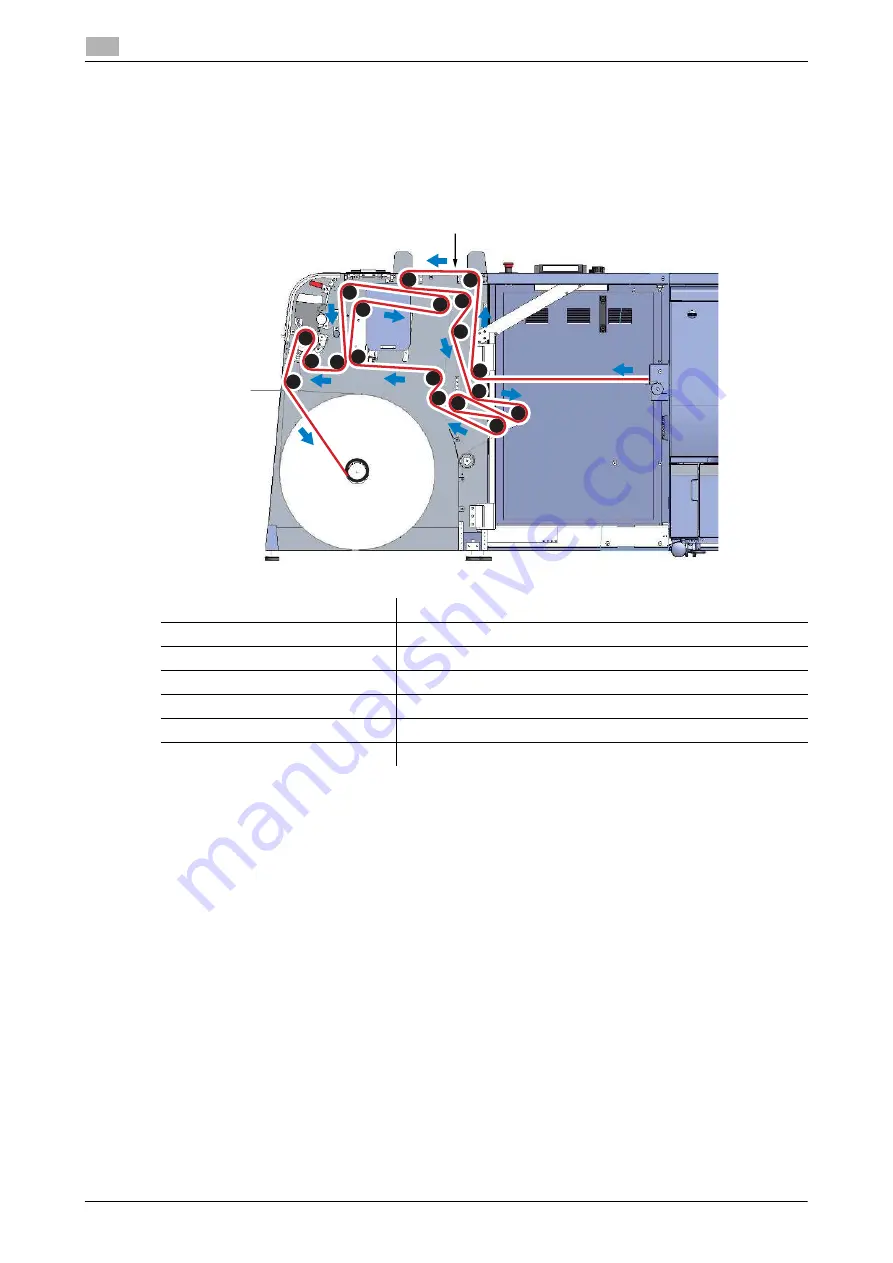
Feed the media to Roll Winder RW-210

The following diagram shows the media route of 

Roll Winder RW-210

. Feed the media along the correct 

route.

NOTICE

Feed the media so that it passes through the center position of each roller.

Item

Description

Rollers (1) to (2)

Open the front door and feed the media.

Roller (3)

Feed the media from above the media inspection table.

Rollers (4) to (9)

Open the front door and feed the media.

Rollers (10) to (12)

Feed the media from the rewinder spindle side.

Rollers (13) to (15)

Open the safety cover of the upper side and feed the media.

Rollers (16) to (19)

Open the nip safety cover and feed the media.

1

2

3

14

4

5

6

7

9

8

10

11

12

13

15

16

17

18

19

Pass it above the media inspection table.

Содержание AccurioLabel 230

Страница 1: ...AccurioLabel 230 QUICK GUIDE...

Страница 2: ......

Страница 3: ...110 Roll Winder RW 210 2 13 2 2 3 Touch panel Roll Winder RW 110 Roll Winder RW 210 2 14 Startup screen 2 14 Stop screen 2 15 Debug Settings screen 2 16 Taper Tension screen 2 17 Run screen 2 18 2 2...

Страница 4: ...in the upper side of the media 4 37 Installing ES 101 When checking the eye mark in the lower side of the media 4 41 4 6 3 Turn on the additional printing function 4 44 4 6 4 Confirm change the teach...

Страница 5: ...is displayed 6 23 6 5 3 The jam code J 3105 is displayed 6 24 6 5 4 White spots appear on the output paper 6 24 6 5 5 The media wrinkles 6 25 6 5 6 The media in the feeding section goes out alignment...

Страница 6: ...Contents 4 AccurioLabel 230 7 2 Typical specifications 7 14 7 2 1 Main body 7 14 7 2 2 Roll Winder RW 110 7 14 7 2 3 Roll Winder RW 210 7 14 7 2 4 Web guide 7 15 7 2 5 External Sensor Kit ES 101 7 15...

Страница 7: ...1 Introduction...

Страница 8: ......

Страница 9: ...nstructions may lead to mishandling that may cause injury or property damage NOTICE This symbol indicates a risk that may result in damage to this machine or originals Follow the instructions to avoid...

Страница 10: ...s are observed Legal restrictions on copying or printing are observed refer to instruction booklet Safety Information Inspection and maintenance instructions are adhered to General national and compan...

Страница 11: ...es refer to the User s Guide For details on how to obtain the User s Guide contact your service representative Note that basic technical knowledge about the machine is required in order to enable user...

Страница 12: ...1 6 AccurioLabel 230 Configuration and usage of this manual 1 1 5...

Страница 13: ...2 Before using this machine...

Страница 14: ......

Страница 15: ...to the following pages Main body power on off page 2 3 ON OFF of Roll Winder RW 110 Roll Winder RW 210 page 2 7 2 1 1 Main body power on off Turn the main body on 1 Turn ON the main power switch The...

Страница 16: ...h turned on the power LED on the control panel turns green The Wake up screen is displayed followed by the MACHINE screen The warm up takes approximately 2 minutes This is the time period before Ready...

Страница 17: ...wer on off 2 When the message Please confirm media unit appears turn on Roll Winder RW 110 Roll Winder RW 210 to make them ready For how to turn on the power refer to page 2 7 For details on how to ma...

Страница 18: ...turning it off turn the main power switch off check that the power LED on the control panel is out and be sure that at least 10 seconds have passed be fore turning the main power switch on If the mai...

Страница 19: ...namely the main power switch and the sub power switch Turn on Roll Winder RW 110 Roll Winder RW 210 1 Turn ON the main power switch The main power switch is located on the left side of Roll Winder RW...

Страница 20: ...f the sub power switch When turning the main power switch on immediately after turning it off be sure to wait for 10 seconds or longer before turning the main power switch on again If the main power s...

Страница 21: ...fixture of the media The black circle and lateral line indicate the roller and media respectively When you release fixture of the media the media is displayed in green Wait until the dancer arm lowers...

Страница 22: ...2 10 AccurioLabel 230 Power on off 2 2 1 5 Turn off the main power switch located on the left side of Roll Winder RW 210 1 1...

Страница 23: ...numeric value 8 This is not available on this machine 9 Setting Used to check settings of the print job in progress or those currently made 10 Utility Counter Displays the UTILITY screen and various c...

Страница 24: ...NOTICE Be sure not to turn off the main power switch in usual operation Be sure not to turn off the main power switch before turning off the sub power switch Be sure not to turn off the main power swi...

Страница 25: ...1 Sub power switch When you press the sub power switch the touch panel starts 2 Tension adjustment dial This is a dial to adjust the tension of the torque When start printing make adjustments by turni...

Страница 26: ...of Roll Winder RW 110 and Roll Winder RW 210 When the main power switch and sub power switch of Roll Winder RW 110 Roll Winder RW 210 are turned on the touch panel starts Startup screen This section d...

Страница 27: ...ockwise 5 Rewind mandrel On Off Switches whether to fix or release the media core of the re winder spindle When the media core is fixed a lateral line is displayed on the button When the media core is...

Страница 28: ...ensor Switches ON OFF of the sensor at the top of the winding dancer arm This is not available on this machine Unw Dancer Arm Top Sensor Switches ON OFF of the sensor at the top of the feeding dancer...

Страница 29: ...an anti static ioniser is installed 6 Back The Stop screen is displayed again No Name Description No Name Description 1 Taper Tension mm Diameter Sets the value of the tension of the taper suitable f...

Страница 30: ...tor Switches the rotation direction and ON OFF of the rewind er spindle It switches in the order of counterclockwise OFF clockwise 5 Rewind mandrel On Off Switches whether to fix or release the media...

Страница 31: ...lease the emergency stop status 1 Turn the knob of EMERGENCY STOP pressed when stopping the device clockwise The button returns to its original state from the pressed state 2 Press the sub power switc...

Страница 32: ...tus LED orange The LED lights in orange according to the status of ES 101 2 LED bar display green The LED lights in green according to the detection sensi tivity level of the eye mark 3 SET Press this...

Страница 33: ...ine 5 Sensor 2 button Guides the media to the right end This is not available on this machine 6 Sensor 1 button Guides the media to the left end This is not available on this machine 7 Arrow keys left...

Страница 34: ...shown in the automatic mode 3 Displays the gain of the controller This is not available on this machine 4 Displays the operation status of the status display system This is not available on this machi...

Страница 35: ...3 Printing workflow...

Страница 36: ......

Страница 37: ...peration Prepare the Media Set or change the media Prepare the Machine Prepare the machine to print Adjust Image Position and Image Quality Adjust the image position and image quality before printing...

Страница 38: ...ing For details refer to the following page Cleaning parts and intervals page 5 3 3 1 2 Step 2 Prepare the media Replace the currently loaded paper with the media used for printing For details refer t...

Страница 39: ...ss the sub power switch on the upper side of Roll Winder RW 210 The power is turned on and the Startup screen is displayed on the touch panel 3 Press Startup The Stop screen is displayed 4 Press Debug...

Страница 40: ...Rew Tension Pot to 200 with the tension adjustment dial Press Back to display the Stop screen again 6 Confirm the settings on the Stop screen If is not displayed in the circle press the button to set...

Страница 41: ...nder RW 210 When you close all the doors and covers the message is not displayed anymore If Torque too high reduce tension or increase taper is displayed and the media is not conveyed con firm that th...

Страница 42: ...type of media different from that previously set on the machine select Change Set or Recall to specify the paper settings Change Set Specify paper settings using Change Set 1 Press Paper Setting on t...

Страница 43: ...u select in Paper Type Select the desired unit button under Change Unit The screen displays the paper weight in the se lected unit Process speed can be selected from the keys under Speed Setting Some...

Страница 44: ...creen shows newly specified paper conditions When completing the paper setting press Close The screen returns to the MACHINE screen Specified paper condition is displayed in Paper Setting on the MACHI...

Страница 45: ...Setting screen is displayed If an entry with a Paper Profile displayed is selected the registered paper conditions are overwrit ten with new settings 8 Enter the paper profile name and press OK Up to...

Страница 46: ...3 12 AccurioLabel 230 Before printing 3 3 1 9 Check that the paper profile has been registered in Paper Profile and press Close This returns to the Paper Setting screen 10 Press Close...

Страница 47: ...printing 3 Return to the MACHINE screen and the registered paper condition is displayed on the MACHINE screen Recall Specify paper setting using Recall 1 Press Paper Setting on the MACHINE screen The...

Страница 48: ...all The Recall screen is displayed 3 Press or on the Recall screen select a desired paper profile from the list of registered paper conditions and then press Confirm Details The selected entry will be...

Страница 49: ...fore printing 3 4 When finished with checking press Close 5 Press OK on the Recall screen This returns to the Paper Setting screen If you want to change the recalled paper condition refer to page 3 8...

Страница 50: ...abel 230 Before printing 3 3 1 6 Press Close on the Paper Setting screen The Paper Profile Name changes to that of recalled specifications Return to the MACHINE screen and the recalled paper condition...

Страница 51: ...e Adjustment The adjustment for the reference position of the print side is an advanced adjustment Contact your service representative in advance of the adjustment Tips There are two ways for registra...

Страница 52: ...th Vertical and Horizontal 1 00 to 1 00 1 step 0 01 Use to specify the value to be positive or negative Press Clear to reset the value Adjustment example of Zoom When the printed image is vertically e...

Страница 53: ...justment procedures of this machine refer to the User s Guide Adjustment Machine Adjustment NOTICE You can register the adjusted value of Registration Adj in Paper Profile where paper conditions are s...

Страница 54: ...int a chart and scale measurement points Entering the measured value adjusts the magnification and printing position 1 Press Registration Adj on the MACHINE screen The Registration Adj screen is displ...

Страница 55: ...21 3 1 Before printing 3 3 Press Print Mode The PRINT MODE screen is displayed 4 Press the Start button on the control panel A test chart is printed 5 Press Exit PrintMode The Chart Adjustment screen...

Страница 56: ...om the vertical line to the edge of the media The figure shows an example when measuring lines 1 and 6 You can enter values in increments of 0 1 mm Be sure to write down the measured value 7 Press the...

Страница 57: ...achine use pre output image quality adjustment In addition to regular calibration for the controller use other image quality adjustments as necessary such as when changing screens or papers or when hu...

Страница 58: ...e 0 mm 0 respectively When allocating several lines in a page ensure a 1 mm 0 04 space B between each line When printing several pages a 1 mm 0 04 space is automatically inserted between each page Tip...

Страница 59: ...ly Tips If you want to combine several jobs to print test pages insert or copy using the Call Insert Job tab in the Image Page Edit screen and delete any unnecessary pages edit the pages for test prin...

Страница 60: ...3 26 AccurioLabel 230 Job printing 3 3 2 2 Press the JOB LIST tab to display the Hold Job screen 3 Select a job to perform test printing for then press Job Ticket 4 Press Set Number...

Страница 61: ...AccurioLabel 230 3 27 3 2 Job printing 3 5 Enter the number of copies for test printing then press OK 6 Press Overwrite 7 Press Output...

Страница 62: ...3 mode may result in the media deforming or the adhesive running out In such cases print test pages in Stop Position 1 or Stop Position 2 Contact the manufacturers about the specifications of the med...

Страница 63: ...to print beforehand For details refer to page 3 4 1 Press the MACHINE tab on the touch panel of the main body and make sure that Stop Position 1 or Stop Position 2 is selected for Print Stop Change Se...

Страница 64: ...check Continuous Job to select multiple jobs you can only insert the specified blank page and continuously output jobs while skipping stop processing between jobs the warm up operation and the paper m...

Страница 65: ...230 3 31 3 2 Job printing 3 6 Press Overwrite 7 Press Output It is recommended to press Job Ticket and reconfirm Set Number Paper Type and Thickness or Weight on the Job Ticket Edit screen before pre...

Страница 66: ...machine adjustment another 300 m 984 24 is printed Output Limit The first 300 m 984 24 is printed and subsequent printing is canceled Continuous job output is possible until the total of blank amount...

Страница 67: ...Replace the media core Remove the media after printing and install a new media core dReference For details refer to page 4 23 3 3 2 Step 2 Idle the machine To idle the machine after printing long pres...

Страница 68: ...3 34 AccurioLabel 230 Operation after printing 3 3 3...

Страница 69: ...4 Handling paper...

Страница 70: ......

Страница 71: ...ge 4 23 Replacing the media core page 4 29 Splicing the media For cleaning clearing paper jam page 4 33 4 1 Media route The following diagram shows the media route Set the media along the correct rout...

Страница 72: ...printer page 4 9 Feed the media to Roll Winder RW 210 page 4 12 Set the media core to the rewinder spindle page 4 13 Adjust the media conveyance page 4 14 Specify the paper type and thickness Weight p...

Страница 73: ...d mandrel On Off on the Stop screen to release the fixture of the media If is displayed in the circle press the button to hide 4 Press Nip On Off to release fixture of the media The black circle and l...

Страница 74: ...as shown in the following figure NOTICE Note that if Roll Winder RW 110 is subjected to a strong shock the installation location may become misaligned and cause media meandering When setting the medi...

Страница 75: ...7 4 2 Setting media 4 7 Cut both sides of the tip of the media with scissors for ease of feeding 8 Open the safety cover pull out the media edge and pass it into the workbench NOTICE Pull out the medi...

Страница 76: ...nter position of each roller Item Description Rollers 1 to 3 Open the safety cover of the side and feed the media from above the workbench Rollers 4 to 6 Feed the media from the unwinder spindle side...

Страница 77: ...es of the leading section of the main body and delivering section 1 Pull out about 1 5 m of media from Roll Winder RW 110 to the main body of the printer 2 Open the top cover of the leading section of...

Страница 78: ...ong the guide plate Confirm with the scale of the leading section that the media passes through the center position of the leading section 6 Insert the media into the inside of the main body until Sta...

Страница 79: ...y is delivered about 30 cm from the delivering section and stops automatically Press Start Convey on the touch panel and then press Stop Convey after delivery of about 2 m to enable pass the media thr...

Страница 80: ...em Description Rollers 1 to 2 Open the front door and feed the media Roller 3 Feed the media from above the media inspection table Rollers 4 to 9 Open the front door and feed the media Rollers 10 to 1...

Страница 81: ...pindle Set the media core with its edge adjusted with the position of 330 mm 12 99 of the scale on the rewinder spindle 3 Adhere the media to the media core with masking tape NOTICE Be sure to attach...

Страница 82: ...n NOTICE Before conveying the media turn on the main power switch and sub power switch of the main body and the main power switch and sub power switch of Roll Winder RW 110 Roll Winder RW 210 1 Open t...

Страница 83: ...the web guide to move the sensor unit back and forth When you move the sensor unit to the front and to the back the value is changed to the minus and plus directions re spectively After adjustment ti...

Страница 84: ...ia passes through the center position of the leading section If the positions are misaligned correct the position by confirming both scales of the leading sec tion 7 Close the top cover of the leading...

Страница 85: ...t to make the value of the web guide 0 0 Loosen the upper knob of the web guide to move the sensor unit back and forth When you move the sensor unit to the front and to the back the value is changed t...

Страница 86: ...ing the me dia For the steps refer to page 4 29 13 Press Nip On Off on the Stop screen of the touch panel to fix the media The black circle and lateral line indicate the roller and media respectively...

Страница 87: ...on the touch panel and press Start Convey Confirm that the status of Roll Winder RW 110 Roll Winder RW 210 is displayed in blue NOTICE Redo it from step 1 if the value of the web guide set to 0 is not...

Страница 88: ...nting specify paper conditions such as the paper type and thickness weight on the main body to suit the media type For details refer to the User s Guide 1 Press Paper Setting on the MACHINE screen The...

Страница 89: ...er Type on the right of the screen Available Weight settings vary depending on the Paper Type 4 Select Weight from the buttons under Change Setting on the left and set Weight Speed and Weight Unit fro...

Страница 90: ...4 22 AccurioLabel 230 Setting media 4 4 2 6 Press Close The screen returns to the MACHINE screen...

Страница 91: ...Lifter NOTICE Before setting or replacing the media turn on the main power switch and sub power switch of the main body and the main power switch and sub power switch of Roll Winder RW 110 Roll Winder...

Страница 92: ...o the un winder spindle side 3 Press Unwind mandrel On Off on the touch panel to release fixture of the media If is displayed in the circle press the button to hide 4 Remove the media core of the unch...

Страница 93: ...2 Connect the media using the workbench 1 Insert the tip of the new media into the workbench through outside the rollers 1 and 2 For the positions of the rollers 1 and 2 refer to page 4 8 2 Put the re...

Страница 94: ...yed in the circle 4 Cut the overlapping part of the media with following the cutter groove on the workbench After cutting remove the overlapped part Be careful not to cut your hand when cutting the me...

Страница 95: ...with masking tape Stick to protrude the masking tape from both ends of the media NOTICE Adhere the joint firmly by rubbing the surface of the masking tape to avoid peeling the media during transport 7...

Страница 96: ...body and the main power switch and sub power switch of Roll Winder RW 110 Roll Winder RW 210 1 Prepare the machine to print For details refer to page 3 4 2 Press Start Convey on the MACHINE screen on...

Страница 97: ...replace the media when removing the media wound being misaligned NOTICE Before taking the media from Roll Winder RW 210 make sure that this machine is stopped 4 4 1 Set the media core to the rewinder...

Страница 98: ...NOTICE Keep such a length that the edge of the media can reach a new media core When cutting the paper be careful not to injure your hands or fingers 3 Stick the cut media edge to the media with the...

Страница 99: ...a lifter 6 Place the new media core on the rewinder spindle Set the media core with its edge adjusted with the position of 330 mm 12 99 of the scale on the rewinder spindle 7 Press Rewind mandrel On...

Страница 100: ...ia to the media core with masking tape NOTICE Be sure to attach in three positions center back and front in the order to equalize the tension on the front and back Make sure the media is securely adhe...

Страница 101: ...n ing or clearing a paper jam NOTICE It is difficult to connect the edges of the media in other than the workbench so connect the edges of the me dia by overlapping them 4 5 1 Connect the media betwee...

Страница 102: ...tape Stick to protrude the masking tape from both ends of the media NOTICE Adhere the joint firmly by rubbing the surface of the masking tape to avoid peeling the media during transport 4 Cut the pro...

Страница 103: ...s When the optional External Sensor Kit ES 101 is installed this function can be used Workflow Conditions of detection of eye mark page 4 36 Install External Sensor Kit ES 101 page 4 36 Turn on the ad...

Страница 104: ...all it in the correct position aligned with the position of the eye mark Removing ES 101 ES 101 is installed to the upper or lower side of the leading section When moving ES 101 from the upper side to...

Страница 105: ...emove it by holding ES 101 with hand 3 Remove the rotation knob from ES 101 4 Turn the nut of the sensor cable and remove the sensor cable from ES 101 Installing ES 101 When checking the eye mark in t...

Страница 106: ...AccurioLabel 230 Additional printing on the media with eye mark printed 4 4 6 1 Install the sensor cover and sensor holder to ES 101 and fix them with two screws Install the sensor holder with Up engr...

Страница 107: ...ioLabel 230 4 39 4 6 Additional printing on the media with eye mark printed 4 2 Pull the sensor cable into inside of the leading section 3 Install the sensor cable to ES 101 and turn the nut to fix it...

Страница 108: ...onal printing on the media with eye mark printed 4 4 6 4 Install ES 101 to the upper sensor slider and fix it with two screws Install it by holding ES 101 with hand 5 Install the rotation knob 6 Fix t...

Страница 109: ...When checking the eye mark in the lower side of the me dia When checking the eye mark in the lower side of the media install ES 101 to the lower side of the leading section 1 Install the sensor cover...

Страница 110: ...l 230 Additional printing on the media with eye mark printed 4 4 6 2 Take out the sensor cable from the leading section and remove it from the clamp 3 Install the sensor cable to ES 101 and turn the n...

Страница 111: ...ditional printing on the media with eye mark printed 4 4 Install ES 101 to the lower sensor slider and fix it with two screws Install it by holding ES 101 with hand 5 Install the rotation knob 6 Fix t...

Страница 112: ...6 3 Turn on the additional printing function Turn on the additional printing mode on the MACHINE screen When Additional Printing Mode is turned on continuous job printing is impossible When outputting...

Страница 113: ...hen the eye mark is to be checked change the calibration mode to two point teach in and confirm again Confirm the teach in mode 1 Long press the and buttons of ES 101 at the same time The mode is swit...

Страница 114: ...witch the teach in mode LED lights as follows depending on the selected teach in mode Dynamic teach in Two point teach in 5 Press the SET button The teach in mode is set 6 Long press the and buttons o...

Страница 115: ...st the position of the media When adjusting ES 101 you can adjust the position of the media by the following procedure 1 Feed the media in the conveyance direction with the delivering knob 2 Feed the...

Страница 116: ...with eye mark printed 4 4 6 4 6 7 Adjust ES 101 Adjust ES 101 to enable correct detection of the eye mark For black eye mark with white background 1 Keep pressing the SET button with the red spot mark...

Страница 117: ...oLabel 230 4 49 4 6 Additional printing on the media with eye mark printed 4 2 Feed the media in the conveyance or feeding direction and release the SET button where the spot mark is on the white back...

Страница 118: ...l 230 Additional printing on the media with eye mark printed 4 4 6 For white eye mark with black background 1 Keep pressing the SET button with the red spot mark projected from ES 101 aligned with the...

Страница 119: ...oLabel 230 4 51 4 6 Additional printing on the media with eye mark printed 4 2 Feed the media in the conveyance or feeding direction and release the SET button where the spot mark is on the black back...

Страница 120: ...on the media with eye mark printed 4 4 6 Confirmation of the detection stability Confirm the lighting status of LED One LED is lighting Detectable Two to four LEDs are lighting Good detection Five or...

Страница 121: ...r Installing the reflection holder When checking the eye mark in the upper side of the media 1 Install the reflection holder to the sensor holder Install the sensor holder with Lw engraved 2 Open the...

Страница 122: ...f the media 1 Install the reflection holder to the sensor holder Install the sensor holder with Up engraved 2 Open the cover of the leading section 3 Install the assembled reflection holder to the upp...

Страница 123: ...adjust the additional printing position vertical horizontal on the Registration Adj screen When printing heat in the fixing section may cause the media to enlarge or shrink How much the paper is affec...

Страница 124: ...f the media The vertical position can be adjusted between 5 0 and 5 0 The horizontal position can be adjusted between 20 0 and 400 0 When you press Reset the settings return to the defaults 4 Press Cl...

Страница 125: ...5 Cleaning...

Страница 126: ......

Страница 127: ...control panel For details about cleaning refer to the following Daily cleaning page 5 5 Weekly cleaning page 5 12 Monthly cleaning page 5 22 Clean the exterior page 5 24 Clean the control panel page...

Страница 128: ...to the parts clean them For details refer to page 5 9 2 Make sure that no adhesive has stuck to Roll Winder RW 110 leading section delivering section or the machine interior If any adhesive sticks to...

Страница 129: ...he leading section page 5 5 Clean the delivering section page 5 7 Clean Roll Winder RW 210 page 5 9 Adjust the position of the media page 5 10 When the cleaning is complete be sure to perform the posi...

Страница 130: ...of the tension roller 1 Keep in mind that the shaft with a groove is for the front side 5 Clean tension roller 2 tension roller 3 tension roller 4 aligning roller and the guide plate While shifting p...

Страница 131: ...oller 1 into the hole and then insert the front shaft into the hole Make sure that it clicks when attaching Go to page 5 7 5 2 2 Clean the delivering section 1 Turn the thumbscrews on the top cover of...

Страница 132: ...ler and the guide plate 4 Turn the feeding knob slowly and clean the parts of the upper delivering roller and the lower deliv ering roller that are yet to be cleaned up 5 Turn the thumbscrews on the t...

Страница 133: ...ll Winder RW 210 2 Clean the nip roller while spinning it Firmly clean the nip roller as adhesive easily sticks to the both ends of the roller NOTICE After cleaning is complete allow isopropyl alcohol...

Страница 134: ...ge Replacing the media core page 4 29 1 Turn on Roll Winder RW 110 Roll Winder RW 210 to display the Stop screen on the touch panel For how to turn on the power refer to the following page ON OFF of R...

Страница 135: ...of the printer For details refer to page 4 9 7 Open the leading section of the main body and check the following The media does not protrude from each roller The media is centered against the scale ma...

Страница 136: ...cloth Ruler Scissors Cutter knife Masking tape width more than 30 mm 1 18 NOTICE When cleaning the machine use a soft cloth dampened with isopropyl alcohol Other solvents may cause mal function 5 3 1...

Страница 137: ...by hand from the leading section side NOTICE Pull the media out straight Pulling out the media diagonally can cause it to remain in the main body resulting in a feeding error 6 Turn ON the sub power s...

Страница 138: ...the leaf spring Inserting paper prevents adhesive from sticking to the conveyance section 10 Remove the leaf spring front and the leaf spring back To detach the leaf spring front and the leaf spring b...

Страница 139: ...ring back does not Make sure to use the correct springs when attaching them Do not apply too much force when attaching or detaching the leaf spring front or the leaf spring back Doing this can cause d...

Страница 140: ...Clean the secondary transfer roller Clean the secondary transfer roller while spinning it NOTICE Clean only both ends of the secondary transfer roller Touching other parts may cause the deteriora tio...

Страница 141: ...he main body 17 Cut the tips of the media in the leading section into triangle strips 18 Set the media to the leading section Set the media so that it is pulled under the leading section NOTICE Be car...

Страница 142: ...and sub power switch of Roll Winder RW 110 Roll Winder RW 210 1 Pull out about 1 5 m of media from Roll Winder RW 110 to the main body of the printer 2 Open the top cover of the leading section of th...

Страница 143: ...he main body before turning ON the machine If the leading edge of the media is set before the machine is turned ON the J 1755 JAM code is displayed when the machine is turned ON 6 Feed the media into...

Страница 144: ...creen on the touch panel of the main body lights in red it indicates that an error occurred Check the error and solve the problem 8 Close the top cover of the leading section Before closing the top co...

Страница 145: ...l 230 5 21 5 3 Weekly cleaning 5 5 3 3 Clean the web cleaner Open the safety cover of Roll Winder RW 110 and clean inside the stainless tray in the front side of the brush NOTICE Remove the media befo...

Страница 146: ...nter the grooves of the workbench of Roll Winder RW 110 Apply the seal peeling spray and wipe it with a dry soft cloth NOTICE Remove the media before cleaning If a paper scrap liner enters the groove...

Страница 147: ...cleaning Do not use water because the internal metal will rust 5 4 4 Check the compressor Check the following part Check the remaining oil only the fueling type compressor Remove the water accumulated...

Страница 148: ...he exteriors of Roll Winder RW 110 and Roll Winder RW 210 with a dry soft cloth NOTICE When cleaning the machine be sure to turn off all of the main power switch and sub power switch of the main body...

Страница 149: ...ipe the surface of the control panel clean using a soft dry cloth NOTICE When cleaning be careful not to press the control panel buttons and the touch panel too hard Never use neutral detergent glass...

Страница 150: ...5 26 AccurioLabel 230 Clean the web guide 5 5 7 5 7 Clean the web guide Remove the lids of the web guides of Roll Winder RW 110 and Roll Winder RW 210 and wipe the surfaces with a dry soft cloth...

Страница 151: ...6 Troubleshooting...

Страница 152: ......

Страница 153: ...4 24 Other job cannot be printed unless the toner is replenished Jobs can be accepted The current job stops when the toner becomes empty Toner bottles can even be replaced during printing Before repla...

Страница 154: ...in contact If toner lands on your skin or clothing wash thoroughly with soap and water If you inhale toner move to a place with fresh air and gargle with a lot of water repeatedly Should you get sympt...

Страница 155: ...g printing the current job can be continued maximum 300 m 984 3 Other job cannot be printed unless the waste toner box is replaced Jobs can be accepted The current job will stop when the waste toner b...

Страница 156: ...the main body the printing job is paused In such a case the MACHINE tab blinks in orange and the following message is displayed Please load designated paper To release the machine suspension and start...

Страница 157: ...ng 6 3 Select the job to cancel printing for and click Delete 4 Press Cancel Job Printing is canceled 5 Replace the media which is set on the printing job For details about how to replace the media re...

Страница 158: ...during printing 6 6 3 Forcibly print on the set media 1 Press Confirm Details A dialog will be displayed 2 Press Forced Output The MACHINE screen is restored with the message Press Start to restart 3...

Страница 159: ...l panel and machine operation cannot be continued until all the locations are cleared JAM Position screen Details of the paper jam and JAM code are displayed in the message area For details about the...

Страница 160: ...pre transfer sensor Removethepaper inside the main body and then open and close the front door of the main body For instructions on how to remove the paper refer to page 6 13 J 1712 94 Conveyor senso...

Страница 161: ...ng and con veying section Centering im proper Removethepaper inside the main body and then open and close the front door of the main body For instructions on how to remove the paper refer to page 6 13...

Страница 162: ...of the main body For instructions on how to remove the paper refer to page 6 13 J 5101 Main body front door Main body front door is open J 5110 94 Feeding and con veying section Error of a detec tion...

Страница 163: ...Winder RW 210 Error related to Roll Winder RW 110 Roll Winder RW 210 while printing or conveying paper 1 Remove the pa per inside the main body and then open and close the front door of the main body...

Страница 164: ...n roller 1 clean them For details refer to page 5 5 5 Pull out the media from the delivering section When pulling out the media do not apply excessive force and pull it out straight If JAM code J 3105...

Страница 165: ...nd stuck to the guide plate as well as adhesive run ning off the edge of the media If paper remains remove it If the JAM code J 3112 is displayed check if the centering sensor located behind the cover...

Страница 166: ...U and return the lever M1 to the original position NOTICE Gently insert the ADU to avoid strong shock Note that applying a strong impact to the main body affects the setting position of the main body...

Страница 167: ...AccurioLabel 230 6 17 6 4 Clearing paper jams 6 14 Set the media on the machine For details refer to page 5 18 15 Connect the media between the main body and Roll Winder For details refer to page 4 33...

Страница 168: ...he out put paper 1 Check the position of the media 2 Clean adhesive sticking on the parts 3 Adjust the second transfer output For details refer to page 6 24 The media wrinkles 1 Adjust the fusing spee...

Страница 169: ...und Being Misaligned Remove the media wound being misaligned from the rewinder spindle to replace it For details refer to page 4 29 STEP 2 Check the Position of the Media Check if the media is set in...

Страница 170: ...eb guide of Roll Winder RW 110 and press the center positioning key 2 Adjust the position of the sensor unit to make the value of the web guide 0 0 Loosen the left knob of the web guide to move the se...

Страница 171: ...the top cover of leading section 7 Open the cover of the web guide of Roll Winder RW 210 and press the center positioning key 8 Adjust the position of the sensor unit to make the value of the web gui...

Страница 172: ...RW 110 For details refer to page 4 29 11 Press Unwind mandrel On Off and Rewind mandrel On Off on the Stop screen of the touch panel on the upper side of Roll Winder RW 210 to fix the media When the...

Страница 173: ...5 2 The jam code J 1714 is displayed The jam code J 1714 is displayed when the machine detects that the delivering roller stops while conveying paper at a low speed before printing Follow the procedur...

Страница 174: ...age 6 13 IMPORTANT If the paper cannot be pulled out from the delivering section contact your service rep resentative Paper may coil around the fixing unit Pulling out the paper with excessive force m...

Страница 175: ...Roll Winder RW 110 and Roll Winder RW 210 on the MACHINE screen on the touch panel of the main body is red follow the following procedure to solve the problem STEP 1 Confirm the Preparation before Pri...

Страница 176: ...e remaining media sensor and unwinder spindle When you widen this interval the detection timing becomes earlier When you reduce this interval the detection timing be comes later 1 Loosen the rotation...

Страница 177: ...s slow Follow the procedures below to solve the problem STEP 1 Check the Shaft of the Knife If it is dirty wipe it with a cloth etc After cleaning apply grease to the shaft Clean the shaft once a mont...

Страница 178: ...rocedure 4 Turn OFF and then ON the sub power switch of the main body For how to turn on and off the power refer to page 2 3 If it cannot be restored even after this procedure proceed to the next proc...

Страница 179: ...7 Appendix...

Страница 180: ......

Страница 181: ...urns machine power on off when pressed 3 Touch panel Displays screens such as the MACHINE screen to allow various settings and machine operations Also operation or troubleshooting procedures can be pr...

Страница 182: ...cquisition of log information 3 Service port USB 2 0 Type A x 1 Used to operate as a USB connected printer 4 Service port USB 2 0 Type B x 1 Used to operate as a USB connected printer 5 Network port 1...

Страница 183: ...to set the toner bottle There are toner bottles for four colors yellow Y magenta M cyan C and black K 4 Fixing unit Pulled out for removal of a paper jam For handling levers and knobs of the fixing un...

Страница 184: ...ng 13 Pre transfer roller 2 Conveys the media 14 Secondary transfer roller Transfers toner to the media No Name Description No Name Description 1 Top cover Protects the leading section Open in case of...

Страница 185: ...g a connection terminal or other electric parts may damage the machine or cause unexpected trouble Please do not try to work yourself but contact your service representative 7CAUTION DO NOT pull out t...

Страница 186: ...replacing the media If it opens during the media conveyance or print the machine stops in emergency 5 Workbench When replacing the media cut the media with following the cutter groove on the workbenc...

Страница 187: ...machine items No Name Description 1 Web guide Adjusts the media conveyance position to prevent meandering and mis centering of the media 2 8 Feed roller Conveys the media 9 10 Unwinder dancer arm Adj...

Страница 188: ...table Used to check the printing status of the media You can turn on the light by operating the touch panel 5 EMERGENCY STOP Press to stop this system in emergency Use only in case of emergency To rel...

Страница 189: ...ys the media You can switch whether to fix or release media by operating the touch panel 2 Web guide Adjusts the media conveyance position to prevent meandering and mis centering of the media 3 11 Rew...

Страница 190: ...color Machine state Red The machine stops by the error occurrence such as paper jam replenishing toner supply or replacing the media The status indicator lights in red before the machine stops when th...

Страница 191: ...nent 7 7 1 5 External Sensor Kit ES 101 External Sensor Kit ES 101 is optional No Name Description 1 Rotation knob Used for position adjustment of the External Sensor Kit 2 Control panel Used for sett...

Страница 192: ...m to 60 m 136 g m2 to 216 g m2 37 lb Bond to 57 lb Bond Only conveyance is guaranteed for non tack paper Media with film liners are not available Only media with acrylic adhesive are available Metall...

Страница 193: ...ications Type Media Conveyance Position Adjustment Device Operating environment conditions Temperature 0 C to 45 C Humidity 5 to 90 RH No dew condensation Specifications Type External Sensor Kit Opera...

Страница 194: ...7 16 AccurioLabel 230 Typical specifications 7 7 2...

Отзывы: