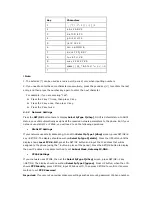
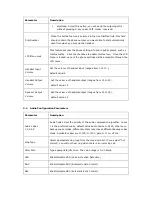
background image

Key Characters 

1


. , \' ? !    \" - 1 \/ | : [ ] ; 1


2


a b c 2 A B C 2


3


d e f 3 D E F 3


4


g h i 4 G H I 4


5


j k l 5 J K L 5


6


m n o 6 M N O 6


7


p q r s 7 P Q R S 7


8


t u v 8 T U V 8


9


w x y z 9 W X Y Z 9


0


space ( ) @ _ * & 0 % # ^= + < > 0


*


*


! Note:  

1. The asterisk (*) can be used as a radix point (period) only when inputting numbers. 

2. If you need to enter the same character consecutively, press the pound key (#) to confirm the last 
entry, and then press the number key again to enter the next character       

      For example, if you are entering “Cab”: 


Press the 2 key 7 times, then press # key. 


Press the 2 key once, then press # key. 


Press the 2 key twice.       
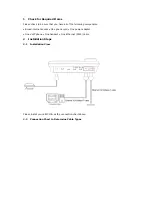
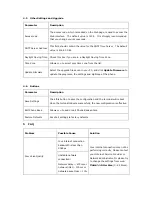
3.1.2 Network 

Settings 

Press the SET/OK button twice to display Select IpType 1[dhcp], DHCP is default status. In DHCP 
status, your LAN automatically assigns all the required network parameters to the phone. But if your 
network use static IP or PPPoE, you will need to do the following operations. 

• 

Static IP Settings 

If your network uses static addressing, then at the Select IpType 1[dhcp] screen, press SET/OK>0 
key >SET/OK. The display should now show Select IpType 0[static]. Press the UP button until the 
display shows Local IP X.X.X.X, press the SET/OK button and input the IP address that will be 
assigned to the phone (using the * button in place of the period). Press the SET/OK button to display 
the new IP address. Use same method to set Subnet Mask, Gateway IP,DNS.   
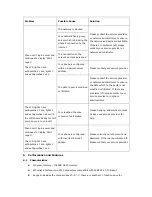
• 

PPPoE Settings 

If your network uses PPPOE, then at the Select IpType 1[dhcp] screen, press SET/OK>2 key 
>SET/OK. The display should now show Select IpType 2[pppoe]. Press UP button, when the LCD 
shows PPP Identity, press SET/OK, input PPPoE user ID, then press SET/OK to confirm. Use same 
method to set PPP Password.  

Important: If your service provider makes presettings such as account, password, IP phone number, 

Содержание KE1020A

Страница 1: ...ttings 5 3 2 Changing the Setting via Web Browser 5 3 3 Work Normally 5 4 Configuration Parameters 5 4 1 Network configuration parameters 5 4 2 SIP Protocol Configuration Parameters 6 4 3 Phone Configuration Parameters 7 4 4 Audio Configuration Parameters 8 4 5 Other Settings and Upgrade 9 4 6 Buttons 9 5 FAQ 9 6 Performance and Features 10 6 1 Characteristics 10 6 2 Standards and Protocols 11 6 3...

Страница 2: ...e following components Broad internet access One phone cord One power adapter One VoIP phone One handset One Ethernet RJ45 cable 2 Installation Steps 2 1 Installation View Please install your KE1020A as the connection chart above 2 2 Connection Chart to Determine Cable Types ...

Страница 3: ...ernet cable Note when the port LAN connects with line1 2 6 the equipments connected with port PC will not get IP address i e they can t connect with Internet 3 Ready to Use First of all you should obtain the IP address of the phone Please press ESC key to view the IP address if the IP address is 0 0 0 0 or 255 255 255 255 you should contact the network administrator or your service provider After ...

Страница 4: ...to the phone But if your network use static IP or PPPoE you will need to do the following operations Static IP Settings If your network uses static addressing then at the Select IpType 1 dhcp screen press SET OK 0 key SET OK The display should now show Select IpType 0 static Press the UP button until the display shows Local IP X X X X press the SET OK button and input the IP address that will be a...

Страница 5: ...ly click on Save Settings and exit the browser after the Update Successful screen appears Note If you make changes to your User Name and Password those changes must also be made in the Settings screen on your terminal 3 3 Work Normally After the phone reboots and properly programmed the LCD of the phone will display Ready for Call In addition when the phone is off hook you will now hear a dial ton...

Страница 6: ...ote Please check with your ISP for the protocol settings Changing the settings without proper guidance may result in the the terminal not functioning Parameter Description SIP Server Address SIP server address Please ask your service provider if you do not know what to fill in Provider Index Display according to service provider type Please ask your service provider if you do not know which to sel...

Страница 7: ... With this item selected nat addr field is activated Please ask your service provider if you do not know which one to select NAT Server Address When NAT Traversal is set to enable please put the domain name of the servers These web server helps to find out the public IP of the NAT device into nat addr When NAT Traversal is set to Stun please put the URl of the stun server into NAT Addr in the form...

Страница 8: ...lume Set the volume of handset output ranges from 12 to 22 default value 16 Speaker Output Volume Set the volume of handset output ranges from 12 to 22 default value 14 4 4 Audio Configuration Parameters Parameter Description Audio Codec 1 2 3 4 5 Audio Codec X set the priority of the audio compression algorithm Cocec 1 is the preferred codec default value Audio Codec 1 G729 others are backup code...

Страница 9: ...te the programe the settings and digitmap of the phone 4 6 Buttons Parameter Description Save Settings Click this button to save the configuration and the terminal will reboot Once the terminal reboots successfully the new configuration is effective Edit Phone Book Allows you to add or edit Phone Book entries Restore Defaults Reset all settings to factory defaults 5 FAQ Problem Possible Cause Solu...

Страница 10: ...ure the data which to the ports is not modified or filtrated If there are problems left please contact your service provider or network administrator The LCD lights 3 sec extinguishes 1 sec lights 1 and extinguishes 1 sec with the LCD shows Ready for call or when you are on a call Your reached the max concurrent call limited Please hang up and wait a moment Or ask your service provider for help Ph...

Страница 11: ...cho Cancellation Dynamic Buffer Management minimize effect to voice quality caused by audio delay jitter 6 2 Standards and Protocols IEEE 802 3 10 Base T G 711A G 711µ G 723 1 5 3K 6 3 Kbps and G 729 audio codec SIP TCP IP Internet Transport and Control Protocol RTP Real time Transport Protocol RTCP Real time Control Protocol G 723 1 G 729 VAD CNG Economical Bandwidth G 165 16ms Echo Cancellation ...

Страница 12: ...erature 0 to 50 C 32 to 122 F Storage Temperature 30 to 65 C 22 to 149 F Humidity 10 to 90 no dew 6 6 Recommend Network Condition Delay Less than 400ms Jitter Less than 100ms Package Loss Rate Less than 10 Required Bandwidth Minimums 30Kbps Safety Warning Please do not place this product under fire and high temperature Avoid heavy impact and do not leave the product in rainy or highly humid enviro...

Отзывы: