- 2 -
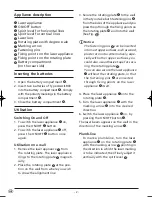
Appliance description
q
Laser appliance
w
ON/OFF button
e
Spirit level for horizontal lines
r
Spirit level for vertical lines
t
Laser lens
y
Rotating plate with degree scale
u
Marking arrow
i
Fastening pins
o
Fixing points on the laser appliance
a
Fixing points on the rotating plate
s
Battery compartment
(on the rear side)
Inserting the batteries
1. Open the battery compartment
s
.
2. Insert two batteries of Type AAA/LR03
into the battery compartment
s
. Comply
with the polarity markings in the battery
compartment
s
.
3. Close the battery compartment
s
.
Utilisation
Switching On and Off
1. To switch the laser appliance
q
on,
press the ON/OFF
w
button.
2. To switch the laser appliance
q
off,
press the ON/OFF
w
button once
again.
Utilisation on a wall
1. Remove the laser appliance
q
from
the rotating plate. The laser appliance
clings to the rotating plate
y
magneti-
cally.
2. Place the rotating plate
y
at the posi-
tion on the wall from where you wish
to draw the alignment line.
3. Secure the rotating plate
y
to the wall
in that you take both fastening pins
i
from the sides of the appliance and you
press them through the fixing points on
the rotating plate
a
and into the wall
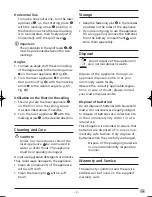
(See Fig.
).
Notice:
The fastening pins
i
can be inserted
into most upper surfaces, such as wood,
plaster or mortar. Alternatively, espe-
cially with other upper surfaces, you
could also use adhesive tape for secu-
ring the rotating plate
y
.
You can also secure the laser appliance
q
without the rotating plate, in that
the fastening pins
i
are inserted
through fixing points on the laser
appliance
o
itself.
4. Place the laser appliance
q
onto the
rotating plate
y
.
5. Turn the laser appliance
q
with the
marking arrow
u
into the desired
direction.
6. Switch the laser appliance
q
on, by
pressing the ON/OFF button
w
.
The laser beam appears on the wall in the
direction of the marking arrow
u
.
Plumb-line
To mark a plumb-line, turn the laser
appliance
q
on the rotating plate
y
with the marking arrow
u
pointing in
the direction in which the laser marking
is to be indicated, then finely adjust it
vertically with the spirit level
r
.
IB_KH3006_BL5778_EN.qxd 12.06.2007 11:46 Uhr Seite 2


