Kolcraft Jeep Overland Limited Скачать руководство пользователя страница 11

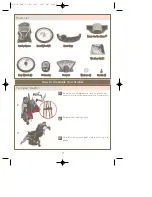
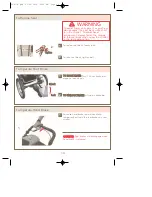
On the front side of the basket, locate the

webbing with snaps on it. On the underside

of the footrest, feed the webbing through the

loop and snap together. Repeat for the other

side of the basket.

Snap rear of basket around the back tube as

shown.

11

1

To Attach Basket

WARNING  

• A

Allw

waayyss  b

baallaan

ncce

e  tth

he

e  w

we

eiig

gh

htt  o

off  tth

he

e  

ssttrro

olllle

err  e

evve

en

nllyy.. To prevent the 

stroller from becoming unstable or 

tipping:

• Do not put more than 10 lbs.    

(4.54 kg) in the basket.

• Do not put more than 3 lbs.       

(1.36 kg) in any of this product’s 

pockets.

2

2

1

S56J-A.qxd  03/06/2006  9:52 AM  Page 11

Содержание Jeep Overland Limited

Страница 1: ...2006 Kolcraft Enterprises Inc All Rights Reserved S56J A 3 06 by Jeep Overland Limited Jogging Stroller Instructions S56J A qxd 03 06 2006 9 51 AM Page 1...

Страница 2: ...u un na as ss si is st te ed d a an nd d w wh ho o w we ei ig gh h l le es ss s t th ha an n 4 45 5 l lb bs s 2 20 0 4 4 k kg g a an nd d w wh ho os se e h he ea ad d r re es st ts s b be el lo ow w t...

Страница 3: ...l ll l b br ra ak ke es s w wh he en ne ev ve er r y yo ou u p pa ar rk k t th he e s st tr ro ol ll le er r e es sp pe ec ci ia al ll ly y o on n a an n i in nc cl li in ne e This prevents the stroll...

Страница 4: ...2 3 How to Assemble Your Stroller S St tr ro ol ll le er r F Fr ra am me e F Fr ro on nt t W Wh he ee el l 1 1 R Re ea ar r W Wh he ee el ls s 2 2 F Fr ro on nt t T Tr ra ay y M Mu us si ic c O On n T...

Страница 5: ...e the wheel off N NO OT TE E Keep wheels at a recommended tire pressure of 35 p s i 241 kPa or as specified on the tire wall 1 2 4 5 3 2 T Ta ab b To Assemble Front Wheel 1 Place the stroller back on...

Страница 6: ...to 90 angle from wheel and retighten the round nut Push lever toward frame until it is tight T TE ES ST T Shake wheel back and forth to be sure it is tight on the frame T TO O R RE EM MO OV VE E W WH...

Страница 7: ...et Slide the magnet along the spoke so that it is as close as possible to the two lines on the bottom of the sensor Rotate the magnet so that it faces the sensor 2 3 To Attach Footrest S Sc cr re ew w...

Страница 8: ...ay and rotate the tray upwards 1 2 1 2 To Attach Music On The Move Parent Tray To assemble Music On The Move align tray holes with posts on handle and snap on To remove Music On The Move pull each sid...

Страница 9: ...not fit inside remove foam Use a Phillips screwdriver to remove the battery door Place batteries in the battery compartment as shown Screw the battery door back onto the unit and replace the foam 1 2...

Страница 10: ...sion is correct retighten nut A tightly by turning it towards you while holding nut B in place F FI IR RS ST T T TI IM ME E U US SE E N NO OT TE E Be sure to activate the hand brake 25 times to stretc...

Страница 11: ...around the back tube as shown 11 1 To Attach Basket WARNING A Al lw wa ay ys s b ba al la an nc ce e t th he e w we ei ig gh ht t o of f t th he e s st tr ro ol ll le er r e ev ve en nl ly y To preve...

Страница 12: ...to secure child safely To unsnap restraint system buckles press tabs to release For proper fit adjust shoulder straps and waist band as shown 1 How to Properly Use Your New Stroller 3 WARNING Avoid se...

Страница 13: ...ed while using this weather shield Only use with this product When using weather shield canopy must be open D DO O N NO OT T leave child in sun under weather shield as child may overheat A AL LW WA AY...

Страница 14: ...e the rear brakes on your stroller C CA AU UT TI IO ON N Rear brakes will disengage when hand brake is released 1 To Recline Seat To recline seat back loosen belt To raise seat back tighten belt 1 2 W...

Страница 15: ...p air pump until tires are filled to 35 PSI 241 kPa or as specified on the tire wall Disassemble pump and store in basket when not in use 2 3 To Properly Use the Tether 1 1 Always attach tether around...

Страница 16: ...To avoid startling your child adjust volume on your personal sound system to its lowest level Turn on your personal sound system and slowly increase volume to a comfortable listening level for you an...

Страница 17: ...stroller There is also an option to set the odometer to kilometers Km or miles ML This is a one time set up but they can be changed in the future if desired using these steps Turn odometer on Push MOD...

Страница 18: ...m ML in the lower right portion of the screen Distance traveled will not advance while the stroller is stopped T TO O D DI IS SP PL LA AY Y B BO OT TH H D DI IS ST TA AN NC CE E E EL LA AP PS SE ED D...

Страница 19: ...ent speed reading CHECK ITEMS 1 Is the battery dead 2 Is the battery properly installed 1 Check for broken wire odometer not properly positioned on clip or sensor and magnet incorrectly aligned 2 Is t...

Страница 20: ...Close canopy Locate trigger fold on frame below parent tray Pull up latches on frame to fold Push stroller forward to fold stroller Engage locking latch 20 To Fold Stroller 1 2 5 3 4 6 6 4 S56J A qxd...

Страница 21: ...s se es s I In nc c o or r J Je ee ep p a an nd d n no o a ap pp pr ro ov va al l b by y t th he em m i is s t to o b be e i im mp pl li ie ed d Jeep is a registered trademark of DaimlerChrysler Corpo...

Страница 22: ...g P Pl le ea as se e d di ir re ec ct t a an ny y c co om mm me en nt ts s q qu ue es st ti io on ns s o or r r re ep pl la ac ce em me en nt t p pa ar rt t r re eq qu ue es st ts s t to o Born with S...

Страница 23: ...23 Replacement Parts List S56J A qxd 03 06 2006 9 53 AM Page 23...

Страница 24: ...payable to Karlisle s Pty Ltd Charge to credit card Visa Mastercard Bank card Card Expiration Date Signature Post to Name Address City State Post Code Telephone Email Address Complete the following fo...

Отзывы: