


114503-2-
CA
(-)
Kohler Co., Kohler, WI
3
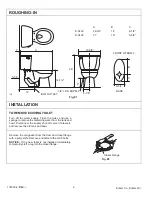
Install two new 5/16” diameter T-bolts into the closet
flange.
Fig. #3
T-Bolts
Closet Flange
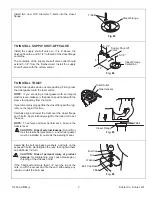
TO INSTALL SUPPLY SHUT-OFF VALVE
Install the supply shut-off valve so it is 8” above the
finished floor line, and 5-1/8” to the left of the closet flange
centerline.
The centerline of the supply shut-off valve outlet should
extend 5-1/4” from the finished wall. Install the supply
shut-off valve with the outlet vertical.
Fig. #4
Supply Shut-Off
Valve
8”
14”
5-1/8”
Closet Flange
Centerline
5-1/4”
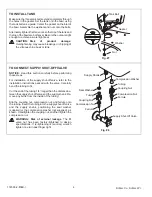
TO INSTALL TOILET
Set the toilet upside down on some padding. Firmly press
the toilet gasket onto the toilet outlet.
NOTE: If you are using a toilet gasket with an integral
plastic sleeve, make sure the gasket is positioned with the
sleeve facing away from the toilet.
If you temporarily plugged the the closet flange with a rag,
remove the rag at this time.
Carefully align and lower the toilet over the closet flange
and T-bolts. Apply full body weight to the toilet rim to set
the seal.
NOTE: To achieve optimum performance, be sure the
toilet is level.
CAUTION: Risk of external leakage: Do not lift or
rock the toilet after placement – a new toilet gasket
must be installed if you break the watertight seal.
Fig. #5
Toilet Outlet
Toilet Gasket
Closet Flange
T-Bolt
Assemble the bolt cap bases, washers, and nuts on the
exposed T-bolts. Handtighten the nuts, then tighten them
an additional 1/2-turn.
CAUTION: Risk of personal injury or product
damage: Overtightening may cause breakage or
chipping of the vitreous china.
If the T-bolts extend more than 1/4” over the top of the
nuts, cut off the excess and file the end. Wipe away any
residue. Install the bolt caps.
Fig. #6
Nut
Washer
Bolt Cap Base
Bolt Cap
T-Bolt
Содержание WELLWORTH K-3432
Страница 8: ... 114503 2 CA 8 Kohler Co Kohler WI ...


