background image

2. Install the Bowl

Install a supply shut-off valve.

Record the model number in the Homeowners Guide.

Lay the toilet down onto a padded surface.

From the bottom of the toilet, firmly press a new wax seal around
the toilet outlet.

Remove the temporary rag (if used) from the toilet flange hole.

Align and lower the toilet over the flange and T-bolts.

CAUTION: Risk of external leakage.

Do not lift or rock the

bowl after placement. If you break the watertight seal, you must
install a new wax seal.

Apply your full body weight around the toilet to set the seal.

Place the plastic bolt cap bases over the T-bolts in the

up

position as marked.

Place the metal washers and nuts on the plastic bolt cap bases
and T-bolts.

CAUTION: Risk of product damage.

Overtightening may cause

breakage or chipping of the vitreous china.

Carefully tighten the nuts.

CAUTION: Risk of product damage.

Protect the vitreous china

from exposure to the saw blade when cutting off excess T-bolt
length.

If the T-bolts extend more than 1/4

(6 mm) over the top of the

nuts, cut off the excess.

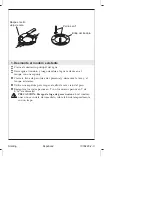
Nut

Washer

Bolt Cap Base

Bolt Cap

T-Bolt

Wax Seal

Closet Flange

T-Bolt

1035429-2-C

4

Sterling

Содержание STERLING 402024

Страница 1: ...Installation Guide Dual Flush Close Coupled Toilet Français page Français 1 Español página Español 1 402024 402025 402027 402028 1035429 2 C ...

Страница 2: ...als Before You Begin CAUTION Risk of personal injury or product damage Handle with care Vitreous china can break or chip if the product is handled carelessly Observe all local plumbing and building codes Carefully inspect the new toilet for damage Illustrations shown may not represent your specific product 10 Adjustable Wrench Supply Shut Off Valve Tape Measure Pipe Wrench Tubing Cutter Safety Gla...

Страница 3: ...e if present and remove the old tank and bowl Remove the old wax seal from the floor with a putty knife Replace the old T bolts with the new 5 16 diameter T bolts CAUTION Risk of hazardous gases If the new toilet is not installed immediately temporarily stuff a rag in the closet flange T Bolts Closet Flange Scrape off the old wax seal Sterling 3 1035429 2 C ...

Страница 4: ...all a new wax seal Apply your full body weight around the toilet to set the seal Place the plastic bolt cap bases over the T bolts in the up position as marked Place the metal washers and nuts on the plastic bolt cap bases and T bolts CAUTION Risk of product damage Overtightening may cause breakage or chipping of the vitreous china Carefully tighten the nuts CAUTION Risk of product damage Protect ...

Страница 5: ...Install the Bowl cont Attach the bolt caps Sterling 5 1035429 2 C ...

Страница 6: ...ION Risk of product damage Overtightening may cause breakage or chipping of the vitreous china Install the bolt gaskets onto the tank bolts and slide the tank bolts down through the holes in the tank and bowl Assemble the washers and nuts to the tank bolts Securely tighten the nuts so the tank is level Be sure the nuts are tight enough to achieve a watertight seal Tank Gasket Washer Brass Nut Tank...

Страница 7: ...e push button and then the other and check all connections for leaks Verify proper operation Periodically check for leaks for several days following the installation Adjustments Adjust the water level in the tank by squeezing and sliding the C clip on the float rod To raise the water level slide the C clip up To lower the water level slide the C clip down Ferrule Supply Shank Tubing Compression Wa...

Страница 8: ...e small push button Then pull out and remove the large push button Press the large push button onto the larger diameter rod and the small push button onto the smaller rod Insert the rods into the side holes in the push button housing in the center of the cover Press down on the push buttons until they click into place in the housing Flush the toilet several times and check all connections for leak...

Страница 9: ... Risque de blessure corporelle ou d endommagement du produit Manipuler avec précaution La porcelaine vitrifiée peut se briser ou se fendre si le produit est manipulé avec négligence Respecter tous les codes de plomberie et de bâtiment locaux Examiner soigneusement le nouveau W C pour en déceler tout dommage Les illustrations peuvent être différentes de votre produit actuel 10 Clé à molette Valve d...

Страница 10: ...éservoir et sa cuvette Retirer du sol l anneau en cire existant avec un couteau à mastic Remplacer les vieux écrous en T avec de nouveaux de Ø 5 16 ATTENTION Risque d émanation de gaz nocifs Si l installation du nouveau W C n est pas immédiate recouvrir temporairement la bride du sol avec un chiffon Boulons en T Bride de sol Retirer le vieux joint en cire 1035429 2 C Français 2 Sterling ...

Страница 11: ...en cire Appliquer une pression de tout le poids du corps autour du W C pour fixer le joint Placer les bases de capuchons en plastique sur les boulons en T dans la position Haut tel que marqué Placer les rondelles et écrous métalliques sur les capuchons en plastique et boulons en T ATTENTION Risque d endommagement du produit Le serrage excessif peut casser ou fendre la porcelaine vitrifiée Serrer s...

Страница 12: ...Installer la cuvette cont Si les boulons en T s étendent à plus de 1 4 6 mm du dessus des boulons couper l excédent Installer les bouchons des boulons 1035429 2 C Français 4 Sterling ...

Страница 13: ...uit Le serrage excessif peut casser ou fendre la porcelaine vitrifiée Installer les deux joints des boulons du réservoir et glisser ces derniers à travers les orifices du réservoir et de la cuvette Assembler les rondelles et les écrous sur les boulons du réservoir Bien serrer les écrous pour niveler le réservoir S assurer que les écrous soient assez serrés pour réaliser une bonne étanchéité Réserv...

Страница 14: ...tre pour en vérifier le bon fonctionnement Vérifier le bon fonctionnement Vérifier périodiquement s il y a des fuites ceci plusieurs jours après l installation Réglages Régler le niveau d eau du réservoir en comprimant et en faisant glisser le clip C sur la tige du flotteur Pour élever le niveau d eau glisser le clip C vers le haut Pour abaisser le niveau d eau glisser le clip C vers le bas Collet...

Страница 15: ...tit Puis retirer le bouton poussoir le plus large Presser le large bouton sur la tige au diamètre le plus large et le bouton le plus petit sur la tige la plus petite Insérer les tiges par les trous sur le coté dans le bouton poussoir au centre du couvercle Presser sur le bouton poussoir jusqu a ce qu il s enclenche dans son logement Purger le W C plusieurs fois et vérifier les connexions de toutes...

Страница 16: ...IÓN Riesgo de lesiones personales o daños al producto Trate el producto con cuidado La porcelana vitrificada puede romperse o despostillarse si no se tiene cuidado al manejar el producto Cumpla con todos los códigos locales de plomería y de construcción Revise atentamente el nuevo inodoro para ver si está dañado Es posible que las ilustraciones mostradas no representen su producto específico Llave...

Страница 17: ...smonte la taza y el tanque existentes Utilice una espátula para raspar el sello de cera viejo del piso Reemplace los viejos pernos en T con los nuevos pernos en T de 5 16 de diámetro PRECAUCIÓN Riesgo de fuga de gases nocivos Si el inodoro nuevo no se instala de inmediato cubra la brida temporalmente con un trapo Pernos en T Brida del inodoro Raspe el sello viejo de cera Sterling Español 2 1035429...

Страница 18: ... instalar un nuevo sello de cera Aplique todo el peso de su cuerpo sobre el inodoro para fijar el sello Coloque las bases de los tapapernos plásticos sobre los pernos en T y en posición hacia arriba como se indica Monte las arandelas metálicas y tuercas en las bases de los tapapernos plásticos y los pernos en T PRECAUCIÓN Riesgo de daños al producto Si se aprieta en exceso la porcelana vitrificada...

Страница 19: ...Instalación de la taza cont Si los pernos en T sobresalen más de 1 4 6 mm por la parte superior de las tuercas corte el exceso Monte los tapapernos Sterling Español 4 1035429 2 C ...

Страница 20: ...l producto Si se aprieta en exceso la porcelana vitrificada puede romperse o despostillarse Instale los empaques para los pernos en los pernos del tanque y deslize los pernos del tanque hacia abajo a través de los orificios en el tanque y la taza Monte las arandelas y tuercas sobre los pernos del tanque Apriete bien las tuercas de manera que el tanque esté nivelado Verifique que las tuercas estén ...

Страница 21: ... haya fugas en las conexiones Verifique que funcione correctamente Verifique periódicamente que no haya fugas durante los días siguientes a la instalación Ajustes Ajuste el nivel de agua apretando el clip tipo C y deslizándolo en la varilla del flotador Para elevar el nivel del agua deslice el clip tipo C hacia arriba Para bajar el nivel del agua deslice el clip tipo C hacia abajo Casquillo Vástag...

Страница 22: ...eño Luego saque y extraiga el botón grande Presione el botón grande en la varilla de mayor diámetro y el botón pequeño en la varilla más pequeña Introduzca las varillas por los orificios laterales en el alojamiento del botón en el centro de la tapa Oprima los botones hasta que encajen en el alojamiento Descargue el inodoro varias veces y verifique no haya fugas en las conexiones Verifique periódic...

Страница 23: ...1035429 2 C ...

Страница 24: ...USA 1 888 STERLING México 001 877 680 1310 SterlingPlumbing com 2005 Sterling Plumbing 1035429 2 C ...

Отзывы: