background image

-2-

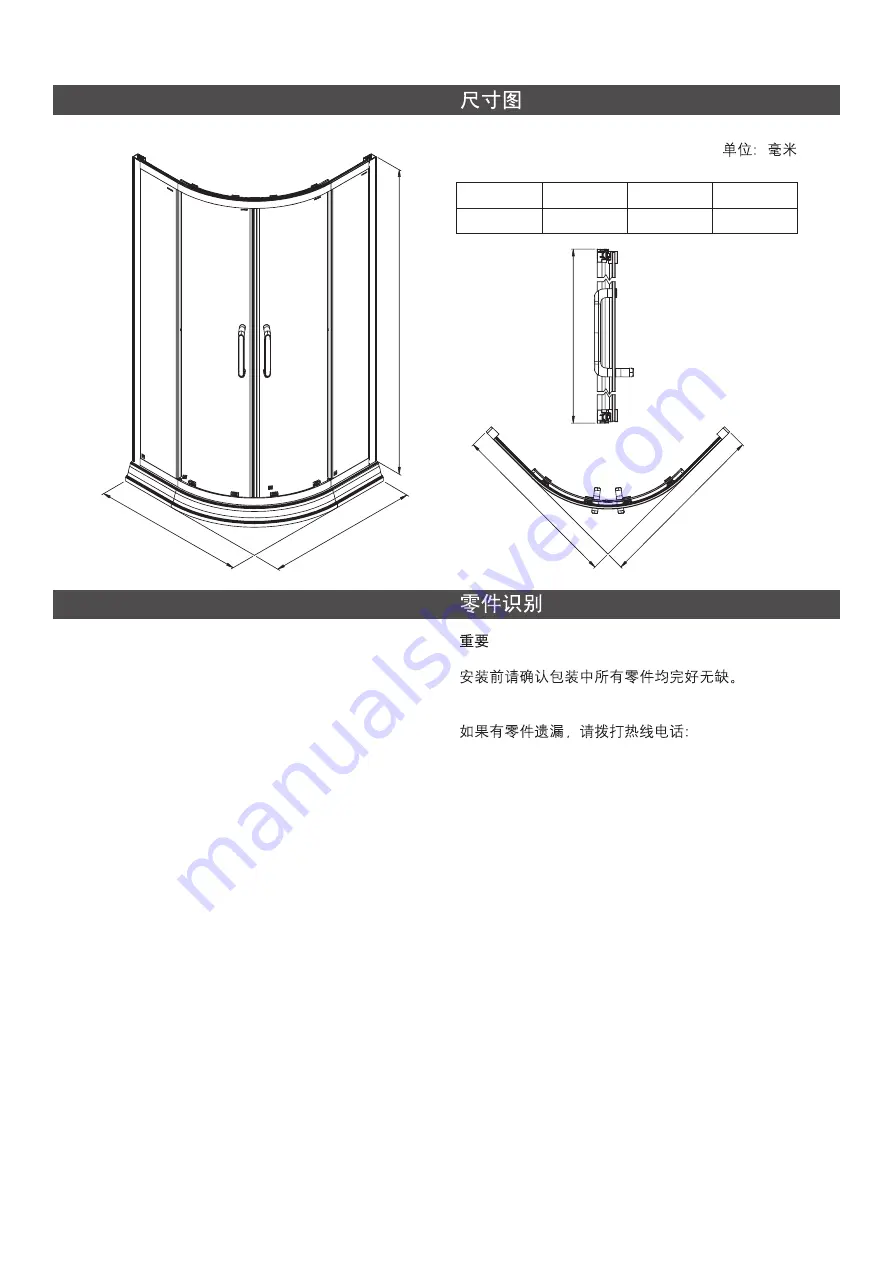
ROUGHING-IN

Unit: mm

L

R

H

SKU

K-706035T

800-1250

800-1250

1850-2000

800-820-2628

IMPORTANT

800-820-2628

Before installation check that all components are
correctly supplied.

If any parts are missing please ring the helpline.

PARTS IDENTIFICATION

PARTS IDENTIFICATION

R

R

L

L

H

H

1279909-T01-A

Содержание SKYLINE K-706035T-FM-SHP

Страница 1: ... correctly installed prior to installing your shower door Prepare waterproof layer to wall and floor of the showering area It is not allowed for any presence of electric switches and sockets Make sure the floor drain runs smoothly Before starting the door installation lay out and identify all the parts Use the exploded view illustrated on page 3 for reference For the installation method of customi...

Страница 2: ... 1250 800 1250 1850 2000 800 820 2628 IMPORTANT 800 820 2628 Before installation check that all components are correctly supplied If any parts are missing please ring the helpline PARTS IDENTIFICATION PARTS IDENTIFICATION R R L L H H 1279909 T01 A ...

Страница 3: ...ding Wall Side Panel Skyline Sliding Insert Seal Csk Screw ST3 5X12 ST3 5X12 X2 X2 X4 X2 X2 X4 X2 X2 Wall Side Panel Skyline Sliding Wall Jamb Side Panel Skyline Sliding Side Waterproof Seal Skyline Sliding Rail Skyline Sliding Insert Seal U Seal Skyline Sliding U Straight Magnetic Seal 45 Double Metal Handle Skyline Sliding Top Roller Assy Skyline Sliding Bottom Roller Assy Skyline Sliding Top Co...

Страница 4: ... Sealant Tools Required 6mm INSTALLATION REQUIREMENTS INSTALLATION REQUIREMENTS INSTALLATION Mark the wall 20mm in from the front edge of the tray on both sides 20mm STEP 1 IMPORTANT MUST Tray be level along front edge Mark the wall 20mm in from the front edge of the tray 20mm IMPORTANT Tray must be level in all planes or door will not install properly 0mm 4 1279909 T01 A ...

Страница 5: ...mes on the wall jamb Insert one side of the wall jamb into wall and then insert the other side to the wall jamb 0mm The wall jamb be kept vertical must The wall jamb be kept vertical must 0mm Fix wall jambs STEP 4 STEP 3 6mm 1279909 T01 A ...

Страница 6: ...d bottom frames to make the fixed glass firm Use U shaped protective seals on top and bottom of the fixed glass U Adjust the top and bottom frames vertical The length shall be the same on two sides Then rotate the lock to fix wall jamb STEP 5 IMPORTANT MUST Tray be level along front edge 0mm Rotate clockwise to lock Rotate clockwise to lock X X Install blocks Insert side seal 1279909 T01 A ...

Страница 7: ...Install seals and handle Cut the seals to proper length to prevent scrunching the wall jamb and glass Note STEP 8 STEP 9 Install and adjust door glass Install top roller Install bottom roller 1279909 T01 A ...

Страница 8: ...the enclosure for at least 24 hours 24 24hrs STEP 12 8 STEP 11 Apply silicone sealant to bottom of the fixed glass and both sides of the bottom threshold STEP 10 Install cover extrusion and top cover 1279909 T01 A ...

Отзывы: