background image

27

Electrical System

18 690 06 Rev. --

KohlerEngines.com

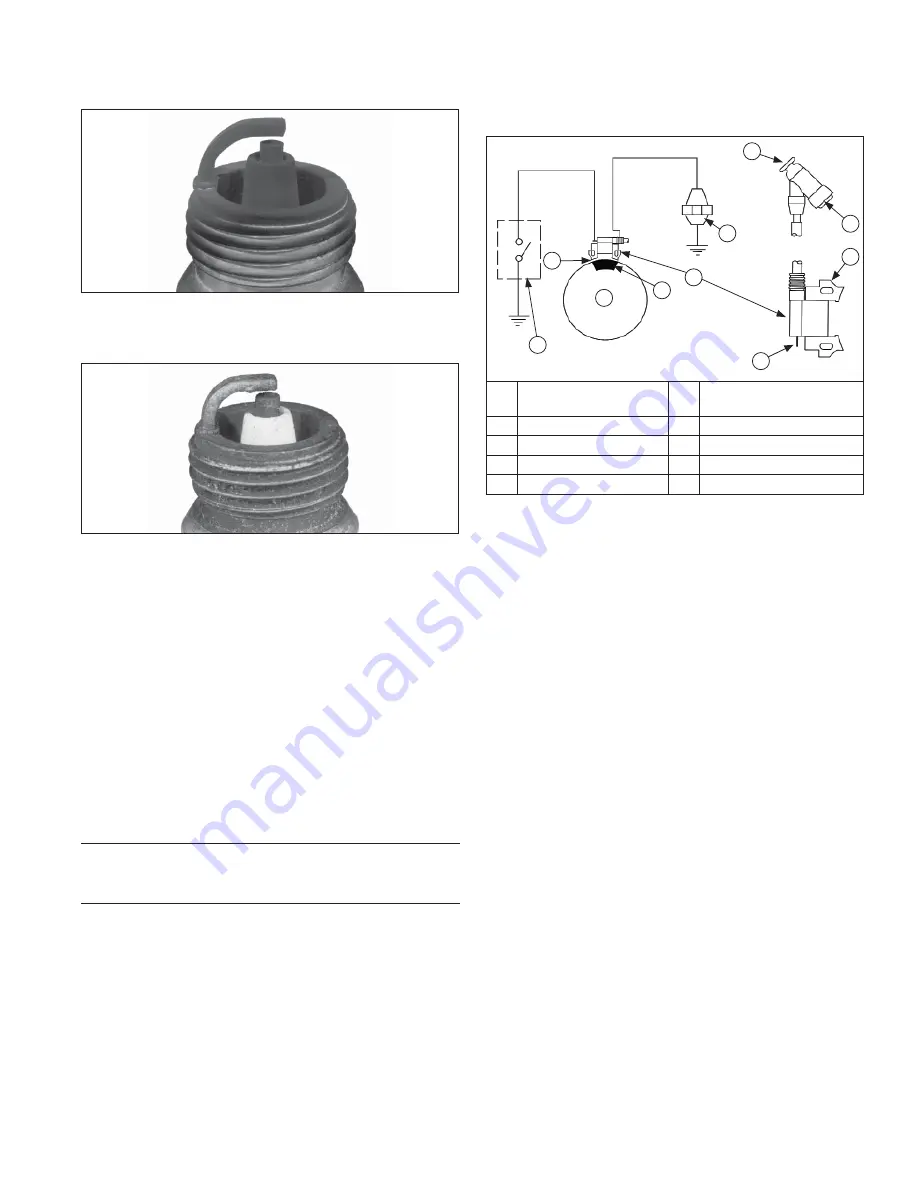
Carbon Fouled

Soft, sooty, black deposits indicate incomplete 

combustion caused by a restricted air cleaner, over rich 

carburetion, weak ignition, or poor compression.

Overheated

Chalky, white deposits indicate very high combustion 

temperatures. This condition is usually accompanied 

by excessive gap erosion. Lean carburetor settings, 

an intake air leak, or incorrect spark timing are normal 

causes for high combustion temperatures.

BATTERY

A 12 volt battery (not furnished) with a minimum current 

rating of 230 cold cranking amps/18 amp hours should 

be suf

fi

 cient for cranking most electric start engine 

models. Actual cold cranking requirement depends 

on engine size, application and starting temperatures. 

Cranking requirements increase as temperatures 

decrease and battery capacity shrinks. Refer to 

equipment's operating instructions for speci

fi

 c battery 

requirements.
If battery charge is insuf

fi

 cient to turn over engine, 

recharge battery.

Battery Maintenance

Regular maintenance is necessary to prolong battery 

life.

Battery Test

To test battery, follow manufacturer's instructions.

ELECTRONIC IGNITION SYSTEM
Inductive Discharge Ignition System Components

A

C

D

E

F

G

H

I

J

B

A

Kill Switch/Off Position 

of Switch

B

Air Gap 0.254 mm 

(0.010 in.)

C

Flywheel

D

Magnet

E

Ignition Module

F

Spark Plug

G

Kill Terminal

H

Lamination

I

Spark Plug Terminal

J

Spark Plug Boot

These engines are equipped with a dependable 

magneto breakerless ignition. In such a system, 

electrical energy is generated by cutting of magnetic 

fl

 ux 

lines generated from ignition magnet on engine 

fl

 ywheel 

via prescribed air gap as it passes ignition module. 

This energy is transferred through ignition module 

laminations and is then converted in module electronics 

and stored in module primary coil, as a current. Stored 

energy is transferred at correct moment by triggering a 

semiconductor switch inside module. Electrical break 

by switch initiates energy transfer by causing collapse 

of magnetic 

fi

 eld at coil primary. This includes a voltage 

at coil primary that is ampli

fi

 ed via transformer action at 

coil secondary. Amplitude of voltage at coil secondary 

is suf

fi

 cient to jump gap at spark plug, igniting fuel air 

mixture in gap and initiating combustion. Note that by 

design, these modules only will provide proper function if 

mounted in correct orientation.
This ignition system is designed to be trouble free for 

life of engine. Other than periodically checking/replacing 

spark plugs, no maintenance or timing adjustments 

are necessary or possible. Mechanical systems do 

occasionally fail or break down. Refer to Troubleshooting 

to determine root of a reported problem.
Reported ignition problems are most often due to poor 

connections. Before beginning test procedure, check 

all external wiring. Be certain all ignition-related wires 

are connected, including spark plug leads. Be certain all 

terminal connections 

fi

 t snugly. Make sure ignition switch 

is in run position. 

Содержание RH255

Страница 1: ...m 24 Governor System 25 Lubrication System 26 Electrical System 32 Starter System 36 Disassembly Inspection and Service 45 Reassembly IMPORTANT Read all safety precautions and instructions carefully b...

Страница 2: ...NG Accidental Starts can cause severe injury or death Disconnect and ground spark plug lead s before servicing Before working on engine or equipment disable engine as follows 1 Disconnect spark plug l...

Страница 3: ...owever warranty repairs must be performed by a Kohler authorized dealer MAINTENANCE SCHEDULE After first 5 Hours Change oil Lubrication System Every 100 Hours or Annually Clean replace foam element Ai...

Страница 4: ...roved and should NOT be used effects of old stale or contaminated fuel are not warrantable Fuel must meet these requirements Clean fresh unleaded gasoline Octane rating of 87 R M 2 or higher Research...

Страница 5: ...00 0 591 SAE FLANGE 4X 5 16 24 UNF 2B 15 00 0 591 297 37 11 707 106 00 4 173 5 00 0 197 15 24 0 600 40 00 1 575 35 71 1 406 80 50 3 169 1 16 0 046 3 89 0 153 61 24 2 411 MOUNTING FACE 19 0 0 75 4 74 0...

Страница 6: ...or Mounting Nut 8 N m 70 8 in lb Stud 10 N m 88 5 in lb Blower Housing Retractable Starter Assembly and Sheet Metal M6 Screw 8 N m 70 8 in lb M6 Nut 8 N m 70 8 in lb Connecting Rod Cap Fastener torque...

Страница 7: ...Clearance 0 016 0 052 mm 0 0006 0 0020 in Bore I D New Max Wear Limit 14 000 14 018 mm 0 5512 0 5519 in 14 048 mm 0 5531 in Connecting Rod Crankpin End I D 21 C 70 F New Max Wear Limit 30 021 30 026...

Страница 8: ...g Rod Journal O D O D New O D Max Wear Limit Max Taper Max Out of Round Width 29 975 29 985 mm 1 1801 1 1805 in 29 920 mm 1 1779 in 0 025 mm 0 0010 in 0 025 mm 0 0010 in 25 02 25 08 mm 0 9850 0 9874 i...

Страница 9: ...e Used Bore max 0 020 0 060 mm 0 0008 0 0024 in 0 15 mm 0 0059 in Top Compression Ring End Gap New Bore Used Bore max 0 147 0 344 mm 0 0058 0 0136 in 1 00 mm 0 0394 in Center Compression Ring End Gap...

Страница 10: ...5 32 mm 0 2094 in Exhaust Valve Stem O D New Max Wear Limit 5 47 mm 0 2153 in 5 305 mm 0 2088 in Intake Valve Stem to Guide New Max Wear Limit 0 024 0 039 mm 0 001 0 002 in 0 10 mm 0 0004 in Exhaust V...

Страница 11: ...nglish Fastener Torque Recommendations for Standard Applications Bolts Screws Nuts and Fasteners Assembled Into Cast Iron or Steel Grade 2 or 5 Fasteners Into Aluminum Size Grade 2 Grade 5 Grade 8 Tig...

Страница 12: ...Dealer Tool Kit Domestic Complete kit of Kohler required tools Components of 25 761 39 S Ignition System Tester Cylinder Leakdown Tester Oil Pressure Test Kit Rectifier Regulator Tester 120 V AC 60Hz...

Страница 13: ...t available Starter Brush Holding Tool Solenoid Shift SE Tools KLR 82411 SE Tools KLR 82416 Triad OHC Timing Tool Set For holding cam gears and crankshaft in timed position while installing timing bel...

Страница 14: ...ng gear teeth Bosses will lock tool and flywheel in position for loosening tightening or removing with a puller A spanner wrench to lift rocker arms or turn crankshaft may be made out of an old junk c...

Страница 15: ...to check simple causes which at first may seem too obvious to be considered For example a starting problem could be caused by an empty fuel tank Some general common causes of engine troubles are list...

Страница 16: ...ndications of improper fit and seal Check air cleaner element Look for holes tears cracked or damaged sealing surfaces or other damage that could allow unfiltered air into engine A dirty or clogged el...

Страница 17: ...closed 2 Start engine and run no load high speed 3 Open clamp and note water level in tube Level in engine side should be a minimum of 10 2 cm 4 in above level in open side If level in engine side is...

Страница 18: ...Install a 3 8 in breaker bar into hole slot of holding tool so it is perpendicular to both holding tool and crankshaft PTO If flywheel end is more accessible use a breaker bar and socket on flywheel...

Страница 19: ...ir Unhook latch and remove air cleaner cover Paper Element Remove and replace paper element Foam Element Remove foam element replace or wash in warm water with detergent Rinse and allow to air dry Rei...

Страница 20: ...er use gasoline as a cleaning agent Filter is in tank outlet fitting Remove fuel tank from engine Remove outlet fitting from fuel tank Check condition and replace if required Torque fitting to 2 0 N m...

Страница 21: ...rburetor 1 Make sure fuel tank is filled with clean fresh gasoline 2 Make sure fuel tank cap vent is not blocked and is operating properly 3 Make sure fuel is reaching carburetor This includes checkin...

Страница 22: ...ce of float will again overcome fuel pressure rising to predetermined setting and stop flow Slow and Mid Range At low speeds engine operates only on slow circuit As a metered amount of air is drawn th...

Страница 23: ...emoval by loosening removing bowl drain screw 3 Remove float pin and inlet needle Seat for inlet needle is not serviceable and should not be removed 4 Clean carburetor bowl and inlet seat areas as req...

Страница 24: ...il it stops 5 Rotate governor shaft clockwise until it stops 6 Hold both in this position and torque governor lever nut to 7 N m 62 in lb Governed speed setting is determined by position of throttle c...

Страница 25: ...plug and tighten securely CHANGE OIL Change oil while engine is warm 1 Clean area around oil fill plug dipstick and drain plug 2 Remove drain plug and oil fill plug dipstick Drain oil completely 3 Rei...

Страница 26: ...feeler gauge Adjust gap to 0 76 mm 0 03 in 2 Install plug into cylinder head 3 Torque plug to 27 N m 20 ft lb Inspection Inspect each spark plug as it is removed from cylinder head Deposits on tip ar...

Страница 27: ...al J Spark Plug Boot These engines are equipped with a dependable magneto breakerless ignition In such a system electrical energy is generated by cutting of magnetic flux lines generated from ignition...

Страница 28: ...m is used Make sure all ground connections are secure and in good condition Disconnect both battery cables before doing electrical welding on equipment powered by engine Also disconnect other electric...

Страница 29: ...690 06 Rev KohlerEngines com Wiring Diagram 3 Amp Charging System Rectified Only B G D C E H A F I A Diode B Stator C Ignition Module D Spark Plug E Ignition Switch F Starter Motor G Relay H Battery...

Страница 30: ...com 18 690 06 Rev Wiring Diagram 10 Amp Charging System with Rectifier Regulator A G D E H B C F I A Rectifier Regulator B Stator C Ignition Module D Spark Plug E Ignition Switch F Starter Motor G Rel...

Страница 31: ...Connect an AC voltmeter across stator leads female terminals With engine running at 3600 RPM measure AC output from stator Condition Conclusion Voltage is 20 0 volts or more Stator is OK Rectifier reg...

Страница 32: ...urns slowly Battery Check specific gravity of battery If low recharge or replace battery as necessary Wiring Check for corroded connections poor ground connection Transmission or Engine Make sure clut...

Страница 33: ...om starter for testing a Set an ohmmeter on Rx1 scale and zero meter Connect one ohmmeter lead to small spade terminal on relay Connect other ohmmeter lead to relay mounting bracket Condition Conclusi...

Страница 34: ...t comes in contact with hot parts or sparks from ignition Never use gasoline as a cleaning agent Explosive Fuel can cause fires and severe burns Do not fill fuel tank while engine is hot or running Re...

Страница 35: ...rter rope with double left hand knot in one end through inside of pulley through eyelet in housing Pull rope until knot meets inside of pulley Tie a slipknot approximately 24 in from free end of rope...

Страница 36: ...p Cover I Foam Element J Paper Element K Air Cleaner Cover Clean all parts thoroughly as engine is disassembled Only clean parts can be accurately inspected and gauged for wear or damage There are man...

Страница 37: ...ng Spring F Control Assembly G Carburetor H Blower Housing Retractable Starter Assembly 3 If engine has evap air cleaner base disconnect evap hose from base 4 Remove air cleaner base and base gasket 5...

Страница 38: ...inder Head Components G H I L N A B C D E F K M J A Valve Cover B Adjusting Nut C Rocker Arm D Rocker Arm Stud E Push Rod Guide F Push Rod G Valve Keeper H Valve Spring I Intake Valve Stem Seal J Cyli...

Страница 39: ...2 5256 in 62 15 mm 2 4468 in Valve Length Service Limit 64 15 mm 2 5256 in 62 15 mm 2 4468 in D Face Seat Width Maximum 2 0 mm 0 079 in 2 0 mm 0 079 in E Face Seat Angle 90 90 5 89 5 90 90 90 5 89 5...

Страница 40: ...interference angle where maximum pressure occurs on outside diameters of valve face and seat Lapping Valves Reground or new valves must be lapped in to provide proper fit Use a hand valve grinder wit...

Страница 41: ...rfaces as this can cause leaks Inspection Inspect oil seal in closure plate and remove it if it is worn or damaged New oil seal can be installed after closure plate is assembled to crankcase See Reass...

Страница 42: ...aft from crankcase Connecting Rod Inspection and Service Check bearing area big end for excessive wear score marks running and side clearances Replace connecting rod and end cap if scored or excessive...

Страница 43: ...Use following procedure to accurately measure piston to bore clearance 1 Use a micrometer and measure diameter of piston 15 mm 0 5905 in above bottom of piston skirt and perpendicular to piston pin 2...

Страница 44: ...e Governor Assembly NOTE Mark location of all parts as governor assembly is removed 1 Remove hitch pin from governor cross shaft 2 Remove governor cross shaft from inside crankcase 3 Remove cup and wa...

Страница 45: ...clean 2 Using an appropriate seal driver install oil seal into closure plate to a depth of 3 52 mm 0 139 in from outer surface 3 Using an appropriate seal driver install oil seal into crankcase to a...

Страница 46: ...top rail expander ring and bottom rail 1 Install piston with index mark on piston to connecting rod with dipper of end cap down 2 Install connecting rod with offset down and oil hole in 4 o clock pos...

Страница 47: ...efully seat ends of camshaft and balance shaft into their mating bearings Rotate crankshaft slightly to help engage governor gear teeth 5 Install screws securing closure plate to crankcase Torque scre...

Страница 48: ...onding hole on flywheel Hold in position and install nut Finger tighten to keep cup indexed 6 Use a flywheel strap wrench and torque wrench to tighten flywheel nut Torque nut to 74 N m 655 in lb Insta...

Страница 49: ...pet socket 3 Assemble rocker arms adjusters and locknuts onto rocker arm studs and push rods 4 Adjust valve tappet clearance as follows a Be sure piston is still at top of compression stroke b Insert...

Страница 50: ...Control Panel if equipped 1 Align and mount electric starter onto crankcase Install and torque screws to 24 N m 212 in lb 2 Connect electrical leads for ignition module ignition switch relay and start...

Страница 51: ...across top of blower housing through clips and toward carburetor while positioning fuel tank on crankcase mounting brackets If engine has evap fuel tank make sure that hose is in proper position 2 Sec...

Страница 52: ...e be sure to do following 1 Make sure all hardware is properly torqued 2 Make sure oil drain plugs and oil fill plugs are tightened securely 3 Fill crankcase with correct oil Refer to Maintenance and...

Страница 53: ...53 18 690 06 Rev KohlerEngines com...

Страница 54: ...54 KohlerEngines com 18 690 06 Rev...

Страница 55: ...55 18 690 06 Rev KohlerEngines com...

Страница 56: ...56 KohlerEngines com 18 690 06 Rev 8 85612 30913 6 1P18 690 06 2014 by Kohler Co All rights reserved...

Отзывы: