background image

1345406-T01-B

-3-

STEP

10

STEP

1

STEP

2

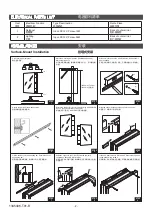
Slide two clips onto the bottom T-slot. Drill pilot holes and 

secure with round-headed long screws.

将两个夹子滑入底部

T

型槽。钻安装孔。用圆头的长螺钉固

定搭扣。

Find the two bracket locations on each side of the cabinet.

在镜柜两侧找出支架位置。

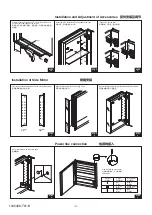
Cover the screws with the screw caps.

安装螺帽。

Install the clips. Insert the shelves between the clips.

安装夹子。将层板插入夹子中。

Align the brackets with the mounting holes.

将支架与安装孔对齐。

If needed, align the door.

若有需要,可对柜门进行调整。

Secure the brackets with the round-headed short screws.

用圆头短螺钉将支架固定。

STEP

4

STEP

1

STEP

1

STEP

2

STEP

3

Installation and Adjustment of Accessories

配件安装及调节

Power line connection

电源线接入

Installation of Side Mirror

侧镜安装

51mm

3/32"

Left Side

左侧

Right Side

右侧

Wire Input (three-core cable)

外部电源线输入(三芯电缆线)

220V/50Hz

Fixture

接线座

Outlet

电源电线

Hot

火线

Brown

棕色线

Ground

地线

Yellow&Green

黄绿色线

Neutral

零线

Blue

蓝色线

Wiring Color

电线颜色

Содержание Grooming K-30495T-L

Страница 1: ...nstallation read all operating and safety instructions All information in these instructions is based upon the latest product information available at the time of publication Kohler China reserves the right to make changes in product characteristics packaging or availability at any time without notice These instructions contain important care cleaning and warranty information please leave instruct...

Страница 2: ...utside mirror 根据左右开门安装 KOHLER标志在外镜底部 Slide two clips onto the T slot Ensure the cabinet is centered as desired Drill pilot holes 将两个夹子滑入顶部T型槽 确保镜柜位于所需的中心位置 钻安装孔 Mark hole locations on the wall Drill holes Insert anchors where needed 在墙上标记安装孔的位置 钻孔 在所需处插入入墙胶粒 Mark the mounting bar position centered as desired Mark stud locations 标记安装支架的位置 根据所需确定中心点 标记螺钉的 位置 ELECTRICAL PARTS LIST 电器部件清单 INSTALLATION...

Страница 3: ... the clips 安装夹子 将层板插入夹子中 Align the brackets with the mounting holes 将支架与安装孔对齐 If needed align the door 若有需要 可对柜门进行调整 Secure the brackets with the round headed short screws 用圆头短螺钉将支架固定 STEP 4 STEP 1 STEP 1 STEP 2 STEP 3 Installation and Adjustment of Accessories 配件安装及调节 Power line connection 电源线接入 Installation of Side Mirror 侧镜安装 51mm 3 32 Left Side 左侧 Right Side 右侧 Wire Input three core cable 外部电源...

Страница 4: ...cally by holding down these buttons 3 之后有人接近镜子感应区域 镜灯缓慢亮起 电源键蓝灯亮起 亮度 色温键维持白色 可供单击换级 长按无级循环调整 3 After the power button is pressed again in front of the mirror the light slowly goes off and the defogger closes after 30 minutes The buttons enter into the factory set status The brightness and the color temperature buttons go off and the brightness and the color temperature are unadjustable 3 在镜前再次点击电源...

Отзывы: