
1271109-2A-A
2
1271109-2A-A
3
INSTALLATION
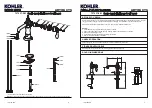
How to Install the Spout
Install the washer(2) into the bottom of faucet(3).
Insert hoses(4) and stud(1) into the hole of lavatory.
From underside of the lavatory, fit the bracket(5) onto
the stud. Position the faucet. Install the washer(6) and
nut(7) onto the stud, tighten the nut by tool(8) to
secure the faucet.
Attach the hoses to water supplies, the hose with
“COLD” label connects to cold water.
Ensure that all coupling nuts are tight. Ensure that
the lever handle is in the off position.
Turn on the main water supply and drain, and check
for leaks. Repair as needed.
Remove the aerator kit(16) by hand. Run hot and
cold water through faucet for about one minute to
remove any debris. Check for leaks. Repair as
needed. Remove any debris from the aerator. Shut
off the faucet. Reinstall the aerator.
INSTALLATION CHECKOUT
CLEANING INSTRUCTIONS
All Finishes: Clean the finish with mild soap and warm water. Wipe entire surface completely dry with clean soft
cloth. Many cleaners may contain chemicals, such as ammonia, chlorine, toilet cleaner etc, which could
adversely affect the finish and are not recommended for cleaning.
Do not use abrasive cleaners or solvents on Kohler faucets and fittings.
3
2
1
4
7
5
6
8
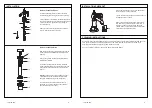
How to Install the Drain
Remove the locknut(15), plastic washer(14) and the
rubber gasket(13) and tailpiece(12) from the drain
body(11).
Supply enough tape or sealant to tailpiece thread.
Reinstall the tailpiece.
Insert the drain body into the lavatory. Install the
rubber gasket(Tapered side up), plastic washer and
locknut back to the drain body in turn. Tighten the
locknut.
NOTE:
If needed, apply a ring of plumbers putty or
other sealants around the underside of the drain
flange(9), instead of using rubber washer(10).
Do not reposition the drain after the locknut is
tightened, or you may break the putty or sealant
seal. Remove any excess putty.
9
10
11
12
13
14
15
16


