7
08467-W2-A
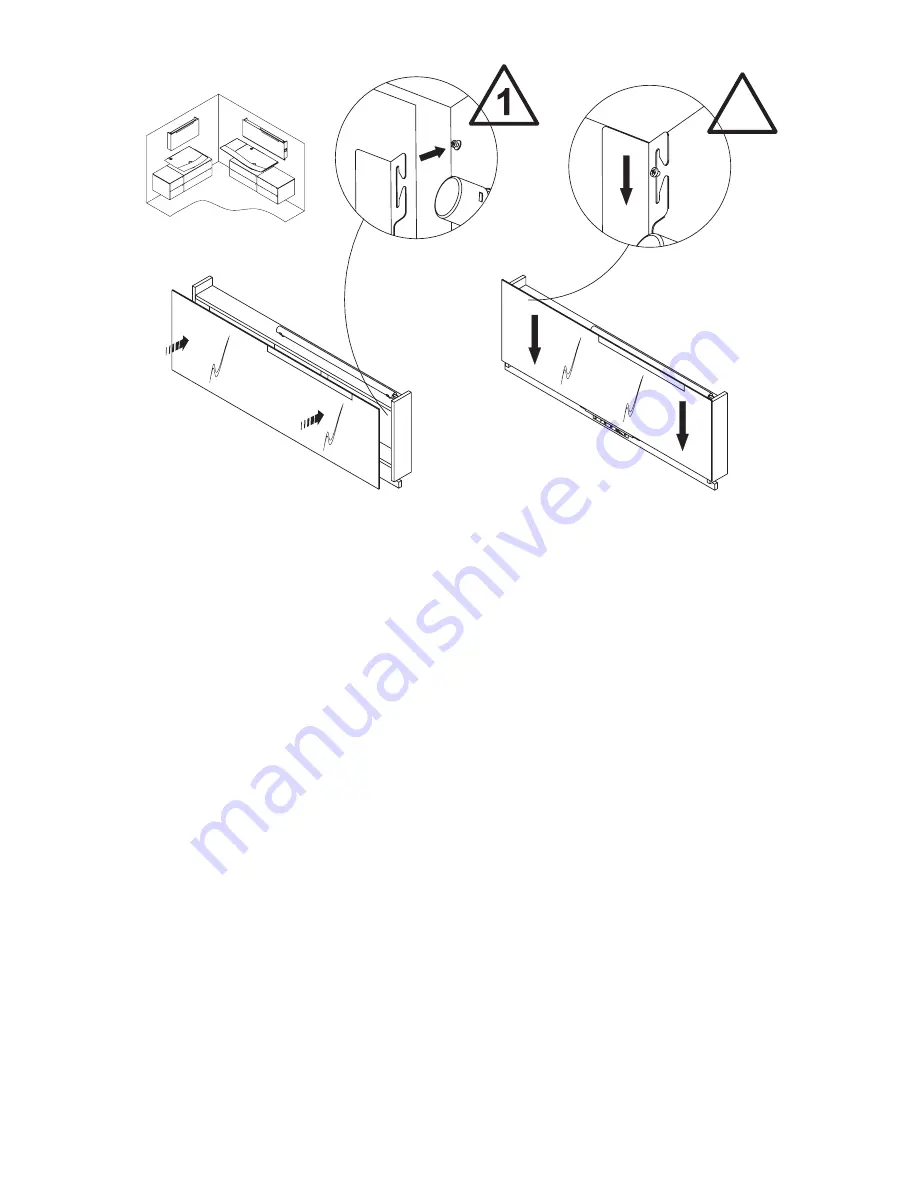
7. carefully lift the mirror back onto the housing making sure that it locates correctly
on the support screws.
2
Страница 1: ...d must be retained with the product for maintenance and operational purposes Installation and User Guide Stillness Fitted Bathroom Furniture MODEL NUMBERS Important Please quote the above model number...
Страница 2: ...user guide covers the installation of the Stillness range of fitted bathroom furniture There are two base units available for installing the washbasins One is available for a single washbasin and anot...
Страница 3: ...stallation General 1 Make sure that the location of the mirrors are in the correct zone away from the bathing area Install the Rectangular Mirror 800 mm 1 Carefully remove the mirror from the housing...
Страница 4: ...uct Special consideration should be given to the fixing arrangements when installing on to a dry lined stud partition or laminated panel wall structures Installers may wish to obtain alternative propr...
Страница 5: ...6 Carefully lift the mirror back onto the housing making sure that it locates correctly on the support screws Install the Rectangular Mirror 1200 mm 1 Carefully remove the mirror from the housing 2 2...
Страница 6: ...ct Special consideration should be given to the fixing arrangements when installing on to a dry lined stud partition or laminated panel wall structures Installers may wish to obtain alternative propri...
Страница 7: ...1084671 W2 A 7 Carefully lift the mirror back onto the housing making sure that it locates correctly on the support screws 2...
Страница 8: ...le for the fixing screws Fit suitable wall plugs Install the 400 mm 600mm and 800 mm Side Units 1 Decide on the location of the side units 2 Mark the positions of the fixing holes for the wall hanging...
Страница 9: ...ixing arrangements when installing on to a dry lined stud partition or laminated panel wall structures Installers may wish to obtain alternative proprietary cavity fixing or choose other options howev...
Страница 10: ...e unit in position on the wall lifting it over the wall hanging brackets 9 Use a spirit level to make sure that the unit is level 10 Level the base unit by adjusting the attachment screws The top scre...
Страница 11: ...dance with the manufacturer s instructions around the opening for the washbasin 2 Install the washbasin making sure that it is orientated correctly 3 Remove and excess sealant Install the Base Unit fo...
Страница 12: ...wall plugs supplied with this product Special consideration should be given to the fixing arrangements when installing on to a dry lined stud partition or laminated panel wall structures Installers ma...
Страница 13: ...ase unit 7 Fit the unit in position on the wall lifting it over the wall hanging brackets 8 Use a spirit level to make sure that the unit is level 9 Level the base unit by adjusting the attachment scr...
Страница 14: ...t the Door Handles 1 If necessary install the door handles A Vertical Loosen screw A on all hinges Adjust door and retighten screw B Lateral Loosen screw B Adjust door and retighten screw C Horizontal...
Страница 15: ...t Never use strong detergents or abrasive cleaners as this may damage the surface finish of your furniture Glass Care When cleaning glass panels or mirrors use a damp cloth or leather with washing up...
Страница 16: ...sed within a commercial business premise is guaranteed for 1 Year against any defect of materials or workmanship Not Covered by this Guarantee Damage or defects arising from incorrect installation imp...