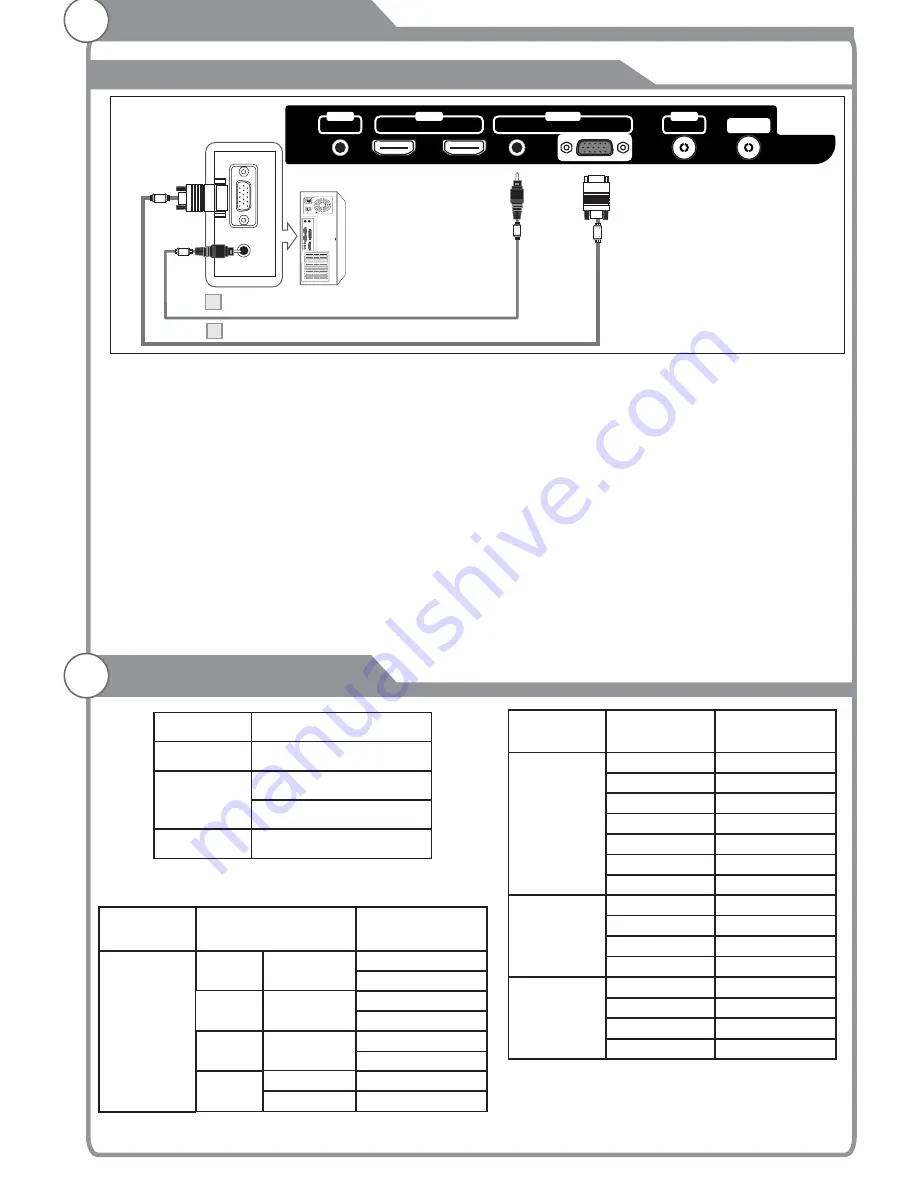
Kogan KGNFHDLED42VBA Скачать руководство пользователя страница 24

Connecting PC

Each PC has a different back panel configuration.
The HDMI jacks do not support PC connection.
1. Connect a D-Sub Cable between VGA/PC IN connector on the TV and the PC output

connector on your computer.

2. Connect a PC Audio Cable between PC AUDIO IN jack on the TV and the Audio Out jack

of the soundcard on your computer.

You should set PC software before you connect a PC to your TV (please refer to "PC

Note:

1. Whenever you connect an external device to your TV, make sure that power on the unit is

turned off.

2. When connecting an external device, match the color of the connection terminal to the

cable.

Display'' settings)

D-Sub Cable (Not supplied)

PC Audio Cable (Not supplied)

PC

2

1

60Hz

60Hz

60Hz

60Hz

640x480

800X600

1024X768

1280X1024

External Connection

Resolution

Input

VGA

60Hz

640x480

PC/VGA

SVGA

XGA

SXGA

75Hz
60Hz
75Hz
60Hz
75Hz
60Hz

800X600

1024X768

1280X1024

Vertical

Frequency

60Hz

1360X768

Supporting signals

Input

Mode

DTV

ATV

DVB-T

CVBS

PAL/NTSC/SECAM

PAL BG DK I

SECAM DK BG

Resolution

Input

Component

60Hz
60Hz

50Hz/60Hz

480i

480p

720p

50Hz/60Hz

1080i

HDMI

DVI-HDMI

50Hz/60Hz

50Hz/60Hz

480p
720p

60Hz

1080i

Vertical

Frequency

50Hz/60Hz

1080p

50Hz/60Hz

1080p

50Hz
50Hz

576i

576p

23

HDMI 2

HDMI 1

AV

OUT

OUT

IN

SPDIF

ANT

AUDIO

VGA

IN

Содержание KGNFHDLED42VBA

Страница 1: ...KGN s USER MANUAL...

Страница 2: ...illed with liquids such as vases shall be placed on the apparatus 1 If the following problems occur Turn off the TV set and unplug the AC power cord immediately if any of the following problems occur...

Страница 3: ...e fatal Ensuring the television is not overhanging the edge of the supporting furniture Installation The ventilation should not be impeded by covering the ventilation opening with items such as newspa...

Страница 4: ...ce of the LCD panel cracks do not touch it until you have unplugged the AC power cord Otherwise electric shock may result Do not throw anything at the TV set The LCD panel may break from the impact an...

Страница 5: ...ote control 12 Teletext 14 Installing Batteries in the Remote Control 16 16 Antenna connection 16 Connecting VCR 17 Connecting a Camcorder 18 Connecting a DVD Player Set Top Box 19 Connecting a DVD Pl...

Страница 6: ...sion if battery is incorrectly replaced please observe polarity Replace only with the same or equivalent type CAUTION OK REC LIST ASPECT REC SOUND AUDIO LANG VOL PROG MENU 1 2 3 4 5 6 7 8 9 0 INFO REC...

Страница 7: ...phone output l TV adopts 32 42 TFT LCD display screen 46 Zero X radiation complies to green environment protection requirement Connect to computer directly to realize TV monitor combo 16 9 wide screen...

Страница 8: ...lanced 46 Diagonal max 42 Diagonal max Display size LED panel resolution Power supply TV receive system Frequency range Video in Antenna Input Speaker output power Power consumption Standby consumptio...

Страница 9: ...Put the screws into the clamps and firmly fasten them onto the wall Confirm that the screws have been firmly installed onto the wall You may need additional material such as an anchor depending on th...

Страница 10: ...r local hardware store and the mounting holes on the back of the unit We recommend removing the TV stand prior to wall mounting the TV Please 1 After detaching the stand fasten 4 mounting screws threa...

Страница 11: ...picture 10 USB2 HDMI 2 HDMI 1 AV OUT OUT IN SPDIF ANT AUDIO VGA IN USB1 Camcorder DVD player PC HDMI output Blu ray disc player Audio system DVD player Video game equipment VCR DVD player with compone...

Страница 12: ...ards this spot on the TV POWER SWITCH Note 1 a c Sensor lights will turn off within 6 seconds of the last operation 2 In order to void errors the TV will go into standby mode after touching the standb...

Страница 13: ...SLEEP button again you will see the Remaining time Notes The sleep timer you have set will be Cancelled when the TV turns off or if a power failure occurs 9 Press it to show channel list on screen 10...

Страница 14: ...8 Press these buttons to adjust TV volume 20 Press these buttons to change channel upward or downward In the teletext these buttons are used to display the next page and previous page 21 Press this bu...

Страница 15: ...ld function on or off When Hold is switched on the page is stopped When Hold is switched acquisition is started Press INDEX button then index page displays certain newspaper with hearing with the tran...

Страница 16: ...ge request is started Press PAGE PAGE buttons to change the subcode pages This button is used to show the time of the Teletext You can press them to enter the number of the Page required You can press...

Страница 17: ...r 300ohm coaxial cable Antenna feeder ANT IN 75ohm coaxial cable Antenna cable Antennas with 300 flat twins Leads W Antennas with 75 Round Leads W External Connection Installing Batteries Point the re...

Страница 18: ...t an RF Cable between the ANT OUT terminal on the VCR and the ANT IN terminal on the TV 4 Connect a Video Cable between the VIDEO OUT jack on the VCR and the VIDEO IN jack on the TV 5 Connect Audio Ca...

Страница 19: ...between the VIDEO jack on the TV and the VIDEO OUT jack on the camcorder 2 Connect Audio Cables between the AUDIO L and AUDIO R jacks on the TV and the AUDIO OUT jacks on the camcorder Note 1 Wheneve...

Страница 20: ...lor of the connection terminal to the cable 1 Connect a Component Cable between the COMPONENT IN Y PB PR jacks on the TV and the COMPONENT Y PB PR jacks on the DVD player 2 Connect Audio Cables betwee...

Страница 21: ...HDMI 2 HDMI 3 or HDMI 4 connector on the TV and the DVI connector on the DVD player Set Top Box 2 Connect Audio Cables between the PC AUDIO IN jack on the TV and the AUDIO OUT jacks on the DVD player...

Страница 22: ...ference between HDMI and DVI is that the HDMI device is smaller in size has the HDCP High Bandwidth Digital Copy Protection coding feature installed and supports multi channel digital audio Each DVD p...

Страница 23: ...ernal input source device has a different back panel configuration When connecting an external device match the color of the connection terminal to the cable 1 Connect Audio Cables between the AUDIO L...

Страница 24: ...onnecting an external device match the color of the connection terminal to the cable Display settings D Sub Cable Not supplied PC Audio Cable Not supplied PC 2 1 60Hz 60Hz 60Hz 60Hz 640x480 800X600 10...

Страница 25: ...he remote control or button on the panel 5 If you want to 6 After switching off the unit you should button is lighted If there is no signal the TV will 10 minutes bottom bottom completely switch off t...

Страница 26: ...enu adjust the volume of TV between 0 to 100 by using key To increase the volume press key To decrease the volume press key Press and the sound cuts off The MUTE icon will appear in the lower left cor...

Страница 27: ...ailed information Press OK to 3 Reminder blue button to reserve programs If the TV is in DTV mode it will automatically turn to the reserved program at the scheduled time Use Schedule yellow button to...

Страница 28: ...ill show the RECORDER page you can press the INFO key on the remote controller to show information in regards to the program you have chosen you can press the OK key on the remote controller to Prev D...

Страница 29: ...olor Adjusts the colors making them lighter or darker Sharpness Adjusts the outline of objects to either sharpen them or make them more dull Tint Adjusts the color of objects making them more red or g...

Страница 30: ...suit your user preferences 1 Press key to select a particular item 2 Press key to decrease or increase the value of a particular item Note The adjusted values are stored according to the selected part...

Страница 31: ...ust the volume every time the channel is changed Auto Volume automatically adjusts the volume of the desired channel by lowering the sound output when the modulation signal is high or by raising the s...

Страница 32: ...nnels When the whole searching is finished all the channels will be stored in memory and a message will appear on the screen as per the diagram on the right NOTE 1 If you want to exit the ATV searchin...

Страница 33: ...Note Only available in ATV program button to choose the channel in ATV mode you want to move and press YELLOW button to move it SKIP button to choose the channel you want to skip and press BLUE butto...

Страница 34: ...f Time item press button or OK button to enter the submenu set the day time to turn off the TV set In On Time item press button or OK button to enter the submenu set the time to turn on the TV set whe...

Страница 35: ...OK OK p q u p q u p q p q p q u Window Auto Adjust Allows you to set the TV to self adjust to the incoming PC video signal The fine coarse and position values are adjusted automatically H Postion Set...

Страница 36: ...word to enter submenu 1 Press key to select option 2 Press 1 Press key to select Set option 2 Enter your 4 digit password to enter Press key to select option key to software update process Note In the...

Страница 37: ...to bright dark DVI HDMI modes or on signal s If OPC is in Demo mode it will turn to On automatically the next time you turn on the TV p q t u p q t u t u Screen Saver OPC requirement Aspect Aspect Co...

Страница 38: ...ximum duration for any recording suitable for Indicates PASS or FAIL for the status of your USB Disk formatted Do not disconnect disk or turn power off during formatting When formatting your disk a pr...

Страница 39: ...Time Shift Size The progress bar will fade out in 10 seconds Press the PLAY button to continue playing the program from the point where it was paused NOTE Time Shift will stop if you change channels c...

Страница 40: ...channel will stop recording Yes or No This unit is able to do recording while in standby mode 1 Start a recording then press the power button A message will be displayed prompting you to continue or...

Страница 41: ...emote Control Button Description of Playback Buttons Digital Media Player NAVIGATION BUTTONS pqtu MENU EXIT 40 INFO OK RED BLUE PgUp PgDn A B Play repeatedly Time selected Pause Play Stop Previous fil...

Страница 42: ...s button to display all the files in current directory 5 When the file is playing press button to play pause press button to switch to the next previous file press button to zoom in out the picture Yo...

Страница 43: ...utton to sign it Press button to display the video file 3 When the file is playing press button to play pause press button to video file press button to zoom in out the picture then you can use the na...

Страница 44: ...urrent directory 5 Press EXIT to exit playing PgUp PgDn USB 1 As the USB device is produced by different manufacturers and of different standards we do not to support all USB device 2 It is suggested...

Страница 45: ...sure a headphone jack is not connected Batteries of remote control may have exhausted if necessary please change the batteries Clean the remote control lens The distance between LED TV and remote con...

Страница 46: ...ock small block dots pixelization etc Black bars on each side will be shown on HD channels when displaying SD 4 3 contents Black bars on Top Bottom will be shown on movies that have aspect ratios diff...

Страница 47: ...Troubleshooting 46 Picture defects and the reason Ghosting may also occur when still pictures are displayed continuously It may disappear after a few moments...

Отзывы: