background image


8.


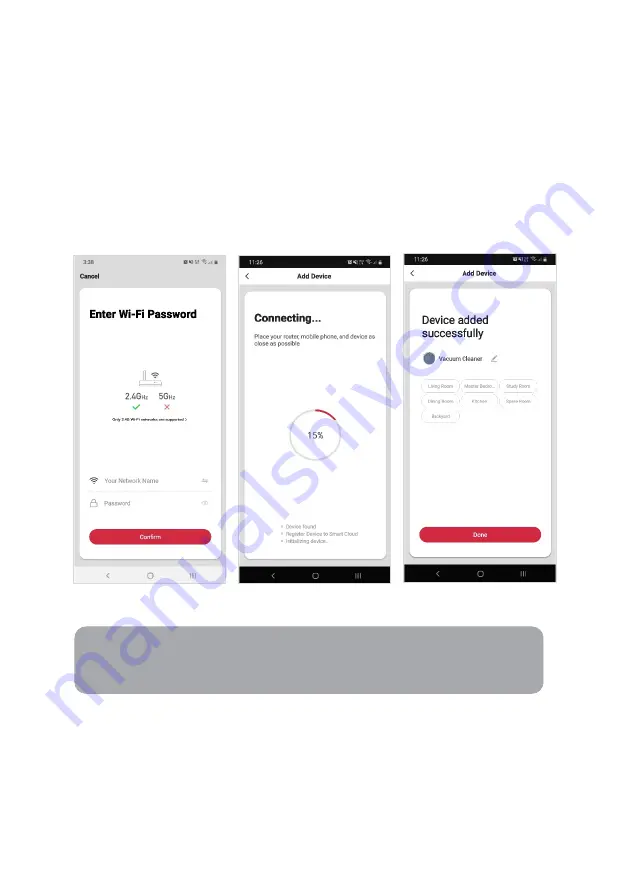
Upon successfully confirming pairing mode, enter your Wi-Fi details. It is important 

that your SmarterHome™ device and the app are connected to the same Wi-Fi 

network during setup. 

9.


The device will commence the pairing process and connect to the app. Ensure your 

Wi-Fi router, mobile phone, and the SmarterHome™ device are kept close until 

connection is complete. 

10.


After successfully being added, you will have the option to rename the device and 

assign it to a location. It will now be listed on the app’s home page. Tap the device 

listing to enter its control page. 


If neither Standard or AP Mode methods are successful, please contact kogan.com for 

assistance.


Notes: 


The device and the app have to use the same Wi-Fi network. 


The device is only compatible with 2.4Ghz networks. 

Содержание KAVACRBL15A

Страница 1: ...KOGAN SMARTERHOME LX15 ROBOT VACUUM CLEANER WITH UV AND MOP KAVACRBL15A ...

Страница 2: ......

Страница 3: ...play with the robot Cleaning and user maintenance shall not be made by children without supervision Keep main brush and other cleaning tools out of reach of children Do not place any objects children or pets on the robot when stationary or moving When in use keep your hair fingers from the suction inlet Keep pets away from the inlet Do not use the robot to vacuum objects at high temperature matche...

Страница 4: ...not wipe or clean the charging base shrapnel using wet cloth or wet hand Do not abandon used batteries arbitrarily Used batteries should be disposed of by professional recycling agency If the power cable is damaged cease use immediately Contact Kogan com Ensure the robot is shut down during transportation It is recommended to use original packaging for transportation If the robot is not used for a...

Страница 5: ...arging Base x1 2 in 1 Electrically Controlled Water Tank x1 Left Side Brush x2 Right Side Brush x2 HEPA Filter x1 Sponge Filter x1 Mopping Cloth x1 Cleaning Brush with Knife x1 Adapter x1 User Guide x1 COMPONENTS ...

Страница 6: ...Robot OVERVIEW Filter Screen Cover Dustbin Button Upgrade Port Map Reset Button Wall Sensor On Off Sweep Recharge Pause Local Cleaning ...

Страница 7: ...nsor Anti Collision Sensor Infrared Recharging Sensor Anti Collision Sensor for Radar LDS Laser Ranging Sensor Side Brush Battery Cover Driving Wheel Rolling Brush Rolling Brush Cover Buckle Charging Contact Universal Wheel UVC ...

Страница 8: ...Charging Base Wire Slot Wrapping Post Power Adapter Port Charging Base Pins Signal Emission Area Power Indicator Light Catching Groove Cover Plate ...

Страница 9: ...t to a power supply Ensure to leave space more than 0 5m on both sides of the charging base and more than 1 5m in the front 3 The charging indicator is on when powered on and is off when charged INSTALLATION Note If the power cable is vertical to the ground it may be dragged by the robot Consequently the charging base may be powered off ...

Страница 10: ...to the charging base and fail to return to the base When restarted the robot will rebuild and memorize the map The rebuilt map may not contain the cleaning information of previously memorised areas Install Side Brush 1 Align the left side brush with the mark L on the bottom casing of the robot Align the right side brush with the mark R on the bottom casing of the robot 2 Insert the brushes into th...

Страница 11: ...oth Paste the mopping cloth flatly on the bottom of the 2 in 1 Electric Controlled Water Tank Step 2 Fill the water tank Remove the dustbin before filling water Remove the cover and fill with water Note Ensure to clean the mopping cloth after every use ...

Страница 12: ...own in the image You will hear a click sound Tips To achieve a better mopping effect the mopping module should be installed after the floor is swept for three times Mopping function of the robot is intended for wiping and deep cleaning It may not remove stubborn stain Do not mop the carpet Set a restricted area in app to prevent the robot from entering the carpet See the Operation section of this ...

Страница 13: ...t by SMS To register 1 Tap to enter registration page 2 The system automatically recognises your country area You can also select your country code manually Enter your email address and tap Next 3 Alternatively you can select Register by mobile number and enter the verification code sent to you by SMS 4 Create a profile on the next page to define your location and room CONNECTTO SMARTERHOME APP ...

Страница 14: ...ing the key and key simultaneously for 3 seconds until a voice prompt Wi Fi has been reset is heard and the purple light begins slowly blinking Using AP Mode to add device 5 Once registered tap in the upper right corner of the app s home page to add a new device through the network 6 Select the product type from the list of options in the app Cleaning Appliances Vacuum Cleaners and then select Oth...

Страница 15: ...nsure that the device is in pairing mode with the light flashing and tap Confirm light is slowly flashing 9 Enter your Wi Fi details It is important that your SmarterHome device and the app are connected to the same Wi Fi network during setup ...

Страница 16: ...successfully being added you will have the option to rename the device and assign it to a location It will now be listed on the app s home page Tap the device listing to enter its control page Notes The device and the app have to use the same Wi Fi network The device is only compatible with 2 4Ghz networks Note If the Wi Fi hotspot does not appear on your phone in the list of available networks yo...

Страница 17: ... connection Add device through network 5 Once registered tap in the upper right corner of the app s home page to add a new device through the network 6 Select the product type from the list of options in the app Cleaning Appliances Vacuum Cleaners 7 Ensure that the device is in pairing mode with the indicator light flashing and tap Confirm light is rapidly flashing In Standard mode it will refer t...

Страница 18: ...one and the SmarterHome device are kept close until connection is complete 10 After successfully being added you will have the option to rename the device and assign it to a location It will now be listed on the app s home page Tap the device listing to enter its control page If neither Standard or AP Mode methods are successful please contact kogan com for assistance Notes The device and the app ...

Страница 19: ...stances long press the key for 15 seconds Sweep Pause To start sweeping after the robot has been started short press the key If the robot has been successfully connected to the app you can start sweeping by pressing the start icon in the app Cleaning Mode 1 After the robot is powered on it will scan the area to be cleaned and generate a map of the area The area will be divided as required 2 Robot ...

Страница 20: ...itioning it will follow the planned path and continue to work If the repositioning fails the robot will abort the previous mission create a new map and do the cleaning again After creating a new map it may not find the charging base Spot Cleaning When an area needs a deep cleaning you can specify that point on the map on the app The robot will automatically drive to the vicinity of the point and t...

Страница 21: ...re restricted areas using mobile app The robot will not sweep restricted areas The robot may enter a restricted area due to positioning errors and abnormal sensors Do not move or interfere with the robot during cleaning The permanently restricted area may become invalid due to moving the objects in the restricted area like furniture The permanently restricted area will be lost when the map is rebu...

Страница 22: ...at the appointed time and return to the charging base after cleaning Partial Cleaning When the robot cannot be controlled by the mobile app remove the robot and place at the point where you want to clean Long press the button on the robot for 3 seconds and the robot will clean twice within the of 2mx2m area centring on itself ...

Страница 23: ...robot will neither sweep the floor nor issue a voice automatically To start the DND mode tap the Do not disturb switch icon in the app Adjust the Suction Power You can adjust the suction power to Quiet Auto or Strong using the app ...

Страница 24: ...Adjust the Water Flow Tap the Water regulation icon in the app to adjust the water flow to Low Middle and High level ...

Страница 25: ...se sleep failure error low power shutdown autonomous shutdown The UVC mode can be turned on only when the robot is running When the robot has stopped the UVC light will be turned off When you hold or pick up the robot the UVC light will be turned off immediately to protect you Caution UVC LEDs emit strong UV radiation Do not look directly into LED lights It may harm your eyes UVC FUNCTION ...

Страница 26: ...after work Manual Mode 1 Place the robot back to the charging base 2 Under suspended state short press key to start recharging If the robot is successfully connected to the app then press the recharge icon in the app The indicator light will be flashing blue colour CHARGING ...

Страница 27: ...omatically if the battery level is less than 20 and will be powered off After the robot has been charged up to 80 it will start cleaning automatically Before use remove all cables including the power cable of the charging base from the ground to avoid robot from dragging the cable and damaging objects If the robot cannot find the charging base it will automatically return to the starting position ...

Страница 28: ...nd manage page 2 Select Set up device then under the Works with Google banner select Have something already set up 3 Select the search bar and type Smarter Home to locate the Kogan SmarterHome service Note You will need to have set up a Google Home account prior to linking your Kogan SmarterHome device GOOGLE HOME CONTROL ...

Страница 29: ...ermission to access the SmarterHome app and your devices 5 From here you will be prompted to sign into your SmarterHome account using either your email or mobile phone number depending on which method you used to register your account ...

Страница 30: ...can assign them to rooms and set up any routines 7 Tap on any of the devices to view a list of available commands Note Note that Google Home can only control the base core functions of any compatible SmarterHome devices To make full use of this product s smart functionality please use the Kogan SmarterHome app ...

Страница 31: ...o locate the Kogan SmarterHome skill 3 Tap Enable to Use to add the Kogan SmarterHome skill to Alexa 4 From here you will be prompted to sign into your SmarterHome account using either your email or mobile phone number depending on which method you used to register your account AMAZON ALEXA CONTROL Note You will need to have set up an Alexa account prior to linking your Kogan SmarterHome device ...

Страница 32: ...ked to your SmarterHome account 7 When your devices have successfully connected to the Alexa app you will be able to control your Kogan SmarterHome devices via Alexa s voice commands Note Alexa can only control the base core functions of any compatible SmarterHome devices To make full use of this product s smart functionality please use the Kogan SmarterHome app ...

Страница 33: ...lling brush into the cover Press the buckle on the rolling brush cover to fix tightly 4 Clean it regularly Side Brush 1 Turn over the robot and Remove the side brush by pulling it upwards 2 Remove hair and dirt and reassemble the side brush See the installation section of this user guide for the guidelines 3 Clean it regularly CLEANING CARE R Right Side Brush L Left Side Brush Buckle Main Brush ...

Страница 34: ...Dustbin 1 Press the button on the dustbin and pull out the dustbin 2 Open and clean the dustbin ...

Страница 35: ...e removed filter gauze Clean the Sponge and HEPA filters under water 3 Shake off the water droplets and dry it naturally Use it after it has completely dried 4 Install it back in this sequence filter gauze sponge HEPA Filter Gauze Button Filter Cover Sponge HEPA ...

Страница 36: ...tank Mopping Cloth 1 Remove the mopping cloth empty the water from the water tank 2 Clean the mopping cloth and dry it Note Ensure to remove the mopping module when the robot is being charged or left unused Note To add water to the tank or clean the mopping cloth pause the robot and remove the mopping module Reassemble the mopping module as per the instructions under the Installation section of th...

Страница 37: ...ti dropping sensors which is located at the back of the robot Clean the infrared recharging sensor which is in the front of the robot Clean the anti collision sensor for radar which is located on the top of the robot Clean electric shock protector and charging contact at the bottom of the robot LDS Laser Ranging Sensor Anti Collision Sensor for Radar Anti Collision Sensor Infrared Recharging Senso...

Страница 38: ...due to excessive discharge Firmware Upgrade Upgrade the robot s firmware using the app If new firmware is detected follow the prompt instructions to upgrade Ensure the battery is 50 during firmware upgrade Place the robot on the charging base Map Reset To reset the robot 1 Remove the dustbin Open the upgrade port rubber plug and press map reset button 2 The current map will be lost The timing sett...

Страница 39: ...lined or dust falls out The dustbin is full clear it The filters are blocked clear or replace it The rolling brush is covered with dust clear it Cannot connect to Wi Fi Wi Fi signal is poor ensure the robot is within range of both your router and connected smartphone Wi Fi is not connected reset Wi Fi Reconnect it with the app Check the Connect to Smarterhome App section of this user guide Robot i...

Страница 40: ...r has been removed Clean the container and filter This error is triggered when you take out dustbin after noticing error 9 Clean and replace the dustbin Error 11 I am stuck help me The robot is stuck Restart or move the robot Error 12 Place me correctly The robot is tilted Place it on a flat surface Error 13 Check if my wheels have been blocked somewhere The driving wheels are stuck due to dust Cl...

Страница 41: ...Robot Dimensions 350 x 350 x 110mm Weight 3 8kg Li Battery 5200mAh Rated Voltage 14 4V Rated Power 50W Charging Base Dimensions 160 x 143 x 80mm Rated Power 24W SPECIFICATIONS ...

Страница 42: ...NOTES ...

Страница 43: ...NOTES ...

Страница 44: ...tion We hope that this user guide has given you the assistance needed for a simple set up For the most up to date guide for your product as well as any additional assistance you may require head online to help kogan com ...

Отзывы: