


13
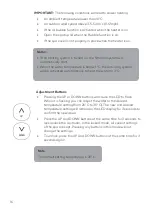
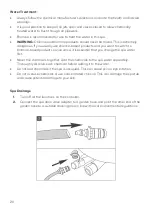
Always read the manometer to ensure that the spa is filled at the correct air pressure for the
conditions.
Ensure the manometer points to the
Yellow
section in the
following conditions:
•
After inflation but before filling the spa with water.
•
When leaving the spa outdoors unattended an extended
period at a temperature higher than 20°C.
Ensure the manometer points to the
Green
section in the
following conditions:
•
When the spa is filled with water.
•
When the spa is in use.
WARNING:
If the manometer points to the
White
section,
the air pressure of your spa is too high.
•
Slightly rotate the valve cap counter-clockwise to release
some air.
•
Tighten the cap after the pointer returns to the
Green
or
Yellow
section.
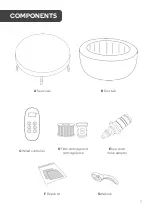
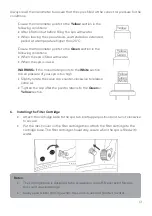
6.
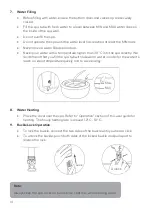
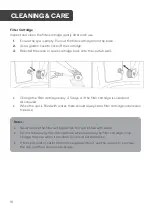
Installing the Filter Cartridge
•
Attach the cartridge base to the spa tub inlet (upper position) and turn it clockwise
to secure.
•
Put the mesh cover on the filter cartridge then attach the filter cartridge to the
cartridge base. The filter cartridge should stay secure when the spa is filled with
water.
Notes:
•
The cartridge base is designed to be screwed on and off. Never exert force as
this could cause damage.
•
Always use a filter cartridge when the spa is in use and filled with water.
Yellow
Yellow
Green
Green
Yellow
White


