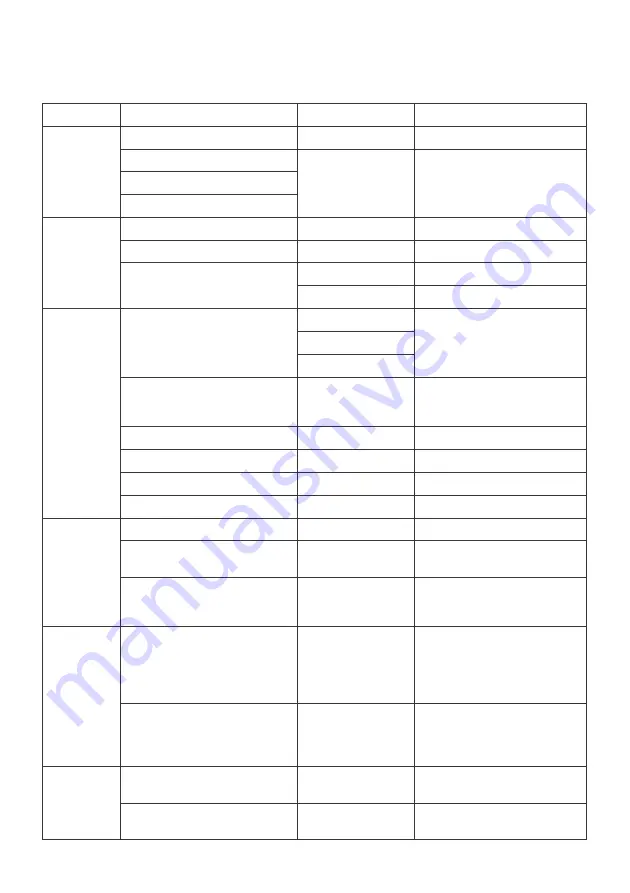
Kogan KAMN32RQ1LA Скачать руководство пользователя страница 14

 
List of Functions 


Main Menu 

Sub-Menu 

Options 

Description 

Input 

Source 

DP 1 

NONE 

Switch to DP signal input 

DP 2 

NONE 

Switch to HDMI signal 

input 

HDMI 1 

HDMI 2 

Brightness/ 

Contrast 

Brightness 

0~100 

Adjust display brightness 

Contrast 

0~100 

Adjust display contrast 

DCR 

On 

Turn on DCR function 

Off 

Turn off DCR function 

Colour 

Setting 

Gamma 

Gamma 2.0 

Set Gamma add-in 

Gamma 2.2 

Gamma 2.4 

Picture Mode 

Standard, Photo, 

Movie, Game, 

FPS, RTS 

Set visual mode according 

to activity 

Colour Temperature 

Warm, Cool, User  Select colour temperature 

Low Blue Light 

0~100 

Set blue light filtering level 

Hue 

0~100 

Adjust hue levels 

Saturation 

0~100 

Adjust saturation levels 

Picture 

Quality 
Setting 

Sharpness 

0~100 

Set display sharpness 

Response Time 

Off, High, Middle, 

Low 

Turn On/Off the response 

time of the monitor 

Noise Reduction 

Off, High, Middle, 

Low 

Reduce the interference of 

image noise caused by 

signal source interference 


Super Resolution 

Off, High, Middle, 

Low 

When the resolution of the 

display screen is low, this 

function can be turned on 

to enhance the image 

resolution. 

Dynamic Luminous Control 

On, Off 

Compensate for greyscale 

display screen and 

strengthen the expression 

of greyscale 

Display 

Aspect Ratio 

Wide Screen, 

4:3,1:1, Auto 

Select the on-screen 

aspect ratio 

Led Mode 

Flicker, Normal, 

Off 

Switch LED modes / turn 

LEDs on/off 

Содержание KAMN32RQ1LA

Страница 1: ...32 CURVED QHD 165HZ FREESYNC HDR GAMING MONITOR 2560 X 1440 KAMN32RQ1LA ...

Страница 2: ......

Страница 3: ...e vents Avoid placing the monitor near heaters stoves fireplaces or other sources of heat as well as in rooms lacking adequate ventilation Do not position the monitor in an unsafe location If the monitor falls it may be damaged and may injure nearby people Unplug the monitor if it is not going to be used for an extended period Do not place heavy objects on the monitor its power cord or any connect...

Страница 4: ...Monitor Stand Stem Stand Base Headphone Clip Screws VESA Connectors DP Cable Power Cable User Guide COMPONENTS ...

Страница 5: ...Controls 1 2 3 4 5 6 Menu Enter Volume Down Brightness Up Input select Exit Power On Off LED indicator Ports 7 8 9 10 Power Connector Audio output DisplayPort Connector x2 HDMI Connector x2 OVERVIEW ...

Страница 6: ... Use a screwdriver to unscrew the screws of lock bracket rotating shaft and base 2 Remove the monitor from the carton lay it flat with the back facing upwards and clamp the base assembly to the rotating shaft of the monitor The base assembly can be taken out by directly pulling the quick release button upwards by hand ASSEMBLY Dismantle Headphone Clip Shaft Assembly Screws 2 Assembly Stand Screw B...

Страница 7: ...the stand remove the stand 2 Remove the original screws x4 from the opening in the back of the monitor 3 Follow the directions received with your mount stand or accessory and install the monitor on the wall or fixture as desired Remember to use the included 4 screws when mounting the monitor Refer to the image for correct screw placement 4 Follow the directions received with your mount stand or ac...

Страница 8: ...overs the input ports It may be easier to remove this panel before attempting to connect or remove cables from the monitor Power Cable Connect the included power cable to the power connector and then plug the other end into a power outlet CONNECTIVITY Power Cable Rear Panel ...

Страница 9: ...vices are connected to your computer at the same time the audio devices will not produce sound Earphones and other audio devices not included DisplayPort For the monitor to receive DisplayPort signals from the computer use the DisplayPort cable to connect the monitor to the computer Earphone Not Included DP Output PC DP Cable Included ...

Страница 10: ...HDMI For the monitor to receive HDMI signals from the computer use the HDMI cable to connect the monitor to the computer HDMI Output PC HDMI Cable Included ...

Страница 11: ...onitor and press it to turn the monitor on FreeSync The feature itself is off by default when setting 144Hz refresh rate To use this feature please note you must have hardware with FreeSync capability a DP cable and the latest graphic drivers To use this feature connect your computer and monitor with a DP cable or an HDMI cable After connecting you may receive a prompt to enable the feature on you...

Страница 12: ...r is on and the monitor is operating normally Flashing blue light indicates no video source no horizontal or vertical signal has been detected Please ensure your computer is on and all video cables are fully inserted and or connected Indicator Light ...

Страница 13: ...ccording to your computer s configuration and parts etc 1 Press any one of the buttons M E to activate the navigation window 2 Press M to enter the OSD menu 3 Press or to browse functions Highlight the desired function and then press M to enter the sub menu Press or to browse sub menus then press M to highlight the desired function Press or to highlight an option then press M to confirm the settin...

Страница 14: ...lue light filtering level Hue 0 100 Adjust hue levels Saturation 0 100 Adjust saturation levels Picture Quality Setting Sharpness 0 100 Set display sharpness Response Time Off High Middle Low Turn On Off the response time of the monitor Noise Reduction Off High Middle Low Reduce the interference of image noise caused by signal source interference Super Resolution Off High Middle Low When the resol...

Страница 15: ... window position Swap NONE Swap the PIP PBP signal sources OSD Language English 简体中文 한국어 Русский Español 日本語 Français Set OSD language OSDH Position 0 100 Adjust the OSD s horizontal position OSD V Position 0 100 Adjust the OSD s vertical position OSD Transparency 0 100 Set the OSD s overall transparency OSD Time Out 5 100 Set how long the OSD remains open after non use OSD Rotation Normal 90 180 ...

Страница 16: ...esponding game icon These game icons are primarily designed to optimise your aim during shooting games though they can be used for other scenarios 3 Press button to switch ECO modes These modes include Standard Text Movie Game FPS and RTS and can be used to optimise settings according to your activity Standard mode is suitable for most activities DISPLAY MODES ...

Страница 17: ...o 3000 1 VESA Mounting 75x75 Colours 16 7M FreeSync YES Signal Input DPx2 HDMI2 0x2 Power AC 100 240V 50 60Hz 1 5A Audio Speakers NO Audio Out YES Accessories Adapter YES DP Cable YES Additional Functions Low Blue Light YES Flicker Free YES Physical Dimensions Dimensions w Stand 712 5 x 505 6 x 226 5 mm Dimensions w o Stand 712 5 x 422 8 x 113 3 mm Net Weight 7 07kg Gross Weight 9 09kg SPECIFICATI...

Страница 18: ...NOTES ...

Страница 19: ......

Страница 20: ...tion We hope that this user guide has given you the assistance needed for a simple set up For the most up to date guide for your product as well as any additional assistance you may require head online to help kogan com ...

Отзывы: