Kogan KALED553DSMTZB Скачать руководство пользователя страница 15

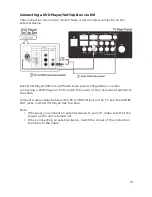
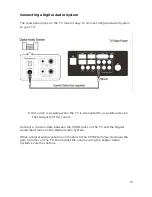
Connecting a DVD Player/Set-Top Box via HDMI

This connection can only be made if there is a DVI output connector on the 
external device.

What is HDMI?

HDMI, or high-definition multimedia interface, is a next-generation interface that 
enables the transmission of digital audio and video signals using a single cable 
without compression.
Multimedia interface is a more accurate name for it, as it allows multiple 
channels of digital audio (5.1 channels).
The difference between HDMI and DVI is that the HDMI connection is smaller in 
size, has HDCP (High Bandwidth Digital Copy Protection) coding installed and 
supports multi-channel digital audio.

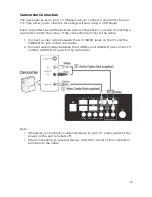
Each DVD Player/Set-Top Box has a different panel configuration.

Connect a HDMI cable between the HDMI1, HDMI2, HDMI3 or HDMI4 connector 
on the TV and the HDMI connection on the DVD Player/Set-Top Box.
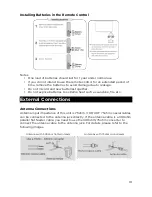
Note:

Whenever you connect an external device to your TV, make sure that the 
power on the unit is turned off.

When connecting an external device, match the colour of the connection 
terminals to the cable.

14

Содержание KALED553DSMTZB

Страница 1: ......

Страница 2: ...p Box via HDMI 14 Connecting a Digital Audio System 15 Connecting a PC 16 Supported Signals 16 Basic Operation 17 Turning the TV on or off 17 Menu Operation 18 Main interface 18 Applications 19 Multi...

Страница 3: ...zation Interface 33 USB Support 34 Photos 34 Music 34 Movie 35 Sync View 35 USB Support Character 36 External Connections 37 Assembling the Stand 37 Wall Mounting Instructions optional 37 Troubleshoot...

Страница 4: ...the Kogan customer support team Never attempt to make repairs yourself Never push objects of any kind into the set through the cabinet slots as they may touch dangerous voltage points or short circui...

Страница 5: ...or limited by covering the ventilation slots with items such as newspapers tablecloths curtains etc At least 10cm of space should be left around the apparatus for sufficient ventilation The televisio...

Страница 6: ...location allow some time for any dew or condensation inside the television to evaporate fully before you turn the unit on To prevent injury the television must be securely attached to the floor wall...

Страница 7: ...A jack 4 x HDMI inputs 1 x computer PC RGB input 3 x USB inputs 1 x component input 1 x CVBS input 1 x AV input 1 x SPDIF output 1 x headphone output Specifications Accessories Specifications Model KA...

Страница 8: ...iew The buttons on the lower right panel control your TVs basic features including the on screen menu To use the televisions more advanced features you must use the remote control Front Panel Rear Pan...

Страница 9: ...Remote Control 8...

Страница 10: ...r turning off the power supply you must switch the television into standby mode by pressing the POWER button on the remote control or on the television set itself Once the television is in standby mod...

Страница 11: ...pose batteries to extreme heat such as sunshine fire etc External Connections Antenna Connections Antenna input impedance of this unit is 75ohm VHF UHF 75ohm coaxial cables can be connected to the ant...

Страница 12: ...m the back of the TV 2 Connect the cable or antenna to the ANT IN terminal on the back of the VCR 3 Connect an RF cable between the ANT OUT terminal on the VCR and the ANT IN terminal on the TV 4 Conn...

Страница 13: ...colour of the connection terminal to the cable 1 Connect a video cable between the AV1 VIDEO jacks on the TV and the VIDEO OUT jack on the camcorder 2 Connect audio cables between the AUDIO L and AUDI...

Страница 14: ...connecting a DVD Player or STB match the colour of the connection terminal to the cable Connect Audio cables between the PC AUDIO IN jack on the TV and the AUDIO OUT jacks on the DVD Player Set Top Bo...

Страница 15: ...digital audio 5 1 channels The difference between HDMI and DVI is that the HDMI connection is smaller in size has HDCP High Bandwidth Digital Copy Protection coding installed and supports multi channe...

Страница 16: ...TV is connected to an external device that supports 5 1 CH sound Connect a coaxial cable between the SPDIF jacks on the TV and the Digital Audio Input jacks on the Digital Audio System When a digital...

Страница 17: ...PC DISPLAY settings Note Whenever you connect an external device to your TV make sure that the power on the unit is turned off When connecting an external device match the colour of the connection ter...

Страница 18: ...you want to completely switch off the power of the TV for an extended period of time unplug the power cord 6 After switching the unit off you should wait at least 5 seconds before turning it on again...

Страница 19: ...function as the following in turn 1 Add to home screen 2 All caps 3 Change wallpaper 4 Search 5 Setting 6 Mass storage 7 Wired Note 1 The first area as the photo shown will display the current video i...

Страница 20: ...nloaded Menu Button Open or Close the app s menu Exit Button Return to the main menu Arrow Button Select the application which you want OK Button Enter the application you ve selected Note When the ap...

Страница 21: ...r the right picture will be displayed and set files you want to share Sharing TV content to a mobile phone IOS Android TV MirrorOp Use mobile phone as game controller for games on TV When you use Game...

Страница 22: ...t the type of special sound to be used when watching a given settings broadcast Your TV has five sound settings Standard Music Movie Sports User that are preset at the factory Press key to select Soun...

Страница 23: ...own signal conditions and it is inconvenient to adjust the volume every time the channel is changed Auto Volume automatically adjusts the volume of the desired channel by lowering the sound output whe...

Страница 24: ...olour Temp You can change the colour of the entire screen according to your preference 1 Press key to select Color Temp option 2 Press key to select one colour temp Adjusting Backlight You can change...

Страница 25: ...ls will be stored in memory and a message will appear on the screen as per the diagram on the right NOTE If you want to exit the search you can press EXIT button EPG Used only in DTV 1 Press key to se...

Страница 26: ...a channel you can choose FAV button in the menu to add it to your favourite list and later you can press FAV button in the remote control to choose your favourite programs as soon as possible Signal I...

Страница 27: ...I1 HDMI2 HDMI3 HDMI4 Use key to move the cursor to the input you desired and press OK key to confirm 2 Input Source Menu 1 Press MENU key to display the main menu on the screen 2 Press key to select I...

Страница 28: ...3D content It is suggested to watch 3D program under the operation temperature above 10 c to obtain the best 3D effect When in 3D mode 2D 3D can t be selected When in 2D mode 3D 2D can t be selected...

Страница 29: ...s locked and the Lock System is on the password is needed to view it Parental Guidance This option only used in DTV mode 1 Press key to select Parental Guidance option 2 Press key to select the Parent...

Страница 30: ...Date and Time In Auto Mode you can get the time automatically from DTV or the internet On Time In On Time press the OK button to enter the submenu Set the time for the TV set to turn on when the TV s...

Страница 31: ...sk or power during formatting 3 Do not modify PVR files on a PC Note Make sure your USB device is compatible with the TV and able to support PVR recording Select Disk Press the OK button to enter the...

Страница 32: ...into standby mode while in Time Shift mode Instant recording 1 Select the desired channel then press the button on the remote control to start recording the current broadcast A progress bar will be d...

Страница 33: ...tronic Program Guide At Guide menu press RED button to change to Record Setting At Guide menu press the OK button to enter the Reminder Settings page Note Press button to adjust the scheduled time pre...

Страница 34: ...ause problems for the system Media Format Picture JPG JPEG PNG BMP Audio MP3 AAC Video MPG MPEG MP4 MOV MKV Device and File Management Initialization Interface On the main interface click the Mass sto...

Страница 35: ...E Next F Stop G Sequence H Rotate Anticlockwise I Rotate Clockwise J Zoom in K Zoom out L DragMode Music The menu items from left to right function as the following A Lyrics B Prev C Pause Play D Next...

Страница 36: ...p E Advanced setting Sync View Press 2D 3D button to open the Sync View menu This menu has two group functions The top row functions use for 3D settings and the bottom row functions use for Sync View...

Страница 37: ...annel item then press OK to open the Sub Channel selection menu Press key and press OK to select a channel Select the Enter Sub item and press OK to enter the sub channel you want Select the Back Main...

Страница 38: ...V set and fix correctly as shown below Securing the TV Stand Caution Pulling pushing or climbing on the TV may cause it to fall Be careful to ensure that children do not hang on the TV or otherwise de...

Страница 39: ...external devices are being used check their volumes are not set too low or turned off If using AVI or Component inputs please make sure cables are connected properly and not loose If using DVI to HDM...

Страница 40: ...channels are available Check your area is covered by Digital Video Broadcasts Try re tuning or manually tuning missing channels Check that you are using the correct antenna type Channel cannot be sele...

Страница 41: ...k bars on each side will be shown on HD channels when displaying SD 4 3 contents Black bars on Top Bottom will be shown on movies that have aspect ratios different from your TV Adjust picture size opt...

Отзывы: