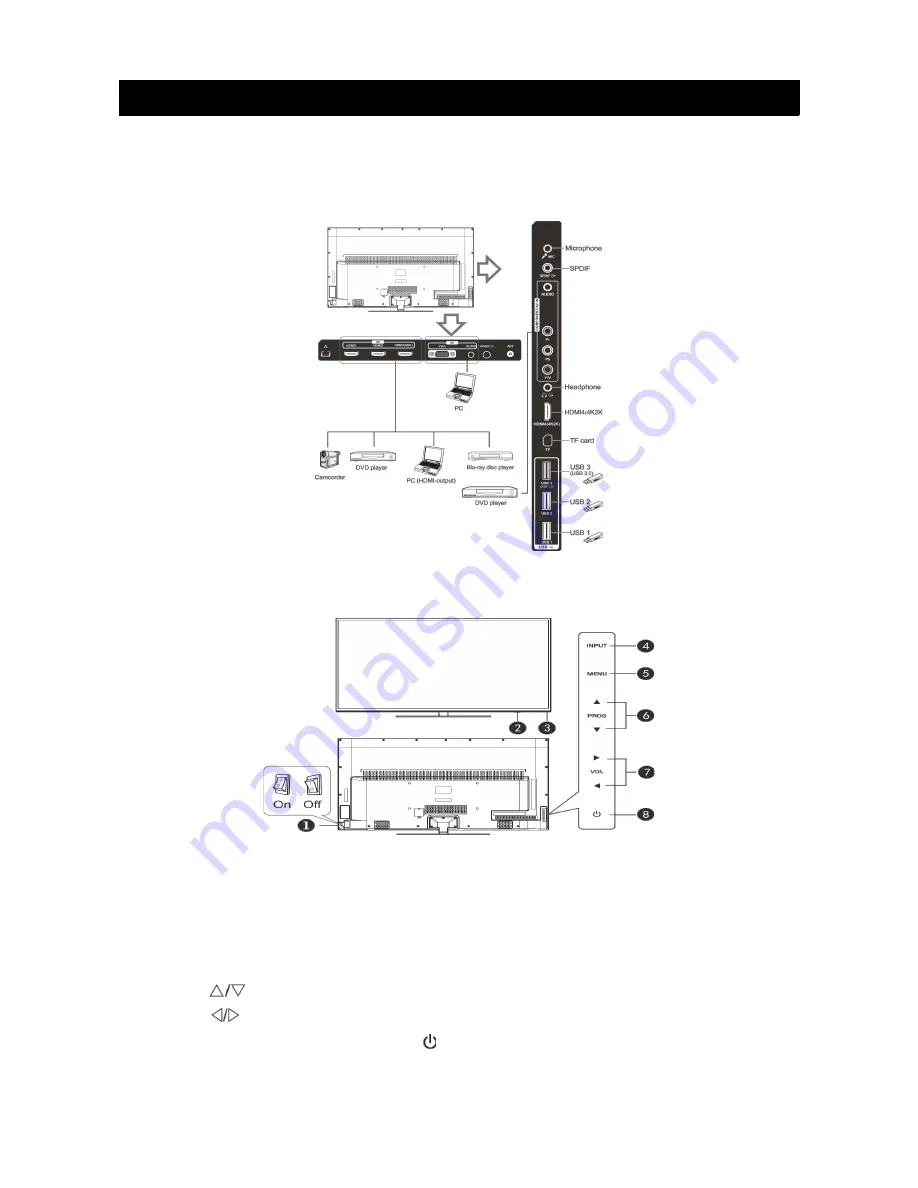
Kogan KALED42UHDZA Скачать руководство пользователя страница 8

Overview

Back Panel

You can connect the TV to video devices such as DVD/Blu-Ray players, VCR and video cameras 
as well as gaming consoles.

Front Panel

The buttons on the lower left panel control your TVs basic functions. For advanced features you 
must use your remote control.

1

Power Switch

Press to turn the TV on or off.

2

Remote control Sensor

Aim the remote at this spot on the TV.

3

Power Indicator

4

INPUT

Toggles between all of the available input sources.

5

MENU

Press to display an on-screen menu of your TVs features.

6

PROG 

Press to change programs.

7

VOL 

Press to increase or decrease the volume.

8

Standby

Press “ ” to toggle between normal and standby mode.

7

Содержание KALED42UHDZA

Страница 1: ......

Страница 2: ...tenna Connection 10 Basic Operation 11 Turning the TV on and off 11 Main Interface 11 TV Applications 12 Menu System 13 TV Menu 13 Sound 13 Sound Mode 13 Equalizer 14 Balance 14 Auto Volume 14 Surroun...

Страница 3: ...nagement 24 Initialization Interface 24 External Connection 25 Connecting a VCR 25 Connecting a Camcorder 26 Connecting a DVD Player Blu Ray Player Set Top Box via DVI 27 Connecting a DVD Player Blu R...

Страница 4: ...the Kogan customer support team Never attempt to make repairs yourself Never push objects of any kind into the set through the cabinet slots as they may touch dangerous voltage points or short circui...

Страница 5: ...or limited by covering the ventilation slots with items such as newspapers tablecloths curtains etc At least 10cm of space should be left around the apparatus for sufficient ventilation The televisio...

Страница 6: ...location allow some time for any dew or condensation inside the television to evaporate fully before you turn the unit on To prevent injury the television must be securely attached to the floor wall...

Страница 7: ...olution 3840 x 2160 Power Supply 110 240V 50 60Hz TV Receive System PAL SECAM BG DK I DVB T Frequency Range DTV 5 12 21 69 Video In PAL NTSC SECAM Antenna Input Impedance 75ohm unbalanced Speaker Outp...

Страница 8: ...features you must use your remote control 1 Power Switch Press to turn the TV on or off 2 Remote control Sensor Aim the remote at this spot on the TV 3 Power Indicator 4 INPUT Toggles between all of...

Страница 9: ...Remote Control 8...

Страница 10: ...r turning off the power supply you must switch the television into standby mode by pressing the POWER button on the remote control or on the television set itself Once the television is in standby mod...

Страница 11: ...t be exposed to excessive heat such as direct sunlight fires or similar situations External Connections Antenna Connection Antenna input impedance of this unit is 75ohm VHF UHF 75ohm coaxial cable can...

Страница 12: ...completely switch off the power to the unit unplug the power cord from the wall completely 6 After switching the unit off you should wait at least 5 seconds before switching it back on Status Indicati...

Страница 13: ...shows some small desktop plug ins Select one and press OK to enter the relevant application 3 The third area is the short cut menu Select one and press OK to enter the relevant short cut options TV Ap...

Страница 14: ...of special sound to be used when watching a given settings broadcast Your TV has five sound settings Standard Music Movie Sports User that are preset at the factory 1 Press key to select Sound Mode op...

Страница 15: ...itions which include varying volume levels As it is inconvenient to adjust the volume every time the channel is changed Auto Volume automatically adjusts the volume of the desired channel by lowering...

Страница 16: ...n the remote control to select one of the scale modes Each source has different scale modes 16 9 4 3 Panorama Movie Subtitle Dot by dot Color Temp You can change the color of the entire screen accordi...

Страница 17: ...hing is finished all the channels will be stored in memory and a message will appear on the screen as per the diagram on the right NOTE If you want to exit the search you can press the EXIT button EPG...

Страница 18: ...your favourite channel instantly Signal Information Used only in DTV Press key to select Signal Information option Press Ok or key so you can see the signal information of the DTV channel NOTE Signal...

Страница 19: ...set to suit your user preferences 1 Press key to select the OSD Setting option 2 Press OK key to display the OSD setting menu OSD Language select the proper language OSD Time Set the preferred amount...

Страница 20: ...ogram list use the Blue key to lock or unlock the program Once the program is locked and Lock System is on the password is needed to watch it Parental Guidance This option only used in DTV mode 1 Pres...

Страница 21: ...tings and channels to factory default Time Clock Setting On the current time display press OK button to enter the Clock Setting menu to set the Date and Time In Auto Mode item you can get the time fro...

Страница 22: ...for PVR Any existing data on the disk will be lost during the formatting process Please back up your disk if you do not want to lose this data You are recommended to use a dedicated disk for PVR use o...

Страница 23: ...nnels or change inputs Instant recording 1 Select the desired channel then press the button on the remote control to start recording the current broadcast a progress bar will be displayed at the botto...

Страница 24: ...Electronic Program Guide At Guide menu press RED button to Record Setting In the Guide menu press OK button to enter Reminder Settings Note Press button to adjust the scheduled time press OK button t...

Страница 25: ...e system Data Format Picture JPG JPE PNG BMP Music MP3 AAC Video MPG MPEG MP4 MOV MKV Device and File Management Initialization Interface On the main interface click the Mass storage icon to enter the...

Страница 26: ...External Connection Connecting a VCR 25...

Страница 27: ...Connecting a Camcorder 26...

Страница 28: ...Connecting a DVD Player Blu Ray Player Set Top Box via DVI 27...

Страница 29: ...Connecting a DVD Player Blu Ray Player Set Top Box via HDMI 28...

Страница 30: ...Connecting a Digital Audio System 29...

Страница 31: ...al device to your TV make sure that the power on the unit is turned off When connecting an external device match the colour of the connection terminal to the cable Supported Signals Input Mode Input R...

Страница 32: ...erforming any work spread cushioning out over the base area to lay the TV on This will prevent it from being damaged Assembly Instructions 1 Fix the bracket at the stand with the three screws Fig 1 2...

Страница 33: ...r holes into the wall 2 Drive Nylon sleeves 2 into the mounting holes on the wall 3 Fasten the wall mounting bracket 3 onto the Nylon sleeves with self tapping screws 4 4 Fasten the screws 5 into the...

Страница 34: ...e volume settings on any external speakers connected to your television Adjust the TV volume accordingly Check that MUTE hasn t been turned on No colour wrong colour or tints Make sure the program its...

Страница 35: ...Product Layout 34...

Отзывы: