background image

4

TV Bracket assemble

SO

URCE

MENU

CH+

-

CH

-

V

O

L

VOL

+

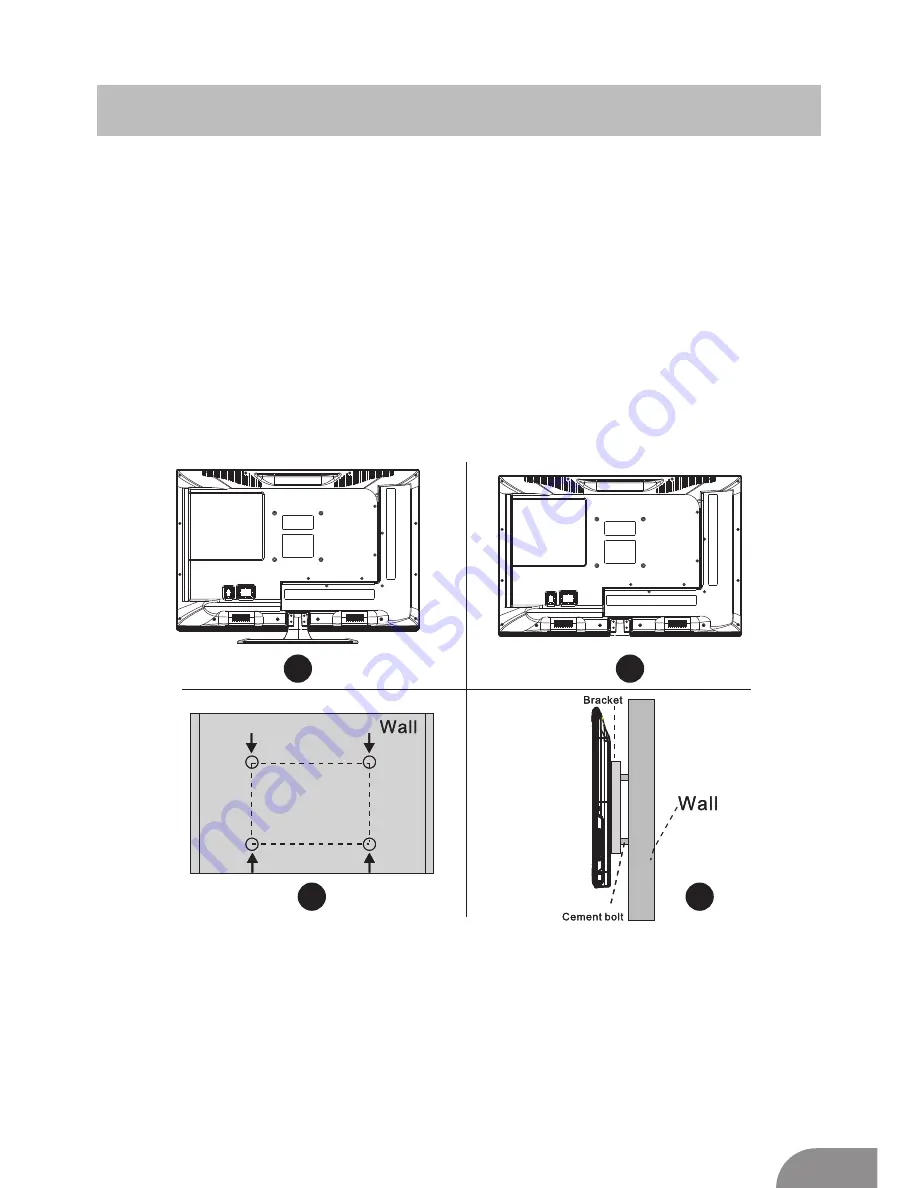
Fix the TV on the wall

1.First,put the TV 

facedown 

on 

a

 table 

carefully,


with

 some soft 

padding

 on the table to 


avoid s

cratching the screen.

2.User 

a

 screw driver to take off the screws which are fixed on the bottom stand

   (the direction of the arrow, refer to the p

h

oto1).

 T

ake off the bottom stand


(please

   take off the screws and bottom stand carefully).

3.Make one bracket which can fix on the wall according to the size of arrow direction
   of photo


2 and photo


3.

4.Drill four holes properly on the wall (the size only for reference) and put into four 
   screws.(optional parts) Drill four holes properly on the wall (the size only for reference)
   and put into four screws.(optional parts)
5.

As a

ccording to step 4,use the screwdriver to lock the screw on the back of the TV.

   then hang the TV on the wall. 

1

2

3

4

Note:

1.The bracket fixed on the wall is 

an 

optional part.

2.

W

hen you assemble the TV, there should be no other articles 

attached to the 

 front

 or


sides, a

nd please keep 

a

 distance from other articles.

3.When 

mounting

 the TV, 

we recommend the use of a professional installer

.

4.The picture

s above


are

 only for reference.

5.Please follow the use

r

 manual about bracket assemble to fix the TV.

6.Attach the mounting bracket from the VESA compatible wall mounting kit.

Содержание KALED16DVDVA

Страница 1: ......

Страница 2: ...TV Bracket assemble 4 TV Buttons And Terminal Interface 5 External device connection diagram 6 Install And Connect TV 7 Setup Menu USB Operation Input Source 8 TV Menu Picture Menu 8 Sound Menu 9 Cha...

Страница 3: ...xperience any issues with the television at all do not attempt to repair it yourself as this may cause further damage or serious injury It will also void your warranty Contact the Kogan customer suppo...

Страница 4: ...ng periods of time 14 Refer all servicing to qualified service personnel Servicing is required when the apparatus has been damaged in any way such as power supply cord or plug is damaged liquid has be...

Страница 5: ...size only for reference and put into four screws optional parts Drill four holes properly on the wall the size only for reference and put into four screws optional parts 5 As according to step 4 use...

Страница 6: ...t the number of different models may be different VIDEO R L INPUT Y Pb Pr INPUT HDMI AV input External AV Signal Input And Relevant Rith Left Sound Channel Y Pb Pr input Connect to the composite termi...

Страница 7: ...xternal device connection diagram DVD Set top boxes HDMI HDMI HDMI input connection VIDEO R L INPUT AV input connection VIDEO R L INPUT Y Pb Pr INPUT AV input connection USB connection TV connection 6...

Страница 8: ...AC 100 240V 50 60Hz 1 3 Turn on TV 3 Press the power button of the TV the indication light will turn to green If it is on standby mode the light is red press the power button on the remote control to...

Страница 9: ...ect the dark region of the picture Contrast Adjust the highlight intensity of the picture but the shadow of the picture won t change Sharpness Adjust the peaking in the detail of the picture Saturatio...

Страница 10: ...ntrol Press button to select AVL then press button to select On or Off SPDIF Press button to select SPDIF then press button to select Off Auto PCM Audio Description Audio Description Press button to s...

Страница 11: ...nel Edit Press button to select Channel Edit then press Enter button to enter sub menu The three colored keys are the shortcut keys for programming the channel First press to highlight the channel you...

Страница 12: ...you want to set twice then e Lock System Menu Clear Lock Press buttontoselectClearLock Hotel mode Press buttonto select Hotel mode SETUP MENU Press MENU button to display the main menu ress to enter...

Страница 13: ...t Press button to select Reset then press Enter button to enter sub menu USB OPERATION Note Before operating USB menu plug in USB device then press INPUT button to set the Input Source to Press button...

Страница 14: ......

Страница 15: ......

Страница 16: ......

Страница 17: ......

Страница 18: ...put sources 5 9 6 0 7 4 8 D Menu D Title Goto D Disp PROG STEP REPEAT A B 1 2 3 MENU MENU SOURCE ENTER ENTER VOL CH Zoom Angle Subtitle Audio EXIT DISPLAY SLEEP SLEEP P MODE S MODE MTS INDEX RED GREEN...

Страница 19: ...xt page for their DVD playback functionality 1 SUB PG SUBTITLE To show subtitles when watching DTV broadcast dependent Switch the teletext on and off TEXT 32 REC Begin recording current program to con...

Страница 20: ...s this button to change the playback order It varies according to the different discs 51 STEP Entrance of DVD OSD features 52 REPEAT Repeat playing the title or chapter 53 A B Whilst watching a DVD pr...

Отзывы: