background image


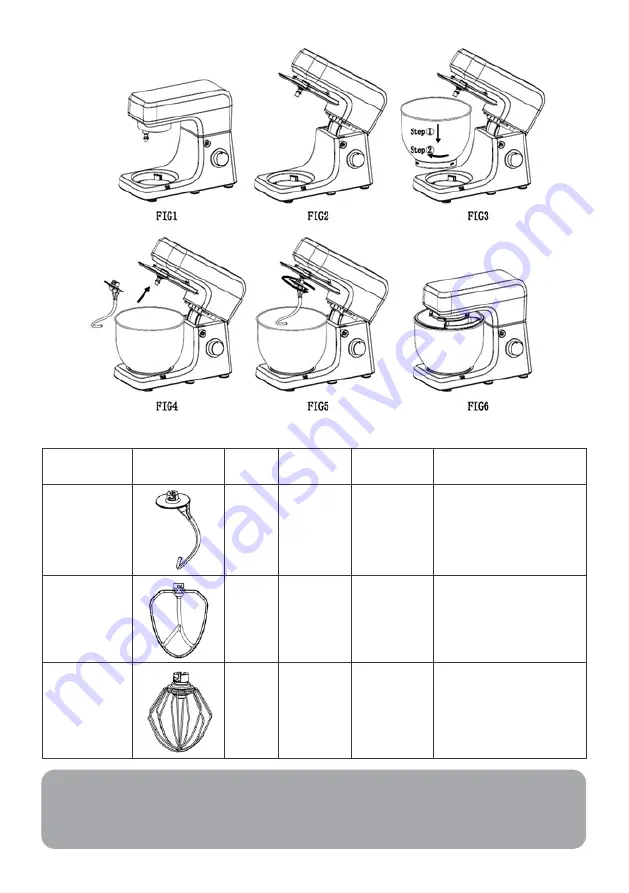
Utensil 

Image 

Levels 

Time 

(Min) 

Maximum 

Operation method 

Dough hook 


1-3 

1250g flour 

and 750ml 

water 


Run on “1” for 30s 


Run on “2” for 30s 


Run on “3” for 2-4 

min to form a 

cluster 

Beater 


2-4 

660g flour 

and 840ml 

water 


Run on “2” for 20s 


Run on “4” for more 

than 2min 40s 

Whisk 


5-6 

3 egg 

whites 

(minimum) 


Run on “5” or “6” 

(as appropriate) for 

3mins or more. 

Note: 

With heavy mixtures, do not operate the machine for more than six minutes at a time. 

Allow the unit to cool down for a further ten minutes afterwards.


Содержание KAELSTMXSVA

Страница 1: ...1200W ELITE ALL IN ONE STAND MIXER KAELSTMXSVA ...

Страница 2: ......

Страница 3: ...u should leave the workplace always switch the machine off or remove the plug from the socket pull the plug itself not the lead Check the appliance and the cable for damage regularly Do not use the appliance if it is damaged Do not try to repair the appliance on your own always contact Kogan com To avoid exposure to danger always have a faulty cable be replaced only by Kogan com Use only original ...

Страница 4: ...achine on a smooth flat and stable working surface Do not insert the mains plug of the machine into the power socket without having installed all the necessary accessories Care must always be taken when handling the sharp cutting blades emptying the bowl and during cleaning Ensure the Cleaning Care section is read in full before cleaning the product or its accessories WARNING To avoid a hazard due...

Страница 5: ...OVERVIEW ...

Страница 6: ...ter housing 7 Beater 23a Coarse shredder 8 Whisk 23b Slicer 9 Front cover 23c Fine shredder 10 Rear cover 24 Sausage segmentation plate 11 Measuring cup 25 Sausage casing tube 12 Jar lid 26 Moulding machine bracket 13 Glass cup 27 Sausage moulding attachment 14 Helix housing 28a Cookie tray 15 Helix 28b Cookie plate bracket 16 Blade 29 Pasta maker accessories ...

Страница 7: ...ls turn the switch to the PULSE position The switch must be held in this position according to the desired interval length When the switch is released it returns automatically to the 0 position 11 After kneading stirring turn the speed knob 3 back to the 0 position as soon as the mixture has formed a ball then remove the mains plug from the wall socket 12 Press the release switch 2 downwards and t...

Страница 8: ... 2 4 min to form a cluster Beater 2 4 3 660g flour and 840ml water Run on 2 for 20s Run on 4 for more than 2min 40s Whisk 5 6 3 3 egg whites minimum Run on 5 or 6 as appropriate for 3mins or more Note With heavy mixtures do not operate the machine for more than six minutes at a time Allow the unit to cool down for a further ten minutes afterwards ...

Страница 9: ... and turn it anticlockwise until it locks into place FIG 4 6 Set the speed control to position 6 Important Do not insert the plug into the power socket until you have attached the blender jar and the jar lid correctly After use unplug the appliance before you remove the blender jar from the housing Do not fill the blender jar with ingredients that are hotter than 80 C To prevent spilling do not pu...

Страница 10: ...er 23b or fine shredder 23c into the cutter housing 22 FIG 1 and 2 3 Press the fixed button then attach the cutter housing into the machine and turn anticlockwise to lock FIG 3 4 Place a vessel under the exit 5 Put the plug in the socket then set the speed control to position 3 5 Cut the vegetable into pieces suitably sized for the cutter housing Choose the appropriate cutter as required Put the v...

Страница 11: ... turn anticlockwise to lock FIG 3 4 Place the filling tray FIG 4 on the filler neck and place a vessel under the exit 5 Insert the plug into the power socket then set the speed control to position 3 Place the meat pieces onto the filling tray 20 and into the filler neck If necessary push the meat with the presser 19 Do not use your fingers to push the meat 6 After use switch off the appliance and ...

Страница 12: ...usage casing by salting Before use float the casing in water to check for large tears or holes and to ease application to the funnel Tie knots in the casing to seal these holes accordingly Set the on the funnel 25 and knot the end or fasten it with string 6 Feed the meat mixture into the filler neck of the helix housing by applying force to the pressure block turn on the machine to position 3 6 an...

Страница 13: ...4 hand tightened the lock ring securely 2 The method of use is the same as the sausage attachment above Illustration B Suggested sausage hollow sausage recipe Ingredients Streaky pork 1kg Salt 16g Sugar 70g Maple syrup 85g White pepper 2g Garlic powder 7g Five spice powder 5g Cayenne pepper 7g Black pepper 15g Potato starch 50g Yellow rice wine 90g Develop for 1 hour then cut into blocks ...

Страница 14: ... 28b to select the desired cookie shape 4 After properly installing the cookie attachment cut the kneaded dough into strips then feed them into the filler neck of helix housing one at a time Set the machine to position 3 6 apply force to the pressure block above the dough and the cookies will be extruded from the output part 5 When the dough sticks to the inner wall of the helix housing you can us...

Страница 15: ...ousing 14 hand tightened the lock ring securely 3 After correctly installed the accessory of the pasta maker cut the dough to bars and feed into the helix housing Set the speed on the machine and noodles will squeeze out from the output end slowly 4 When dough adheres onto the inner wall of the spiral housing push the dough by using the presser Illustration C Tips The recommended dough formulation...

Страница 16: ...o dry thoroughly before reassembling the device Apply a small quantity of vegetable oil to the screens after they have dried to season for use This marking indicates that this appliance should not be disposed with other house hold wastes To prevent possible harm to the environment or human health from uncontrolled waste disposal recycle it responsibly to promote the sustainable reuse of material r...

Страница 17: ...the machine and locked correctly The machine does not work on a certain speed Check if the mark on speed knob corresponds to the speed silkscreen on the housing Rotate speed knob to 0 and re check if the machine works Movement when the machine working Check if the anti slip feet are still attached Check if the machine is placed on a smooth and flat tabletop The release switch does not spring back ...

Страница 18: ...NOTES ...

Страница 19: ......

Страница 20: ...tion We hope that this user guide has given you the assistance needed for a simple set up For the most up to date guide for your product as well as any additional assistance you may require head online to help kogan com ...

Отзывы: