background image

<Fn> + <Delete>

For Audio or Video 'Pause' .

<Fn> + <PrtSc>

<Fn> + <NumLK>

F12

F11

Turns Bluetooth on or off.(bluetooth option)

<Fn> + <F2>

Turns 3G on or off.(3G option)

Using your Notebook        19

your Notebook properly before using this 

monitor or projector), or allows 

and an external display device (such as a  

Switches display between your Notebook 

Puts your Notebook into Sleep mode.

Function hotkey Description

Function hotkey Description

<Fn> + <Esc>

<Fn> + <F1>

<Fn> + <F3>

Activates or deactivates the touchpad.

<Fn> + <F4>

<Fn> + <F5>

Decreases screen brightness.

<Fn> + <F6>

Increases screen brightness.

<Fn> + <F7>

simultaneous display.

 Make sure an external display device (such 

as a monitor or projector) has been connected to 

hotkey combination.

<Fn> + <F8>

Activates or deactivates the speakers.

<Fn> + <F9>

Increases volume.

<Fn> + <F10>

Decreases volume.

Activates or deactivates the numeric 
keypad (indicated by the light gray shade 
in the illustration on the previous page.

Содержание Agora

Страница 1: ...Agora Laptop USER MANUAL ...

Страница 2: ...aintenance 41 Display 39 System 35 Connection 34 Battery and power 33 Exit menu 27 Security menu 26 Boot menu 26 Advanced menu 26 Main menu 26 Touring your 9 Expanding the capabilities of your Notebook 6 Getting your ready for use 3 Using BIOS setup 24 Using the touchpad 16 Using your notebook 16 Table of Contents ii Table of Contents Overview 1 About this book 1 Typographics 2 Getting started 3 F...

Страница 3: ...ters of this book Chapter title Description Overview Introduction to this book Getting started Information about beginning to Introduction to the hardware Basic and advanced Using BIOS setup Information about how to use the BIOS setup utility Replacing the memory Information about how to replace RAM memory FAQ and troubleshooting Information about frequently asked questions and troubleshooting Cle...

Страница 4: ...upplied with your operating system or search from Help and Support in the Start Icon Symbol Item Meaning Warning Information mainly to prevent the damage to components data or personal injury caused by misuse and improper operation or behavior Tip Useful information for completing a task Note Supplementary information or Keys on the keyboard User Interface UI on the screen Indicates a key on the k...

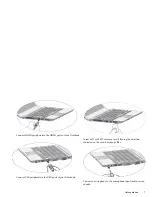
Страница 5: ...e all the items with you For details about what should be included in the package refer to the Product Specification label on the product carton If any of the items are missing or appear damaged contact your dealer immediately Save the service ready for use 1 Installing the battery pack label side of the battery pack facing down slide it gently into the battery compartment until it snaps into plac...

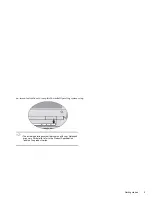
Страница 6: ...the power adapter to the power jack on your c Connect the power cord to a power outlet The battery Gently lift up the latchless lid that allows you to open the case easily 4 Performing initial setup button indicator then lights up in white And then follow the The battery pack is shipped with low charge from the factory charging Power systems and plug types may vary depending on your country region...

Страница 7: ...ructions to complete the initial Operating system label on the product carton The actual operating system that comes with your Notebook may vary For details refe Getting started 5 setup r to the Product Specification ...

Страница 8: ...ccess local area network LAN by connecting a network cable Connect an external display device such as a monitor or with a VGA cable Pay attention to the plug direction when making the following connections Incorrect direction may cause damage to the device To switch to the external display device or simultaneous display press the Fn F7 hotkey combination ...

Страница 9: ...ur Notebook Connect USB peripherals to the USB ports of your Notebook Getting started 7 Insert a SD or MMC memory card following the direction indicated on the card to exchange files Connect a microphone to the microphone input jack to record sounds ...

Страница 10: ...Getting started 8 Connect an earphone to the audio output jack to output sounds ...

Страница 11: ...uring your Notebook Touring your Notebook 9 Front view 1 3 8 7 6 5 4 2 No Front components 1 Built in microphone Receives sounds and voices for recording 2 Built in webcam A built in 1 3 megapixel webcam that allows you to capture still images record videos and chat 4 Keyboard 6 Touchpad Refer to for details Refer to Indicators on page 15 for details ...

Страница 12: ...r default e mail program Wireless LAN WLAN botton 11 10 8 Indicators Indicators on page 15 Touring your Notebook Turns your Notebook on or off 8 Refer to for details 9 Power button Refer to Indicators on page 15 for details ...

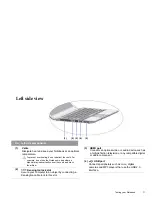
Страница 13: ...gton lock slot 1 2 3 4 1 Vents example do not use the Notebook in bed where a Touring your Notebook 11 temperature Dissipate heat and keep your Notebook at an optimal Left side view No 2 To prevent overheating do not obstruct the vents For blanket may inadvertently cover the vents and block the airflow 5 USB port Connects peripherals such as mice digital cameras and MP3 players that use the USB 2 ...

Страница 14: ...Stick MS Memory Stick Pro MSP digital SD memory card MutiMediaCard MMC Memory Support the following optinal digital card formats Secure Four in One memory card slot Touring your Notebook 12 5 ...

Страница 15: ... 3 USB port Connects peripherals such as mice digital cameras and MP3 players that use the USB 2 0 interface 5 6 15 pin D sub video jack monitors and projectors 5 fast Ethernet 100BASE T network LAN Local Area Network port RJ 45 connector Please be careful to avoid plugging a RJ 11 phone cable connector in the RJ 45 port This will damage the LAN port They look similar but the RJ 45 connector is wi...

Страница 16: ... 7 1 Back cover module Replacing the memory on page 28 refer to memory module of your Notebook from here the Notebook You can replace the existing Touring your Notebook Supplies power to the Notebook when external 14 Bottom view No Bottom components power is not connected Secure the battery in place 4 2 1 3 Inside the cover you can find the memory slot of To remove the cover a small Phillips head ...

Страница 17: ... in Hibernation mode When the system is in Sleep mode it flashes in When the system is on it lights up in blue blue Light up in blue when the battery is fully charged Flashes in red when the battery is low Light up in red when the battery is charging Battery status indicator Power indicator Flashes in blue when the Notebook is 3 Touring your Notebook 15 Indicators No the light goes off Wireless LA...

Страница 18: ...click functions as an external mouse does To move the pointer place your finger with slight pressure on the touchpad and move in the direction as desired 1 2 3 No Component Function 1 Touchpad Moves the pointer selects or activates items on the screen 2 Left touchpad button Equivalent to the left button of an optional external mouse 3 Right touchpad button Equivalent to the right button of an opti...

Страница 19: ... and then use your finger on the touchpad to drag Tap twice quickly and hold the item and then move your finger on the touchpad to drag Display the contextual menu Click once The touchpad is a pressure sensitive device that requires proper care to avoid damage Do not rest heavy objects on the touchpad or its buttons Do not scratch the touchpad with sharp pointed objects or your fingernails ...

Страница 20: ...tkeys to access commonly used functions or make quick settings To use the hotkeys press and hold the Fn Function key at the lower left corner of the keyboard and then press the desired hotkey The appearance of the keyboard legend may vary depending on the country region of your purchase ...

Страница 21: ...leep mode Function hotkey Description Function hotkey Description Fn Esc Fn F1 Fn F3 Activates or deactivates the touchpad Fn F4 Fn F5 Decreases screen brightness Fn F6 Increases screen brightness Fn F7 simultaneous display Make sure an external display device such as a monitor or projector has been connected to hotkey combination Fn F8 Activates or deactivates the speakers Fn F9 Increases volume ...

Страница 22: ...ows key shortcuts and other keys You can access features of the Windows operating system quickly using Windows key combinations To use the shortcut combinations press and hold the Windows key and then press the other shortcut key ...

Страница 23: ...ng disks and files M Minimizes all open windows that contain Minimize buttons Shift M Cancels minimization of all windows Alt Tab Switches between windows CapsLock Capitalizes all text entered Prt Sc Copies a bitmap image of the current entire screen to your clipboard which can be inserted into documents as a screenshot or pasted into a graphics software such as Microsoft Paint Ins Switches betwee...

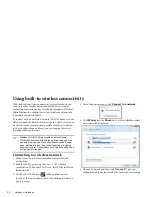
Страница 24: ...ke sure you are located within the wireless network service area 2 Enable WLAN by pressing the Fn F1 hotkey combination When the WLAN is on the WLAN indicator flashes in blue 3 Click on the WLAN icon in the notification area located at the lower right corner of the desktop to display a pop up menu 4 From the pop up menu click Connect to a network 5 Click Wireless in the Show list A list of availab...

Страница 25: ... may have to undergo another authorization process and enter username and password For details please consult your network administrator For data security it is strongly recommended to connect to security enabled wireless networks whenever possible When travelling by air please be sure to turn off wireless networking to avoid any possible risks to flight safety network See LAN Local Area Network p...

Страница 26: ...BIOS setup You need to use BIOS setup when You see an error message on the screen requesting you to run BIOS setup You want to restore the factory default settings You want to modify some specific settings according to the hardware You want to modify some specific settings to optimize system performance To run BIOS setup press the F2 key immediately when the BIOS settings are specific to y NOT cha...

Страница 27: ...rovides Help information about the current menu selected When a menu item is highlighted more detailed information is given Keyboard instructions for moving around and making selections Navigating the BIOS setup screen Keyboard information can be found on the right column of the screen A brief description of keyboard usage is listed below Key Function Left and right arrow keys f Selects a menu tit...

Страница 28: ...firm your selection Hard Disk Drives specifies the Boot Device Priority sequence from hard disks that are available Removable Drives specifies the Boot Device Priority sequence from removable disks that are available PXE SUPPORT supports to boot from LAN Security menu The Security menu contains the security settings which safeguard your system against unauthorized use Change Supervisor Password Th...

Страница 29: ...have made and exits BIOS setup After finishing with your settings you must save and exit so that the new settings can take effect Discard Changes and Exit exits BIOS setup without saving the changes you have made Load Optimal Defaults loads the default values for all the items in the BIOS setup utility It is recommended that you go into BIOS to load manufacture defaults whenever you have installed...

Страница 30: ...connect the Replacing the memory Replacing the memory You can replace the existing memory module with a higher capacity one Before you upgrade or replace memory please distributor or customer service center for the upgrade or memory replacement If you install an uncertified memory module your system may not work properly It is the sole responsibility of the user if problems such as data loss and s...

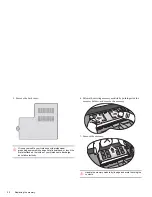
Страница 31: ...ng the memory 29 holding the retainer remove the battery from its compartment 2 To remove the screws a small Phillips head screwdriver is required Battery retainer B 4 The memory door is secured with two screws Use a screwdriver to remove the screws HDD Memory door ...

Страница 32: ...Replacing the memory 5 Remove the back cover 6 Release the existing memory module by pushing aside the memory holders and remove the memory 7 Remove the memory grounding equipment like an anti static wristband or touch the any static electricity Handle the memory module by its edge and avoid touching the contacts ...

Страница 33: ...perly 8 Align the memory module with the slot and then insert it When inserting pay attention to the direction of the memory module 9 Gently push the free edge downwards until the module locks into place If the memory module is not in and use a screwdriver to secure 10 Replace the memory door Memory door ...

Страница 34: ... setup on page 24 32 adapter When you start the Notebook it will automatically Replacing the memory 12 Place the battery on its original position 1 and then slide It is recommended that you go into BIOS to load setup defaults after installing additional memory For details refer to ...

Страница 35: ...arged it means that the battery has It is the result of the battery protection design of your Notebook When the battery icon in the notification area on your Notebook The battery icon in the notification area on my Notebook for a long time What should I do with the battery if I will not use my Notebook My Notebook won t start up with the battery inserted What use of the Notebook along wi FAQ and t...

Страница 36: ...ging If the Power button indicator lights up in white the meaning that the problem lies elsewhere If you have added or replaced any hardware such as a memory module check if it has been installed correctly It is possible that certain operating system files are damaged or missing If so you may need to back up all and shorter It is normal for Lithium ion Li ion batteries to decline in capacity over ...

Страница 37: ...s set Make sure your wireless router or access point is broadcasting the SSID Refer to your wireless device s documentation for enabling this broadcasting feature System How should I resolve the Low on Disk Space or Out of Disk Space error messages Windows uses disk space for operations such as caching and free space of the hard disk drops under 100MB or 200MB The following instructions will help ...

Страница 38: ...ted in Step 1 8 Select the Edit and Paste commands in the folder window The icons that were cut from the Startup folder are now placed in the folder the Startup folder will no longer run when Windows starts However you can still run them by double clicking their icons in the folder created in Step 1 Empty the Recycle Bin You can free up disk space by clearing files you no longer need from the Recy...

Страница 39: ... Universal Serial Bus controllers branch to expand it 4 Right click USB Root Hub and then click Properties 5 Click Power Management 6 Deselect Allow the computer to turn off this device to save power 7 Repeat Step 4 to Step 6 for each USB Root hub 8 Click OK and then close Device Manager Why does the keyboard and or palm rest get warm location of the hard disk is typically underneath the palm rest...

Страница 40: ...ices such as a radio to see if you can still hear that noise If the noise persists the earphone may be out of order If you can hear the noise only when inserting it is the result of high instantaneous current It is a normal phenomenon How can I reduce the wearing of the screen hinge when I lift up Please open close the lid gently and slowly with both hands Apply force evenly on both hands to reduc...

Страница 41: ...is one of the newest cell types available It is also the lightest battery type currently available on a commercial basis and can provide more power than other main cell types There are no known problems of memory effect with this battery type and it is the easiest battery type to be maintained Display There is nothing visible on the screen Check the Power button indicator If it is not lit up no po...

Страница 42: ...ystem starts up normally Fonts displayed on the screen are unclear and strange codes appear There is no display when the hard disk is running normally Colors on the screen are strange and turn into white Vertical or horizontal lines appear on the screen When playing a media file using Windows Media Player the frame speed is abnormal The sound changes while the screen remains the same when playing ...

Страница 43: ...he battery after a storage period 4 Do not short circuit A short circuit may cause severe damage to the battery 5 Do not drop hit or otherwise abuse the battery as this may result in the exposure of the cell contents which are corrosive 6 Do not expose the battery to moisture or rain Do not incinerate Exposure of battery to extreme heat may result in an explosion 8 Do not use power adapters other ...

Страница 44: ... follow all instructions and warnings related to the system that the vents are not obstructed and keep it away from liquids such as beverages faucets and so on it away from sources of heat such as radiators space heaters stoves and so on excessive force temperature is below 0 C or above 50 C nor use your below 5 C or above 35 C Otherwise system performance will be adversely affected bathtub wash b...

Страница 45: ...se the adapter if the cord becomes damaged Do not attempt to service the adapter There are no service parts inside Replace the unit if it is damaged or exposed to excess moisture Disposal of Waste Electrical and Electronic Equipment by users in private households in the European Union This symbol on the product or on the packaging indicates that this can not be disposed of as household waste You m...

Страница 46: ...ządzenie należy wymienić jeśli zostanie uszkodzone lub narażone na oddziaływanie nadmiernej wilgoci 7 Nigdy nie należy instalować kabli telefonicznych podczas burzy z wyładowaniami atmosferycznymi România 1 Asiguraţi vă că respectaţi toate instrucţiunile şi avertismentele privitoare la sistem 2 Nu plasaţi computerul într o zonă cu puternice câmpuri magnetice 3 Pericol de explozie dacă bateria este...

Страница 47: ...stavljena visoki vlagi jo nadomestite z novo 7 Nikoli ne namešèajte telefonske linije med nevihto z grmenjem Български 1 Следвайте всички инструкции и предупреждения относно системата 2 Не слагайте компютъра на място със силно магнитно поле 3 Опасност от експлозия при погрешна смяна на батерията Използвайте само същия или еквивалентен тип батерия препоръчан от производителя на оборудването Изхвърл...

Страница 48: ...izētā servisa centrā 7 Nekad nelietojiet un neveiciet telefona līnijas pieslēgumu negaisa laikā Hrvatski 1 Pridržavajte se svih uputa i upozorenja u vezi sa sustavom 2 Ne postavljajte računalo u područje jakih magnetskih polja 3 Nepravilna zamjena baterije izazvat će opasnost od eksplozije Prilikom zamjene koristite istu ili ekvivalentnu vrstu baterije koju je preporučio proizvođač Rabljene bateri...

Страница 49: ...47 Appendix Memo ...

Отзывы: