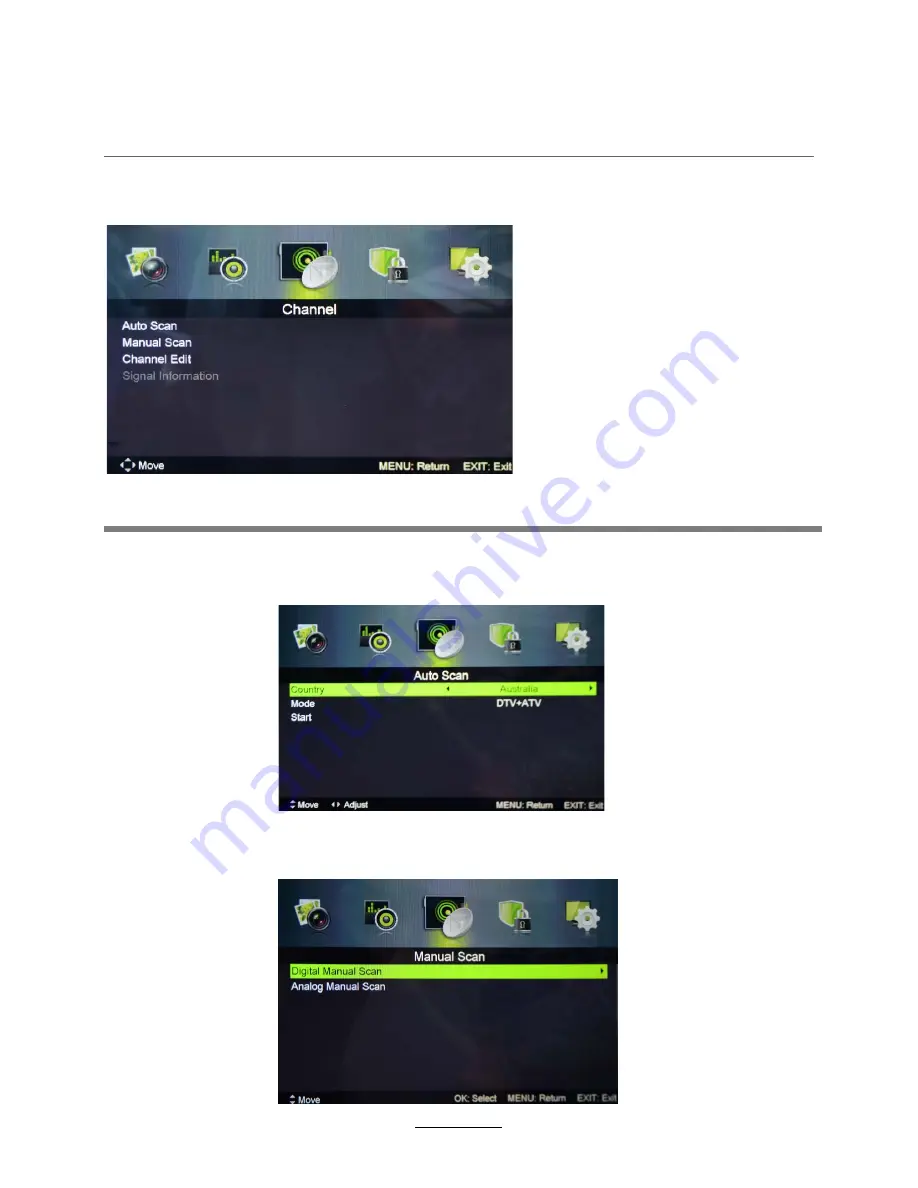
Kogan Agora KALED32SMTWC Скачать руководство пользователя страница 12

Auto Search:

 Enter the Auto Scan menu to start auto scan.

Note:It will search analog channels first, then digital channels.
Before execut

ing

 auto channel search, please confirm 

if 

your antenna type is Air o

r

 Cable.

Digital Manual Scan:

 Press the "OK" button to enter the Digital Manual

Scan menu.

Analog Manual Scan

Press the OK button to enter the Analog Manual

Scan menu.

3. Channel menu

OSD Menu

Description

10

Содержание Agora KALED32SMTWC

Страница 1: ......

Страница 2: ...Safety Information Names of each part Accessories Front View Back View 1 2 3 3 4 3 4 5 6 Remote Control 7 Basic Operation OSD Menu 1 Picture menu 2 Sound menu 3 Channel menu 4 Lock menu 8 13 8 9 10 11...

Страница 3: ...is equipment at your local community waste collection recycling center 1 The exclamation point within an equilateral triangle is intend to alert the user to the presence of important operating and mai...

Страница 4: ...the mains plug or cable is damaged liquid is spilt onto the set or if it is accidentally exposed to water or moisture anything accidentally penetrates the ventilation slots the set does not work norm...

Страница 5: ...View INPUT Display the input source menu MENU Display exit the OSD menu CH Scan through channels VOL Adjust the volume POWER Turn on standby the TV set PLAY EJECT Play pause the disc playing Eject Clo...

Страница 6: ...45 SD card USB3 USB2 11 VGA 6 Headphone out 7 1 YPbPr 9 Video 3 RF L R Audio in 8 PC IN 4 USB1 2 Coax HDMI1 2 10 5 4 Names of each part Back View USB1 HDMI1 4 3 2 8 9 10 HDMI2 1 5 6 7 11 USB2 3 SD RJ4...

Страница 7: ...splay the input source menu MENU System setup menu EXIT Exit the OSD menu DISPLAY Press to display the current mode s information Allows you to navigate the on screen menus and adjust the system setti...

Страница 8: ...mal size SUBPAGE Press to enter subpages press again to cancel COLOUR Buttons Short cuts Follow the coloured links in text or System Menu Play Pause program POWER Turn the TV on standby MUTE Press to...

Страница 9: ...ou select the input source make sure the connections are prepared Basic OSD Menu operation Press MENU button to display the OSD menu as below Use button to select the main menu and press OK button to...

Страница 10: ...GA PC mode Saturation Adjust image colour from black and white Colour Temp Select an optimum color temperature mode to suit your eyes for viewing from Warm Cool Standard Noise Reduction If the broadca...

Страница 11: ...hed sounds Bass Adjust the bass effect Increased or decreases lower pitched sounds Balance Adjust the balance between left and right speakers to adapt to your listening position EQ Settings Adjust Equ...

Страница 12: ...n digital channels Before executing auto channel search please confirm if your antenna type is Air or Cable Digital Manual Scan Press the OK button to enter the Digital Manual Scan menu Analog Manual...

Страница 13: ...on to move and press OK to confirm Signal Information Displays the signal information in DTV mode picture Skip Press GREEN button to skip the channel or cancel the setting and the program will not be...

Страница 14: ...ock Keypad Set to prevent it from being used by young children or from other unexpected usage Max Volume Set the Max volume for the TV Default Volume Set the default volume when the program is on Sour...

Страница 15: ...m Audio Language Allows you to select audio language OSD Time 10 seconds 20 seconds 30 seconds 60 seconds off Sleep Time Set the time span before the unit goes to sleep from the following selections 5...

Страница 16: ...control to display the input source menu select Media source by the buttons and press OK button to enter the Multimedia menu as shown below Then press button to program the files be signed you select...

Страница 17: ...e Press button to select the option on the table and press Pause Play pause the music FB FF Fast backward fast forward Prev Next Play the previous next file Stop Stop the music OK button to change Vie...

Страница 18: ...display the option table when it disappears 16 Press to select options on the toolbar and press OK to change Prev Next Turn to previous next file Press the EXIT button and select Back to return to th...

Страница 19: ...and the like are compatible with recording files Please use USB Flash Drives or external HDDs with a separate power supply The USB drive has to be formatted before any recording can be done to ensure...

Страница 20: ...18 Smart TV 1 Install Wizard WELCOME PAGE when you turn on the TV and first switch to SMART TV channel INSTALLING WIZARD Choose your language...

Страница 21: ...Smart TV 19 Choose your network wireless or Ethernet network and then follow the steps setting the network Configuration Result...

Страница 22: ...aspect ratio date and time and network The AppManager lets you launch selected applications such as Weather Calendar News The Browser allows you enjoy your time on surfing Internet and searching for i...

Страница 23: ...AUNCHER INTRODUCTION Area EXAMPLE DESCRIPTION 1 Show time and calendar You can set time date time zone in settings 2 List the most used 6 apps 3 You can set two widgets as News Google search bar weath...

Страница 24: ...22 Smart TV MEDIA PLAYER The Picture Music and Video are the media player for local storage You can play the media on a USB SD CARD etc Music player Video Music Photo...

Страница 25: ...odec or format the product can play more detail at general outline Type Format Video Upper to 1080P H 264 MKV AVI TS M2TS MOV WMV MP4 FLV DIVX AVI MPEG1 MPEG2 MPEG4 RM VOB MPG MPEG TS M2TS VC1 WMV Aud...

Страница 26: ...and confirm to choose or enter Menu Key Call out the Browser s menu include forward edit bookmark refresh etc Back key Back to the last page Search key Call out the search bar for searching or input n...

Страница 27: ...ct YES Add Google account and press NEXT 25 Smart TV APPLICATIONS Install from USB disk SD card 1 Open the File Manager 2 Choose your USB or any other mass storage s folder 3 Find you application and...

Страница 28: ...ome time receive more popup to accept the new terms conditions For Google Play after accepting this Market APP will change Google play App 26 Smart TV SETTINGS 1 Enter SETTINGS 2 Enter Applications Ma...

Страница 29: ...Ethernet networks Configure Ethernet devices Language and Input Select language Android keyboard Date and time Automatic Set date Select time zone Set time Use 24 hour format Select date format Stora...

Страница 30: ...ch as SD card USB disk mobile HDD etc 2 Unplug the power supply 3 Press the RECOVERY button then plug in the power release the RECOVERY button until you see the screen as follow 4 Use Up Down buttons...

Страница 31: ...29 Smart TV 6 Use Up Down buttons to choose reboot system now and enter it the product will reboot after confirmation 7 The product will enter the system successfully...

Страница 32: ...Aspect Ratio 16 9 Resolution 1080p Media Format Video Formats Full format 1080P HD video decoding play Supported Video decoding MPEG 1 MPEG 2 MPEG4 H 264 H 263 VC 1 RV30 40 Supported Audio decoding PC...

Страница 33: ...appear on the screen Stop using wireless telephones hair driers and electric drills and it shakes The screen does not move Press the PAUSE button Check if the Pause button is pressed on external equip...

Страница 34: ...pecifications 32 Techincal Specifications Power Consumption TV TVSystem PAL BG DK I SECAM BG DK Screen size 32 diagonal Resolution 1366 x 768 pixels RGB Aerial input 75 unbalanced 100 240V 50 60Hz 75W...

Страница 35: ...Manufactured under license from Dolby Laboratories Dolby and the double D symbol are trademarks of Dolby Laboratories...

Отзывы: