


which allows comfortable observation without stretching
forward;
-
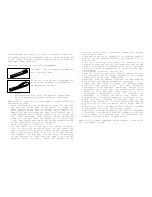
Place inserts (4,5) in the apertures of the rail (3). The
insert (4) is placed with a projection (B) looking
downwards in the nearest slot on the rail of the rifle.
If there is no such a slot, the insert (4) is placed
with a projection (B) looking upwards. It is recommended
to place the inserts at the maximum possible distance
from each other;
-
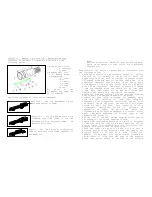
Place clamps (6) and clamp screws (7) in the inserts
(4,5). Tighten screws (6,7) in order to obtain hard
fixation. When necessary the excessive front part of the
rail (3) can be removed.
Adaptation has been completed and the device is ready for
use as a hunter’s scope.
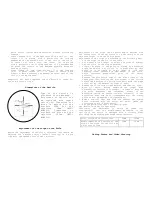
Dimensions of the Reticle
Type of the reticle is
presented at the drawing.
Brightness of reticle can
be regulated with toggle
switch (9). Dimensions are
given in meters for the
distance 100m for the
objective 64mm (NVD-
NORS210) Dimensions in
brackets are given for the
objective 100mm (NVD-
NORS220)
Adjustment of the Scope on the Rifle
Before the adjustment of the scope, objective lens should be
adjusted for a distant object (select infinity) in a dark
time with the opened cover of the objective.
Adjustment of the scope can be performed in daytime with
the closed cover of the objective or in the twilight on the
adjusted target or on the remote point.
Adjustment of the scope is performed in the following way:
-
Fix the scope on the fit of the rifle;
-
Set a panel with a target or select the point of aiming;
-
Set the rifle on the scoped machine;
-
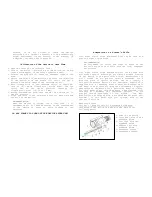
Direct the rifle to the point of aiming by mechanical
sight (bead with a slot) (if it is possible). At this
stage it is suitable to apply laser of cold test
shooting (LCTS) inserted in the barrel of the rifle,
which indicates geometrical point of the barrel
position.
-
Unscrew the protective caps of the bias screws of the
aimed graticule. Turning the bias screws of the reticle
obtain the matching of reticle crosshairs with the aimed
point, set by the mechanical sight or LCTS;
-
Remove the rifle from scoped machine and take out LCTS;
-
Make 2-3 shots. Having examined the target make
necessary corrections (for example, in order to move the
hit point downwards and leftwards, screws of the
mechanism should be turned counter clockwise, in the
directions Down and Left correspondingly. The aiming
point is moving upwards and rightwards);
-
Make a control shot and find out whether the aiming
point coincides with the bullet hit point. (Make the
correction again if necessary);
-
Set the protective caps into their places.
The device is ready for operation.
Performing the adjustment it should be taken into
consideration that the displacement mechanism of the
reticle of the device is equipped with a clicking fixer
providing the following presented characteristics:
Focal length of objective lens
64mm
100mm
Displacement of the reticle at the
turn of the screw for one click at
a distance of 100m
30mm
19mm
Taking Photos and Video Shooting


