background image

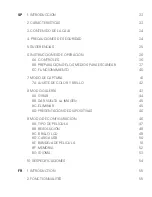
1. INTRODUCCIÓN 

33

2. CARACTERISTICAS 

33

3. CONTENIDO DE LA CAJA 

34

4. PRECAUCIONES DE SEGURIDAD 

34

5. SUGERENCIAS 

35

6. INSTRUCCIONES DE OPERACIÓN 

36


6A. CONTROLES 

36


6B. PREPARACIÓN DE LOS MEDIOS PARA ESCANEAR 

37


6C. FUNCIONAMIENTO 

40

7. MODO DE CAPTURA 

41


7A. AJUSTE DE COLOR Y BRILLO 

42

8. MODO GALERÍA 

43


8A. GIRAR 

44


8B. DAR VUELTA LA IMAGEN 

45


8C. ELIMINAR 

45


8D. PRESENTACIÓN DE DIAPOSITIVAS 

46

9. MODO DE CONFIGURACIÓN 

46


9A. TIPO DE PELÍCULA 

47


9B. RESOLUCIÓN 

48


9C. BRILLO LCD 

49


9D. CARGA USB 

50


9E. BANDEJA DE PELICULA 

51


9F. MEMORIA 

52


9G. IDIOMA 

53

10. SESPECIFICACIONES 

54

1. INTRODUCTION 

55

2. FONCTIONNALITÉS 

55

SP

FR

Содержание SCANZA

Страница 1: ...rhandbuch Manuale Dell utente Manual do Usuário Por favor lea todas las instrucciones antes de usar el producto y conserve esta guía como referencia Veuillez lire toutes les instructions avant d utiliser l article et conserver ce guide pour référence Bitte lesen Sie alle Anweisungen bevor Sie das Produkt verwenden und bewahren Sie dieses Handbuch als Referenz auf Leggere tutte le istruzioni prima ...

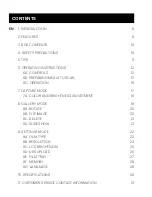
Страница 2: ...C OPERATION 16 7 CAPTURE MODE 17 7A COLOR AND BRIGHTNESS ADJUSTMENT 18 8 GALLERY MODE 19 8A ROTATE 20 8B FLIP IMAGE 20 8C DELETE 21 8D SLIDESHOW 21 9 SETTINGS MODE 22 9A FILM TYPE 22 9B RESOLUTION 24 9C LCD BRIGHTNESS 25 9D USB UPLOAD 26 9E FILM TRAY 27 9F MEMORY 28 9G LANGUAGE 29 10 SPECIFICATIONS 30 11 CUSTOMER SERVICE CONTACT INFORMATION 31 CONTENTS EN ...

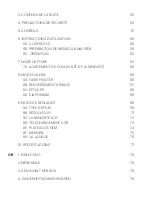
Страница 3: ... 37 6C FUNCIONAMIENTO 40 7 MODO DE CAPTURA 41 7A AJUSTE DE COLOR Y BRILLO 42 8 MODO GALERÍA 43 8A GIRAR 44 8B DAR VUELTA LA IMAGEN 45 8C ELIMINAR 45 8D PRESENTACIÓN DE DIAPOSITIVAS 46 9 MODO DE CONFIGURACIÓN 46 9A TIPO DE PELÍCULA 47 9B RESOLUCIÓN 48 9C BRILLO LCD 49 9D CARGA USB 50 9E BANDEJA DE PELICULA 51 9F MEMORIA 52 9G IDIOMA 53 10 SESPECIFICACIONES 54 1 INTRODUCTION 55 2 FONCTIONNALITÉS 55 ...

Страница 4: ...STEMENT DE COULEUR ET DE LUMINOSITÉ 64 8 MODE GALERIE 66 8A FAIRE PIVOTER 66 8B RENVERSEMENT D IMAGE 67 8C EFFACER 68 8D DIAPORAMA 68 9 MODE DE RÉGLAGES 69 9A TYPE DE FILM 69 9B RÉSOLUTION 71 9C LUMINOSITÉ LCD 72 9D TÉLÉCHARGEMENT USB 73 9E PLATEAU DE FILM 74 9F MÉMOIRE 75 9G LA LANGUE 76 10 SPÉCIFICATIONS 77 1 EINLEITUNG 78 2 MERKMALE 78 3 DEN INHALT DER BOX 79 4 SICHERHEITSVORKEHRUNGEN 79 GR ...

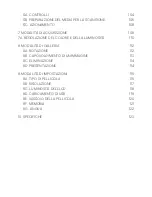
Страница 5: ...A DREHEN 89 8B DAS BILD DREHEN 90 8C LÖSCHEN 90 8D DIASHOW 91 9 EINSTELLUNGSMODUS 91 9A FILMTYP 92 9B LÖSUNG 94 9C LCD HELLIGKEIT 95 9D USB HOCHLADEN 96 9E FILMABLAGE 97 9F SPEICHER 98 9G SPRACHE 99 10 SPEZIFIKATIONEN 100 1 INTRODUZIONE 101 2 CARATTERISTICHE 101 3 CONTENUTO DELLA CONFEZIONE 102 4 PRECAUZIONI DI SICUREZZA 102 5 CONSIGLI 103 6 ISTRUZIONI PER L AZIONAMENTO 104 IT ...

Страница 6: ...LLA LUMINOSITÀ 110 8 MODALITÀ DI GALLERIA 112 8A ROTAZIONE 112 8B CAPOVOLGIMENTO DI UN IMMAGINE 113 8C ELIMINAZIONE 114 8D PRESENTAZIONE 114 9 MODALITÀ DI IMPOSTAZIONI 115 9A TIPO DI PELLICOLA 115 9B RISOLUZIONE 117 9C LUMINOSITÀ DELL LCD 118 9D CARICAMENTO DI USB 119 9E VASSOIO DELLA PELLICOLA 120 9F MEMORIA 121 9G LINGUA 122 10 SPECIFICHE 123 ...

Страница 7: ...t your slides negatives and even Super 8 frames to digital images that you can store and preserve Save your treasured memories on an SD card not included or to your computer You can also directly connect to a TV or HDTV to view images Converts 35mm 126 110 and Super 8 and 8mm film negatives and slides to JPEGS in seconds 14 22 megapixel resolution No computer or software required Adjustable scanni...

Страница 8: ...s a wireless mouse media player mobile phone or other USB powered devices there may not be enough power for the product to function properly Do not move or disconnect the device from the computer while the device is reading writing data This may cause damage to the data and or the device Slides and negatives MUST be placed in the proper adapter tray and insert before inserting them into the produc...

Страница 9: ...re inserting another slide or negative into the scanner For clear images clean your film with a soft cloth or compressed air prior to inserting it into the scanner Negatives and slides should be inserted with the shiny side up Super 8 film should be inserted with the perforated holes facing up Always handle films with care to avoid scratches or fingerprints View your images on your TV Simply conne...

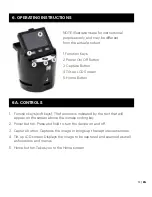
Страница 10: ... off 3 Capture button Captures the image or brings up the capture view screen 4 Tilt up LCD screen Displays the image to be captured and scanned as well as functions and menus 5 Home button Takes you to the Home screen 6A CONTROLS NOTE Illustrations are for instructional purposes only and may be different from the actual product 1 Function Keys 2 Power On Off Button 3 Capture Button 4 Tilt up LCD ...

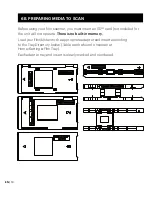
Страница 11: ...nit will not operate There is no built in memory Load your film slide into the appropriate adapter and insert according to the Tray Directory below Table can be found onscreen at Home Settings Film Tray Each adapter tray and insert is clearly marked and numbered 6B PREPARING MEDIA TO SCAN ...

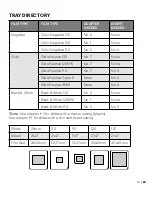
Страница 12: ...KPK No 1 None Slide Positive 110 No 1 No 6 Slide Positive Super 8 None No 4 Slide Positive 8MM None No 4 Black White Black White 135 No 2 None Black White 126KPK No 1 None Black White 110 No 2 No 5 Note Use adapter 3 for slides with a thicker casing plastic Use adapter 1 for slides with a thin cardboard casing Slides 35mm 110 110 126 127 Mount 2 x2 2 x2 1 x1 2 x2 2 x2 Film Size 24x36mm 13x17mm 13x...

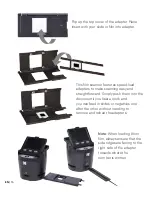
Страница 13: ...ake scanning easy and straightforward Simply push them into the device until you hear a click and you can feed in slides or negatives one after the other without needing to remove and reload the adapters Note When loading 8mm film always ensure that the side ridges are facing to the right side of the adapter towards where the number is written ...

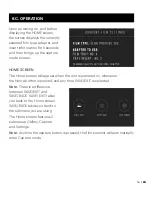
Страница 14: ...appear when the unit is powered on whenever the Home button is pushed and any time SAVE EXIT is selected Note There is a difference between SAVE EXIT and SAVE BACK SAVE EXIT takes you back to the Home screen SAVE BACK takes you back to the submenu you are using The Home screen features 3 submenus Gallery Capture and Settings Note Anytime the capture button is pressed the film scanner will automati...

Страница 15: ...he color of the photo By selecting Info you will be taken to a screen that tells you which adapters are needed for the current mode If you wish to change the film type you will need to do so manually in the Film Type settings 2 Press the hard Capture button camera icon to capture and save an image The screen will display Saving Note An ERROR message will appear if the SD card not included is full ...

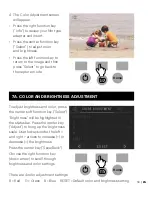
Страница 16: ... the right function key down arrow to scroll through brightness and color settings There are 4 color adjustment settings R Red G Green B Blue RESET Default color and brightness setting 7A COLOR AND BRIGHTNESS ADJUSTMENT Home 4 The Color Adjustment screen will appear Press the right function key Info to review your film type adapter and insert Press the center function key Select to adjust color an...

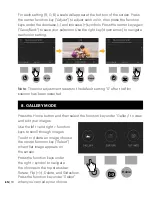
Страница 17: ...utton and then select the function key under Gallery to view and edit your images Use the left and right function keys to scroll through images To edit or delete an image choose the center function key Select when that image appears on the screen Press the function keys under the right symbol to navigate the choices in the top status bar Rotate Flip Delete and Slideshow Press the function key unde...

Страница 18: ...nd right function keys to scroll through images 3 To rotate the image press the center soft key select Then press the right soft key to cycle through the editing options listed at the top of the screen Rotate Flip Delete and Slideshow 8A ROTATE Home 8B FLIP IMAGE Before After You can flip the image vertically or horizontally Home ...

Страница 19: ...the trash can icon Press the center function key to Select You will be asked to confirm if you want to delete that image 8C DELETE Home View stored images in succession In the slideshow mode you can pause or play by pressing the center function key 8D SLIDESHOW Home ...

Страница 20: ...r the left and right arrow symbols to scroll through the settings Film Type Resolution LCD Brightness USB Upload Film Tray Memory Language Press the soft function key under any of the icons that appear on the screen to enter that function s submenu Home 9 SETTINGS MODE Negative 135 110 126 Slides 135 110 126 SUPER8 8MM B W 135 110 126 9A FILM TYPE ...

Страница 21: ...23 EN 1 Choose one of the 3 film types by pressing the center function key Select Choose Back to return to the Settings menu 2 For each film type select the film size Home Home Home Home ...

Страница 22: ...l settings from the submenus Press the function key under Save Exit after each selection Note Selecting Save Exit will redirect you back to the Home screen Home 1 Select Resolution from the settings menu 2 You can choose between the standard 14 megapixel scan or enable the built in software interpolation which through a specialized algorithm enhances the image quality to 22 megapixels Cycle betwee...

Страница 23: ...e Exit button Note This will then take you back to the Home screen 4 To go to the previous slide press the Back button Home 1 Select LCD Brightness from the settings menu 2 Use the and keys to adjust the brightness of the LCD screen 9C LCD BRIGHTNESS Home ...

Страница 24: ... screen Home This mode will allow you to access your SD card not included from your computer Note While connected to a computer you will be unable to use the film scanner 1 Use the included USB cable to connect the scanner directly to a computer 2 Select USB Upload from the settings menu 9D USB UPLOAD Home ...

Страница 25: ...computer This may take a few seconds When connecting your computer will recognize the scanner as an external device 4 When finished press the disconnect button and then unplug the USB cable 1 Select Film Tray from the settings menu 9E FILM TRAY Home ...

Страница 26: ... for each compatible film or slide type Note The film type cannot be actively changed from the Tray Directory To change the film type select Film Type from the Settings menu as described in section 9A of this user manual Home 1 Select Memory from the settings menu 9F MEMORY Home ...

Страница 27: ...ard not included The image count is approximate and may not be an exact reflection of available space Note This film scanner is not equipped with internal memory and an SD card not included must be inserted in order to save photos Home 1 Select Language from the settings menu 9G LANGUAGE Home ...

Страница 28: ...an German Spanish French Home Power source AC adapter USB DC5V output Sensor 14MP CMOS sensor File format JPEG Resolution 14MP 22MP interpolation Supported film negative types 135mm 126 110 Super 8 8mm LCD 3 5 TFT LCD External memory SD SDHC memory card not included Interfaces USB 2 0 port SD card slot TV out 3 5mm phone jack HDMI port Dimensions 4 7 x 4 7 x 5 120 x 120 x 127mm Weight 16 2 oz 460g...

Страница 29: ...your product please contact us before returning the item to the place of purchase We re here to help U S Support kodak camarketing com 844 516 1539 International Support kodakintl camarketing com 844 516 1540 11 CUSTOMER SERVICE CONTACT INFORMATION ...

Страница 30: ...uso marcos Súper 8 en imágenes digitales que puede almacenarlas y conservarlas Guarde sus recuerdos preciados en una tarjeta SD no incluida o en su computadora También puede conectarlos directamente a un televisor o a una televisión de alta definición para ver imágenes Convierte diapositivas y negativos de película de 35mm 126 110 y Super 8 y 8mm a JPEGS en segundos Resolución 14 22 megapíxeles No...

Страница 31: ... digital KODAK SCANZA directamente a su computadora tenga cuidado de no sobrecargar las conexiones USB Si tiene demasiados dispositivos conectados a su computadora tales como un ratón inalámbrico reproductor multimedia teléfono móvil u otros dispositivos USB puede que no haya suficiente energía para que el producto funcione correctamente No mueva ni desconecte el dispositivo de la computadora mien...

Страница 32: ...ente la parte inferior interior de la unidad Nunca use alcohol detergentes o agentes de limpieza abrasivos para limpiar este dispositivo Recuerde siempre guardar su imagen escaneada antes de insertar otra diapositiva o negativo en el escáner Para obtener imágenes nítidas limpie la película con un paño suave o aire comprimido antes de insertarla en el escáner Los negativos y las diapositivas deben ...

Страница 33: ...io 1 Teclas de función teclas programables la función se indica con el texto que aparecerá en la pantalla sobre la tecla correspondiente 2 Botón de encendido manténgalo presionado para encender y apagar el dispositivo 3 Botón de captura captura la imagen o muestra la pantalla de vista de captura 4 Pantalla LCD inclinable Muestra la imagen que será capturada y escaneada así como las funciones y los...

Страница 34: ...orada Cargue su película diapositiva en el adaptador apropiado e insértela de acuerdo con el Directorio de Bandeja que figura a continuación La tabla se puede encontrar en la pantalla en Inicio Configuración Bandeja de película Cada bandeja adaptadora e inserto está claramente marcado y numerado 6B PREPARACIÓN DE LOS MEDIOS PARA ESCANEAR ...

Страница 35: ...ivo 135 No 2 Nada Color Negativo 126 No 1 Nada Color Negativo 110 No 2 No 5 Diapositiva Diapositiva Positiva 135 No 1 Nada Diapositiva Positiva 126 No 1 Nada Diapositiva Positiva 110 No 1 No 6 Diapositiva Positiva Super 8 Nada No 4 Diapositiva Positiva 8MM Nada No 4 Blanco y Negro Blanco Negro 135 No 2 Nada Blanco Negro 126 No 1 Nada Blanco Negro 110 No 2 No 5 Diapositiva 35mm 110 110 126 127 Mont...

Страница 36: ... fácil y sencillo Simplemente empújelos dentro del dispositivo hasta que escuche un clic y puede insertar las diapositivas o negativos uno después del otro sin necesidad de retirar o volver a cargar los adaptadores Nota Cuando cargue la película de 8 mm siempre asegúrese de que las crestas laterales estén orientadas hacia el lado derecho del adaptador hacia donde está escrito el número ...

Страница 37: ...té encendida siempre que se presione el botón de inicio y cuando se seleccione GUARDAR SALIR Nota Hay una diferencia entre GUARDAR SALIR y GUARDAR VOLVER GUARDAR SALIR lo devuelve a la pantalla de inicio GUARDAR VOLVER lo lleva de vuelta a el submenú que está usando La pantalla de inicio presenta 3 submenús Galería Captura y Configuraciones Nota Cada vez que se presiona el botón de captura el escá...

Страница 38: ...ará al menú de configuración para ajustar el color de la foto Al seleccionar Información llegará a una pantalla que le indicará qué adaptadores se necesitan para el modo actual Si desea cambiar el tipo de película deberá hacerlo manualmente en la configuración de Tipo de película 2 Presione el botón rigido de Captura icono de la cámara para capturar y guardar una imagen La pantalla mostrará Guarda...

Страница 39: ...r para volver al modo de captura Home Para ajustar el brillo y el color presione la tecla de función central Seleccionar El Brillo se resaltará en la barra de estado Presiones la tecla de función central Ajustar para que aparezca la escala de brillo Use las teclas debajo de las flechas izquierda y derecha para aumentar o disminuir el brillo Presione la tecla central Guardar Volver Elija la tecla d...

Страница 40: ...ota El ajuste de color se restablece a la configuración predeterminada 0 después de que se haya reiniciado el escáner de la película Home Home Home Presione el botón de Inicio y luego seleccione la tecla de función debajo de Galería para ver y editar sus imágenes Use las teclas de función izquierda y derecha para desplazarse por las imágenes Para editar o eliminar una imagen elija la tecla de func...

Страница 41: ... imágenes 3 Para girar la imagen presione tecla de función del centro seleccionar Entonces presione la tecla de función derecha para ciclar a través de las opciones de edición enumeradas en la parte superior de la pantalla Girar Voltear Eliminar y Presentación de diapositivas 8A GIRAR Home Girar Voltear Eliminar y Presentación de diapositivas Presione la tecla de función debajo de Seleccionar cuan...

Страница 42: ...en verticalmente o horizontalmente Home Para eliminar una imagen navegue por la barra de estado superior para visualizar el icono de papelera Presione la tecla de función central para Seleccionar Se le requerirá confirmar si desea eliminar esa imagen 8C ELIMINAR Home ...

Страница 43: ...la de función debajo del Icono de configuración Presione la tecla de función correspondiente debajo delos la símbolos de flecha izquierda y derecha para desplazarse a través de la configuración Tipo de película Carga USB Resolución Memoria Brillo LCD Idioma Bandeja de película Presione la tecla de función debajo de cualquiera de los íconos que aparecen en la pantalla para ingresar al submenú de es...

Страница 44: ... B W 135 110 126 1 Elija uno de los 3 tipos de película presionando la tecla de función central Seleccionar Elija nuevamente regresar al menú de Configuración 9A TIPO DE PELÍCULA 2 Para cada tipo de película seleccione el tamaño de la película Home Home Home Home ...

Страница 45: ...nes adicionales de los submenús Presione la tecla de función debajo de Guardar Salir después de cada selección Nota Seleccionar Guardar Salir lo har regresar a la pantalla de inicio 1 Seleccione Resolución del menú de configuración 2 Puede elegir entre el escaneo estándar de 14 megapíxeles o habilitar la interpolación del software incorporado que a través de un algoritmo especializado mejora la ca...

Страница 46: ... las teclas y para ajustar el brillo de la pantalla LCD 9C BRILLO LCD Home 3 Seleccione la configuración deseada presionando el botón Guardar Salir Nota Esto lo devolverá a la pantalla de inicio 4 Para volver a la diapositiva anterior presione el botón Volver Home ...

Страница 47: ...Nota Mientras está conectado a un a computadora no podrá utilizar el escáner de película 1 Use el cable USB incluido para conectar el escáner directamente a una computadora 2 Seleccione Carga USB desde el menú de configuración 3 Espere a que el escáner se conecte a la computadora Esto puede demorar unos segundos Al conectarse su computadora reconocerá el escáner como un dispositivo externo 9D CARG...

Страница 48: ...51 SP 1 Seleccione la bandeja de película desde el menú de configuración 9E BANDEJA DE PELICULA Home 4 Cuando haya terminado presione el botón de desconexión y luego desconecte el cable USB ...

Страница 49: ...de diapositiva Nota El tipo de película no puede ser cambiado activamente del Directorio de Bandeja Para cambiar el tipo de película seleccione Tipo de Película desde el menú de configuración como se describe en la sección 9A de este manual del usuario 9F MEMORIA Home 1 Seleccione Memoria en el menú de configuración ...

Страница 50: ...actualmente utilizado y disponible en la tarjeta SD no incluida insertada El recuento de imágenes es aproximado y puede no ser un exacto reflejo del espacio disponible Nota este escáner de película no contiene memoria interna por lo que debe ser insertada una tarjeta SD no incluida para guarda fotos ...

Страница 51: ...ancés Fuente de alimentación Adaptador de CA salida USB DC5V Sensor 14MP CMOS Formato de archivo JPEG Resolución Interpolación 14MP 22MP Tipos de película negativos suportados 135 mm 126 110 Súper 8 8 mm LCD LCD TFT de 3 5 Memoria externa Tarjeta de memoria SD SDHC no incluida Interfaces Puerto USB 2 0 ranura para tarjeta SD salida de TV toma de teléfono de 3 5 mm puerto HDMI Dimensiones 4 7 x 4 7...

Страница 52: ...images Super 8 en images numériques que vous pouvez stocker et conserver Sauvegardez vos précieux souvenirs sur une carte SD non incluse ou sur votre ordinateur Vous pouvez également vous connecter directement à un téléviseur ou à un HDTV pour voir les images Convertit des négatifs et des diapositives 35 mm 126 110 et Super 8 et 8 mm en JPEGS en quelques secondes Résolution de 14 22 méga pixels Au...

Страница 53: ...les que des radiateurs ou des poêles N utilisez pas cet appareil à proximité de sources de chaleur telles que des radiateurs ou des poêles Lorsque vous connectez le scanner de films numériques KODAK SCANZA directement à votre ordinateur veillez à ne pas surcharger les connexions USB Si vous avez trop d appareils connectés à votre ordinateur tels qu une souris sans fil un lecteur multimédia un télé...

Страница 54: ...es trous perforés vers le haut Veillez à toujours manipuler les films avec soin pour éviter des rayures ou des empreintes digitales Regardez vos images sur votre téléviseur Connectez simplement le câble vidéo ou HDMI fourni au scanner et à votre téléviseur Notez que lorsque vous utilisez ce mode l écran du scanner de film devient noir Pour réactiver l écran le câble HDMI devra être débranché 5 CON...

Страница 55: ...d accueil 1 Touches de fonction La fonction est indiquée par le texte qui apparaîtra sur l écran au dessus de la touche correspondante 2 Bouton d alimentation appuyez et maintenez enfoncé pour allumer et éteindre l appareil 3 Bouton de Capture Capture l image ou affiche l écran de capture 4 Écran LCD inclinable Affiche l image à capturer et à numériser ainsi que les fonctions et menus 5 Bouton Acc...

Страница 56: ...Il n y a pas de mémoire intégrée Chargez votre film diapositive dans l adaptateur approprié et insérez le conformément au répertoire du plateau ci dessous Le tableau peut être trouvé à l écran Accueil Paramètres Bac à Film Chaque plateau d adaptateur et insert est clairement marqué et numéroté 6B PRÉPARATION DE MÉDIAS À ANALYSER ...

Страница 57: ...uleur 135 N 2 Aucun Négatif Couleur 126 N 1 Aucun Négatif Couleur 110 N 2 N 5 Diapositive Diapositive Positive 135 N 1 Aucun Diapositive Positive 126 N 1 Aucun Diapositive Positive 110 N 1 N 6 Diapositive Positive Super 8 Aucun N 4 Diapositive Positive 8MM Aucun N 4 Noir et Blanc Noir et Blanc 135 N 2 Aucun Noir et Blanc 126 N 1 Aucun Noir et Blanc 110 N 2 N 5 Diapositives 35mm 110 110 126 127 Sup...

Страница 58: ...ation Il suffit de les pousser dans l appareil jusqu à ce que vous entendiez un clic et vous pouvez insérer des diapositives ou des négatifs les uns après les autres sans avoir besoin de retirer et de recharger les adaptateurs Remarque Lorsque vous chargez un film de 8 mm assurez vous toujours que les arêtes latérales sont orientées du côté droit de l adaptateur vers l endroit où le numéro est écr...

Страница 59: ... appareil est allumé chaque fois que le bouton Home accueil est enfoncé et à chaque fois que SAVE EXIT est sélectionné Remarque Il existe une différence entre SAVE EXIT et SAVE BACK SAVE EXIT vous ramène à l écran d accueil SAVE BACK vous ramène au sous menu que vous utilisez L écran d accueil comporte 3 sous menus Galerie Capture et Paramètres Remarque Chaque fois que vous appuyez sur le bouton d...

Страница 60: ...la couleur de la photo En sélectionnant Info vous serez redirigé vers un écran qui vous indiquera quels adaptateurs sont nécessaires pour le mode en cours Si vous souhaitez changer le type de film vous devrez le faire manuellement dans les réglages Type de film 2 Appuyez sur le bouton de capture dur icône de l appareil photo pour capturer et enregistrer une image L écran affiche Enregistrement Rem...

Страница 61: ...ssez la touche de fonction de droite flèche bas pour faire défiler les paramètres de luminosité et de couleur 7A AJUSTEMENT DE COULEUR ET DE LUMINOSITÉ Home 3 Appuyez sur n importe quel bouton de fonction pour faire apparaître la barre de état en haut de l écran 4 L écran Réglage de la couleur apparaîtra Appuyez sur la touche de fonction à droite Info pour vérifier le type de film l adaptateur et ...

Страница 62: ...a touche de fonction centrale Ajuster pour ajuster chaque couleur puis appuyez sur les touches de fonction sous les symboles de diminution et d augmentation Appuyez à nouveau sur la touche centrale Sauvegarder Retour pour enregistrer votre sélection Utilisez la touche droite flèche vers le bas pour naviguer dans chaque paramètre de couleur Remarque Le réglage de couleur revient au réglage par défa...

Страница 63: ...ppuyez sur les touches de fonction sous le symbole de droite pour naviguer dans les choix de la barre de progression supérieure Faire pivoter Retourner Supprimer et Diaporama Appuyez sur la touche de fonction sous Sélectionner lorsque vous avez fait votre choix 8 MODE GALERIE Home Vous pouvez faire pivoter l image vers la gauche ou la droite Pour sélectionner une image à faire pivoter 1 Entrez en ...

Страница 64: ...erticalement ou horizontalement Home 3 Pour faire pivoter l image appuyez sur la touche d écran centrale sélection Appuyez ensuite sur la touche programmable de droite pour parcourir les options d édition affichées en haut de l écran Rotation Retourner Supprimer et Diaporama ...

Страница 65: ...a corbeille Appuyez sur la clef de fonction Sélectionner Vous serez requis de confirmer si vous souhaitez supprimer cette image 8C EFFACER Home Voir les images stockées en succession En mode diaporama vous pouvez faire une pause ou jouer en appuyant sur la touche de fonction centrale 8D DIAPORAMA Home ...

Страница 66: ...de gauche et de droite pour faire défiler les paramètres Type de film Résolution Luminosité LCD Mémoire Téléchargement USB Langue Plateau de film Appuyez sur la touche de fonction sous l une des icônes apparaissant sur l écran afin d accéder au sous menu de cette fonction Home 9 MODE DE RÉGLAGES Négatif 135 110 126 Diapositives 135 110 126 SUPER8 8MM N B 135 110 126 9A TYPE DE FILM ...

Страница 67: ...sez l un des 3 types de film en appuyant sur la touche de fonction centrale Sélectionner Choisissez Retour pour revenir au menu Paramètres Home Home Home Home 2 Pour chaque type de film sélectionnez la taille du film ...

Страница 68: ...OLUTION Home 3 Une fois que le type et la taille du film ont été sélectionnés un écran de confirmation apparaît avec les directions Appuyez sur Enregistrer Quitter pour enregistrer et revenir à l écran d accueil 4 Répétez le processus pour changer les types ou les tailles du film Dans le menu Paramètres continuez à sélectionner des paramètres s upplémentaires dans les sous menus Appuyez sur la tou...

Страница 69: ... touches et pour ajuster la luminosité de l écran LCD 9C LUMINOSITÉ LCD Home 3 Sélectionnez le réglage souhaité en appuyant sur le bouton Save Exit Sauvegarder Sortir Remarque Ceci vous ramènera à l écran d accueil 4 Pour passer à la diapositive précédente appuyez sur le bouton Retour ...

Страница 70: ... le scanner directement à un ordinateur 2 Sélectionnez Téléchargement USB dans le menu des paramètres 3 Attendez que le scanner se connecte à l ordinateur Cela peut prendre quelques secondes Lors de la connexion votre ordinateur reconnaîtra le scanner en tant que périphérique externe 9D TÉLÉCHARGEMENT USB Home 3 Pour confirmer votre sélection appuyez sur le bouton Save Exit Sauvegarder Sortir Rema...

Страница 71: ...74 FR 1 Sélectionnez Plateau de Film dans le menu des paramètres 9E PLATEAU DE FILM Home 4 Lorsque vous avez terminé appuyez sur le bouton de déconnexion puis débranchez le câble USB ...

Страница 72: ... de diapositive compatible Remarque Le type de film ne peut pas être modifié activement à partir du Répertoire de Plateau Pour changer le type de film sélectionnez Type de film dans le menu Paramètres comme décrit dans la section 9A de ce manuel Home 1 Sélectionnez Mémoire dans le menu des paramètres 9F MÉMOIRE Home ...

Страница 73: ... actuellement utilisé et disponible sur la carte SD non incluse insérée Le nombre d images est approximatif et peut ne pas être refléter exactement l espace disponible Remarque Ce scanner de film n est pas équipé d une mémoire interne et une carte SD non incluse doit être insérée pour sauvegarder des photos ...

Страница 74: ...e mémoire SD SDHC non incluse Interfaces port USB 2 0 fente pour carte SD sortie TV prise téléphonique 3 5 mm port HDMI Dimensions 4 7 x 4 7 x 5 120 x 120 x 127 mm Poids 16 2 oz 460g 10 SPÉCIFICATIONS 2 Parcourez les langues disponibles à l aide des flèches Pour confirmer votre sélection appuyez sur le bouton Save Exit Remarque Ceci vous redirigera vers l écran d accueil Les langues disponibles co...

Страница 75: ... Ihre Dias Negative und sogar Super 8 Bilder in digitale Bilder die Sie speichern und aufbewahren können Speichern Sie Ihre wertvollen Erinnerungen auf einer SD nicht enthalten Karte oder auf Ihrem Computer Sie können auch direkt an einen Fernseher oder HDTV anschließen um die Bilder anzusehen Konvertiert 35mm 126 110 und Super 8 und 8mm Filmnegative und Dias in Sekundenschnelle auf JPEGS 14 22 Me...

Страница 76: ... Wenn Sie den KODAK SCANZA Digital Film Scanner direkt an Ihren Computer anschließen achten Sie darauf die USB Anschlüsse nicht zu überladen Wenn zu viele Geräte an Ihren Computer angeschlossen sind z B eine kabellose Maus ein Medienplayer ein Mobiltelefon oder andere USB betriebene Geräte ist möglicherweise nicht genügend Strom für die ordnungsgemäße Funktion des Produkts verfügbar Bewegen oder t...

Страница 77: ...den Scanner einsetzen Negative und Dias sollten mit der glänzenden Seite nach oben eingefügt werden Super 8 Film sollte mit den perforierten Löchern nach oben eingesetzt werden Behandeln Sie die Filme immer sorgfältig um Kratzer oder Fingerabdrücke zu vermeiden Betrachten Sie Ihre Bilder auf Ihrem Fernseher Schließen Sie einfach das mitgelieferte Video oder HDMI Kabel an den Scanner und Ihren Fern...

Страница 78: ...keys Die Funktion wird durch den Text angezeigt der auf dem Bildschirm über der entsprechenden Taste angezeigt wird 2 Power Taste Halten Sie diese Taste gedrückt um das Gerät ein und auszuschalten 3 Aufnahmetaste Erfasst das Bild oder ruft den Bildschirm für die Aufnahmeansicht auf 4 Neigbarer LCD Bildschirm Zeigt das Bild an das aufgenommen und gescannt werden soll sowie die Funktionen und Menüs ...

Страница 79: ...ieren Es gibt keinen eingebauten Speicher Laden Sie Ihren Film Dia in den entsprechenden Adapter und legen Sie ihn entsprechend dem unten stehenden Fachverzeichnis ein Die Tabelle finden Sie unter Home Einstellungen Filmablage Jedes Adapterfach und jeder Einsatz ist deutlich markiert und nummeriert 6B MEDIEN ZUM SCANNEN VORBEREITEN ...

Страница 80: ...RLICH Negativ Farbnegativ 135 Nr 2 Keiner Farbnegativ 126 Nr 1 Keiner Farbnegativ 110 Nr 2 Nr 5 Dia Diapositiv 135 Nr 1 Keiner Diapositiv 126 Nr 1 Keiner Diapositiv 110 Nr 1 Nr 6 Diapositiv Super 8 Keiner Nr 4 Diapositiv 8MM Keiner Nr 4 Schwarz Weiss Schwarzweiß 135 Nr 2 Keiner Schwarzweiß 126 Nr 1 Keiner Schwarzweiß 110 Nr 2 Nr 5 Dias 35mm 110 110 126 127 Montieren 2 x2 2 x2 1 x1 2 x2 2 x2 Filmgr...

Страница 81: ...tattet die das Scannen einfach und unkompliziert machen Schieben Sie sie einfach in das Gerät bis Sie einen Klick hören und Sie können Dias oder Negative nacheinander einlegen ohne die Adapter entfernen und neu laden zu müssen Hinweis Achten Sie beim Laden von 8mm Film immer darauf dass die seitlichen Rippen zur rechten Seite des Adapters wo die Nummer steht zeigen ...

Страница 82: ...nn das Gerät eingeschaltet ist wenn die Home Taste gedrückt wird und jedes Mal wenn die SAVE EXIT Taste ausgewählt ist Hinweis Es gibt einen Unterschied zwischen SAVE EXIT und SAVE BACK Mit SAVE EXIT gelangen Sie zurück zum Startbildschirm SAVE BACK bringt Sie zurück zu dem von Ihnen verwendeten Untermenü Der Startbildschirm enthält 3 Untermenüs Galerie Aufnahme und Einstellungen Hinweis Jedes Mal...

Страница 83: ...llungsmenü geleitet um die Farbe des Fotos anzupassen Durch Auswahl von Info gelangen Sie zu einem Bildschirm der Ihnen mitteilt welche Adapter für den aktuellen Modus benötigt werden Wenn Sie den Filmtyp ändern möchten müssen Sie dies manuell in den Filmtyp Einstellungen vornehmen 2 Drücken Sie die Hard Capture Taste Kamerasymbol um ein Bild aufzunehmen und zu speichern Auf dem Bildschirm wird Sp...

Страница 84: ...ld zurückzukehren und drücken Sie dann auf Auswählen um zum Aufnahmemodus zurückzukehren Home Um Helligkeit und Farbe anzupassen drücken Sie die mittlere Funktionstaste Auswählen Helligkeit wird in der Statusleiste hervorgehoben Drücken Sie die Mitteltaste Adjust um die Helligkeitsskala aufzurufen Verwenden Sie die Tasten unter den Pfeilen links und rechts um die Helligkeit zu erhöhen oder zu verr...

Страница 85: ...hen Drücken Sie die mittlere Taste erneut Save Back um Ihre Auswahl zu speichern Verwenden Sie die rechte Taste Pfeil nach unten um durch die einzelnen Farbeinstellungen zu navigieren Home Home Home Hinweis Nach dem Neustart des Filmscanners wird die Farbeinstellung auf die Standardeinstellung 0 zurückgesetzt Drücken Sie die Home Taste und wählen Sie dann die Funktionstaste unter Galerie aus um Ih...

Страница 86: ...die Funktionstaste unter Auswählen wenn Sie Ihre Wahl getroffen haben Sie können das Bild nach links oder rechts drehen So wählen Sie ein Bild zum Drehen aus 1 Galeriemodus wie oben beschrieben eingeben 2 Verwenden Sie die Funktionstasten links und rechts um durch die Bilder zu scrollen 3 Um das Bild zu drehen drücken Sie die mittlere Soft Taste Auswahl Drücken Sie dann die rechte Softtaste um dur...

Страница 87: ... vertikal oder horizontal drehen Home Um ein Bild zu löschen navigieren Sie in der oberen Statusleiste um das Papierkorbsymbol anzuzeigen Drücken Sie die mittlere Funktionstaste auf Auswählen Sie werden gefragt ob Sie das Bild löschen möchten 8C LÖSCHEN Home ...

Страница 88: ... indem Sie die Funktionstaste unter dem Symbol Einstellungen drücken Drücken Sie die entsprechende Funktionstaste unter den Pfeiltasten links und rechts um durch die Einstellungen zu scrollen Filmtyp Auflösung LCD Helligkeit Filmfach USB Hochladen Speicher Sprache Drücken Sie die Funktionstaste unter einem der Symbole die auf dem Bildschirm erscheinen um das Untermenü dieser Funktion aufzurufen Ho...

Страница 89: ...ome Home Negativ 135 110 126 Dias 135 110 126 SUPER8 8MM B W 135 110 126 1 Wählen Sie einen der drei Filmtypen durch Drücken der mittleren Funktionstaste Select Wählen Sie Zurück um zum Menü Einstellungen zurückzukehren ...

Страница 90: ... Sie Save Exit um die Einstellungen zu speichern und zum Startbildschirm zurückzukehren 4 Wiederholen Sie den Vorgang um die Filmtypen oder größen zu ändern Wählen Sie im Menü Einstellungen weitere Einstellungen aus den Untermenüs aus Nach jeder Auswahl Drücken Sie die Funktionstaste unter Save Exit Hinweis Wenn Sie Speichern Beenden wählen gelangen Sie zurück zum Startbildschirm ...

Страница 91: ...inen speziellen Algorithmus die Bildqualität auf erstaunliche 22 Megapixel erhöht Wechseln Sie mit den Pfeiltasten zwischen diesen beiden Optionen 3 Wählen Sie die gewünschte Einstellung aus nehmen Sie den Save Exit Taste gedrückt Hinweis Dadurch gelangen Sie zurück zum Startbildschirm 4 Um zum vorherigen Dia zu gelangen drücken Sie die Zurück Taste 9B LÖSUNG Home Home ...

Страница 92: ... Einstellungsmenü 2 Verwenden Sie die und Tasten um die Helligkeit des LCD Bildschirms einzustellen 9C LCD HELLIGKEIT Home Home 3 Um Ihre Auswahl zu bestätigen drücken Sie die Save Exit Taste Hinweis Dies bringt Sie zurück zum Startbildschirm ...

Страница 93: ...gelieferte USB Kabel um den Scanner direkt an einen Computer anzuschließen 2 Wählen Sie USB Upload aus dem Einstellungsmenü 3 Warten Sie bis sich der Scanner mit dem Computer verbunden hat Dies kann einige Sekunden dauern Beim Herstellen einer Verbindung erkennt Ihr Computer den Scanner als externes Gerät 4 Wenn Sie fertig sind drücken Sie die Verbindungstaste und ziehen Sie dann das USB Kabel ab ...

Страница 94: ...rden Sie sehen können welchen Adapter Sie für jeden kompatiblen Film oder Dia Typ benötigen Hinweis Der Filmtyp kann nicht aktiv aus dem Fachverzeichnis geändert werden Um den Filmtyp zu ändern wählen Sie Filmtyp aus dem Menü Einstellungen wie in Abschnitt 9A dieser Bedienungsanleitung beschrieben Home ...

Страница 95: ...nd verfügbaren Speicherplatz auf der eingesetzten SD nicht enthalten Karte sehen Die Anzahl der Bilder ist ungefähr und entspricht möglicherweise nicht exakt dem verfügbaren Platz Hinweis Dieser Filmscanner ist nicht mit einem internen Speicher ausgestattet und es muss eine SD nicht enthalten Karte eingesetzt werden um Fotos zu speichern Home ...

Страница 96: ... Home 2 Blättern Sie mit den Pfeiltasten durch die verfügbaren Sprachen Um Ihre Auswahl zu bestätigen drücken Sie die Save Exit Taste Hinweis Dies leitet Sie zurück zum Startbildschirm Verfügbare Sprachen sind Englisch Italienisch Deutsch Spanisch Französisch Home ...

Страница 97: ...tion Unterstützter Film negative Typen 135mm 126 110 Super 8 8mm LCD 3 5 TFT LCD Externer Speicher SD SDHC Speicherkarte nicht enthalten Schnittstellen USB 2 0 Port SD Kartensteckplatz TV Ausgang 3 5 mm Klinkenbuchse HDMI Anschluss Abmessungen 4 7 x 4 7 x 5 120 x 120 x 127 mm Gewicht 16 2 Unzen 460g 10 SPEZIFIKATIONEN ...

Страница 98: ... anche bobine Super 8 in immagini digitali che possono essere memorizzate e conservate Salva le tue preziose memorie su una scheda SD non inclusa o sul tuo computer Puoi anche collegarti direttamente a una TV o HDTV per vedere le immagini Converte diapositive e negativi di pellicola 35mm 126 110 Super 8 e 8mm in JPEG in pochi secondi Risoluzione di 14 22 megapixel Non è necessario un computer o so...

Страница 99: ...attenzione a non sovraccaricare i collegamenti USB Se troppi dispositivi sono collegati al computer come un mouse wireless lettore multimediale telefono cellulare o altri dispositivi basati su USB potrebbe non esserci potenza sufficiente per consentire al prodotto di funzionare in modo corretto Non spostare o staccare il dispositivo dal computer mentre il dispositivo sta leggendo scrivendo dati Qu...

Страница 100: ... detergenti o materiali di pulizia abrasivi per pulire questo dispositivo Ricordare sempre di salvare l immagine scansionata prima di inserire una nuova diapositiva o negativo nello scanner Per immagini chiare pulire la pellicola con un panno morbido o aria compressa prima di inserirla nello scanner Negativi e diapositive devono essere inserite con la parte lucida verso l alto Una pellicola Super ...

Страница 101: ...sti funzione tasti soft key la funzione è indicata dal testo che apparirà sullo schermo sopra al tasto corrispondente 2 Pulsante di accensione Premere e tenere premuto per accendere e spegnere il dispositivo 3 Pulsante per acquisizione Acquisisce l immagine o visualizza la schermata di visualizzazione dell acquisizione 4 Schermo LCD rivolto verso l alto Visualizza l immagine da acquisire e scanner...

Страница 102: ...emoria integrata Caricare la pellicola diapositiva nell adattatore appropriato e inserire secondo l elenco di vassoi sotto indicato si può trovare la tabella sullo schermo su Home Impostazioni Vassoio della diapositiva Ogni inserto e vassoio dell adattatore è chiaramente contrassegnato e numerato 6B PREPARAZIONE DEL MEDIA PER LA SCANSIONE ...

Страница 103: ...suno Negativo a colori 126 N 1 Nessuno Negativo a colori 110 N 2 N 5 Diapositiva Diapositiva Positivo 135 N 1 Nessuno Diapositiva Positivo 126 N 1 Nessuno Diapositiva Positivo 110 N 1 N 6 Diapositiva Positivo Super 8 Nessuno N 4 Diapositiva Positivo 8MM Nessuno N 4 Bianco e nero Bianco e nero 135 N 2 Nessuno Bianco e nero 126 N 1 Nessuno BBianco e nero 110 N 2 N 5 Diapositive 35mm 110 110 126 127 ...

Страница 104: ...icamento veloce per facilitare la scansione Semplicemente spingerli nel dispositivo fino a sentire un clic si possono inserire dispositive o negativi uno dopo l altro senza bisogno di rimuovere e ricaricare gli adattatori Nota Quando si carica una pellicola da 8mm assicurarsi sempre che i fori laterali siano rivolti al lato destro dell adattatore verso il punto in cui è scritto il numero ...

Страница 105: ...alizzata quando l unità è accesa ogni volta che viene premuto il pulsante Home e quando è selezionato SALVA ESCI Nota C è una differenza fra SALVA ESCI e SALVA INDIETRO SALVA ESCI torna alla schermata Home SALVA INDIETRO torna al menu secondario che si sta usando La schermata Home presenta 3 menu secondari Galleria Acquisizione e Impostazioni Nota Ogni volta che viene premuto il pulsante Acquisizi...

Страница 106: ...nando info si passa a una schermata che dice quali adattatori sono necessari per la modalità attuale Se si desidera cambiare tipo di pellicola è necessario farlo a mano per mezzo delle impostazioni di Tipo di Pellicola 2 Premere il pulsante Acquisizione icona della fotocamera per acquisire a salvare un immagine Sullo schermo sarà visualizzato Salva Nota Sarà visualizzato un messaggio di ERRORE se ...

Страница 107: ...tornare all immagine e poi premere Seleziona per tornare alla modalità di acquisizione Home Per regolare il colore e la luminosità premere il tasto funzione softkey centrale Seleziona Luminosità sarà evidenziato sulla barra di stato Premere il tasto centrale Regolazione per visualizzare la scala di luminosità Usare i pulsanti sotto le frecce sinistra e destra per aumentare o diminuire laluminosità...

Страница 108: ...sare a ogni impostazione di colore Ci sono 4 impostazioni di regolazione di colore R Rosso G Verde B Blu RIPRISTINA Impostazione di colore e luminosità predefinita Per ogni impostazione R G B sarà visualizzata una scala nella parte inferiore dello schermo Premere il tasto funzione centrale Regola per regolare ogni colore poi premere i tasti funzione sotto i simboli diminuisci e incrementa Premere ...

Страница 109: ...lizzata sullo schermo Premere i tasti funzione sotto il simbolo destro per passare fra le scelte nella barra di stato superiore Ruota Gira Elimina e Presentazione Premere il tasto funzione sotto Seleziona dopo avere eseguito la selezione 8 MODALITÀ DI GALLERIA Home È possibile ruotare l immagine verso sinistra o destra Per selezionare un immagine da ruotare 1 Entrare in modalità Galleria come sopr...

Страница 110: ...agine verticalmente o orizzontalmente Home 3 Per ruotare l immagine premere il tasto softkey centrale selezionare Poi premere il tasto softkey destro per passare in modo ciclico fra le opzioni di modifica elencate nella parte superiore dello schermo Ruota Gira Elimina e Presentazione ...

Страница 111: ... il tasto funzione centrale per Selezionare Sarà richiesto di confermare se si desidera eliminare quell immagine 8C ELIMINAZIONE Home Visualizzazione di immagini memorizzate in successione Nella modalità di presentazione è possibile interrompere o riprodurre premendo il tasto funzione centrale 8D PRESENTAZIONE Home ...

Страница 112: ... scorrere attraverso le impostazioni Tipo di pellicola Risoluzione Luminosità di LCD Memoria Caricamento USB Lingua Vassoio della pellicola Premere il tasto funzione softkey sotto una delle icona che sono visualizzate sullo schermo per entrare nel menu secondario di quella funzione Home 9 MODALITÀ DI IMPOSTAZIONI Negativo 135 110 126 Diapositive 135 110 126 SUPER8 8MM Bianco e Nero 135 110 126 9A ...

Страница 113: ...e uno dei 3 tipi di pellicola premendo il tasto funzione centrale Seleziona Scegliere Indietro per tornare al menu Impostazioni Home Home Home Home 2 Per ogni tipo di pellicola selezionare la dimensione della pellicola ...

Страница 114: ...ri dai menu secondari Premere il tasto funzione sotto Salva Esci dopo ogni selezione Nota Premendo Salva Esci si sarà reindirizzati alla schermata Home Home 1 Selezionare Risoluzione dal menu delle impostazioni 2 È possibile scegliere fra la scansione standard a 14 megapixel o consentire l interpolazione integrata del software che per mezzo di un algoritmo specializzato migliora la qualità dell im...

Страница 115: ... Esci Nota Questo riporterà alla schermata Home 4 Per andare alla diapositiva precedente premere il tasto Indietro 1 Selezionare Luminosità dell LCD dal menu delle impostazioni 2 Usare i pulsanti funzione e per regolare la luminosità dello schermo LCD 9C LUMINOSITÀ DELL LCD Home ...

Страница 116: ...o collegati a un computer non è possibile usare lo scanner di pellicola 1 Usare il cavo USB incluso per collegare lo scanner direttamente a un computer 2 Selezionare Caricamento di USB dal menu delle impostazioni 3 Attendere che lo scanner si colleghi al computer Questo richiederà alcuni secondi Quando si collega il computer riconoscerà lo scanner come dispositivo esterno 9D CARICAMENTO DI USB Hom...

Страница 117: ...120 IT 1 Selezionare Vassoio della Pellicola dal menu Impostazioni 9E VASSOIO DELLA PELLICOLA Home 4 Quando finito premere il pulsante Disconnetti e poi staccare il cavo USB ...

Страница 118: ... o tipo di dispositiva Nota Il tipo di pellicola non può essere modificato in modo attivo dall Elenco di Vassoi Per cambiare il tipo di pellicola selezionare Tipo di Pellicola dal menu Impostazioni come descritto nella sezione 9A di questo manuale per l utente 1 Selezionare Memoria dal menu Impostazioni 9F MEMORIA Home ...

Страница 119: ... inserita Il conteggio delle immagini è approssimativo e non riflette in modo esatto lo spazio disponibile Nota Questo scanner di pellicola non è attrezzato con una memoria interna e una scheda SD non inclusa deve essere inserita per salvare foto Home 1 Selezionare Lingua dal menu Impostazioni 9G LINGUA Home ...

Страница 120: ...se Alimentazione adattatore CA energia prodotta DC5V USB Sensore sensore 14MP CMOS Formato del file JPEG Risoluzione interpolazione di 14MP 22MP Tipi di pellicola negativo supportati 135mm 126 110 Super 8 8mm LCD 3 5 TFT LCD Memoria esterna scheda di memoria SD SDHC non inclusa Interfacce porta USB 2 0 slot per la scheda SD TV out presa del telefono da 3 5mm porta HDMI Dimensioni 120 x 120 x 127mm...

Страница 121: ... anderen Ländern Mac è un marchio registrato di Apple Inc registrato negli Stati Uniti e altri Paesi Mac é marca comercial de Apple Inc registrada nos EEUU e em outros países Distributed by C A Marketing Inc 114 Tived Lane East Edison NJ 08837 USA C A Marketing UK LTD 167 Hermitage Road Crusader Industrial Estate London N4 1LZ UK 2017 C A Marketing LTD All Rights Reserved Made in China Distribué p...

Отзывы: