Kodak RVG 6500 Скачать руководство пользователя страница 52

48 Chapter 7  RVG Mobile Application

Locking the RVG Sensor to the Apple Device

To lock the RVG sensor on your Apple device, you need to have the RVG mobile application on your 

iPhone®/iPod® touch device. 

To ensure best use, follow the instructions in the following order.

Accessing the Sensor List Window
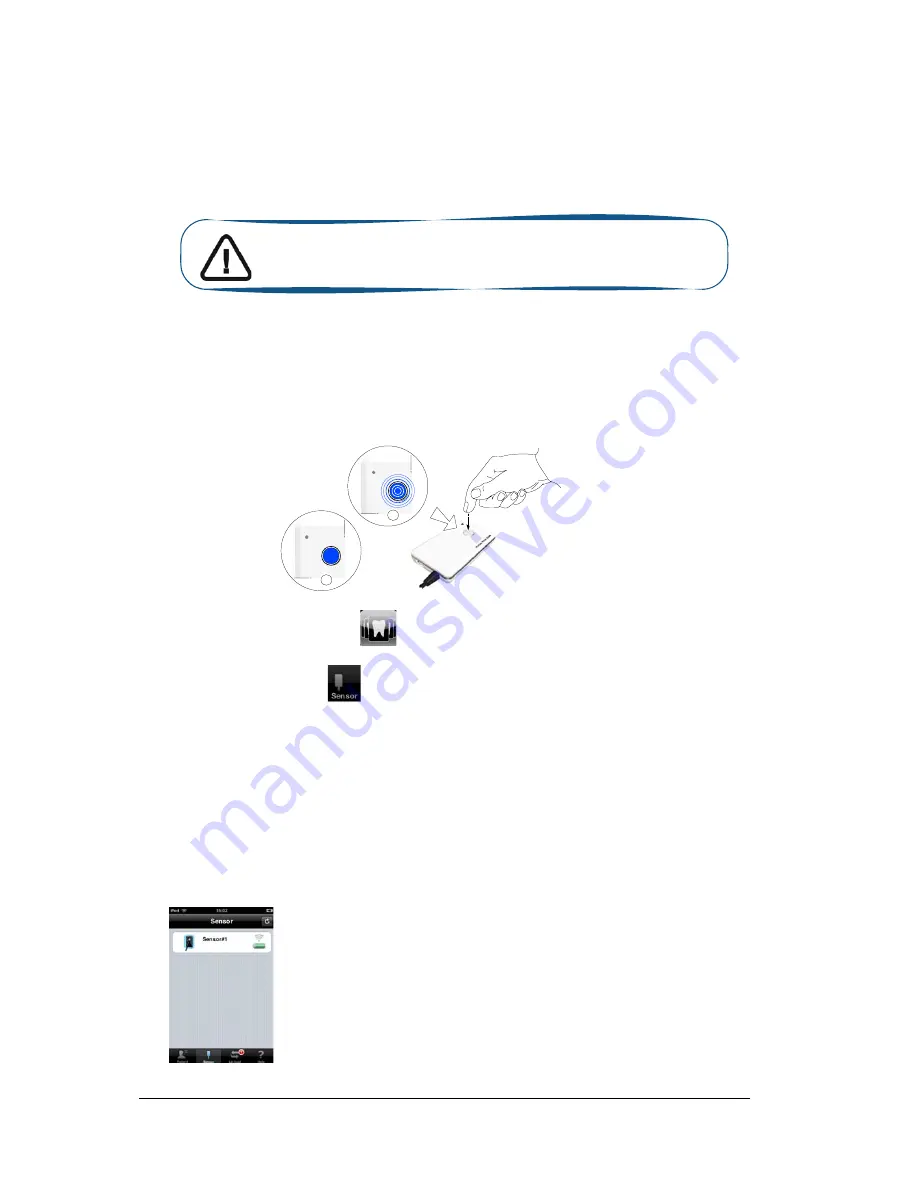
You must access the 

Sensor

 list window before locking the RVG sensor to your Apple device. To 

access the sensor list window, follow these steps

1

With the sensor in hand, press the remote control button of the selected RVG control box to turn 
ON the device. Wait for the blinking blue light (A) to become solid blue (B).

2

Turn ON your Apple device. Tap 

 to access the 

Patient

 window.

3

In the 

Patient

 window, tap 

 to access the 

Sensor

 list window. The 

Sensor

 list window is 

displayed. Find the desired sensor in the sensor list.

Locking a Single RVG Sensor to the 

Apple 

Device

If you have a single RVG sensor, you need to lock only once to the device where the acquired image 

must appear.

To lock the RVG sensor to your device, follow these steps:

1

In the 

Sensor

 list window, tap on the sensor. 

Important:  Make sure that you have connected your device to the 
WiFi access point before starting.

A

B

Содержание RVG 6500

Страница 1: ...KODAK RVG 6500 System and KODAK RVG 6500 IPS System User Installation Guide...

Страница 2: ...ay be reproduced without the express permission of Carestream Health Inc U S Federal law restricts this device to sale by or on the order of a dentist or physician This document is originally written...

Страница 3: ...sition Interface 11 The IPS Aiming Ring Interface Overview 13 IPS Aiming Ring Interface and RVG Sensor Display 13 IPS Aiming Ring Interface and RVG Sensor Centering 14 The RVG Mobile Application Overv...

Страница 4: ...48 Locking a Single RVG Sensor to the Apple Device 48 Locking Several Shared RVG Sensors to the Apple Device 49 Finding or Creating a Patient File 51 Acquiring an Image with the RVG Mobile Applicatio...

Страница 5: ...n or indicate potential risk to personnel or equipment WARNING Warns you to avoid injury to yourself or others by following the safety instructions precisely CAUTION Alerts you to a condition that mig...

Страница 6: ...2 Chapter 1 Conventions in This Guide...

Страница 7: ...s well as the KODAK RVG 6500 IPS System The KODAK RVG 6500 IPS System information applies only to information relevant to the IPS system Packaging of KODAK RVG 6500 System The KODAK RVG 6500 System pa...

Страница 8: ...4 Chapter 2 KODAK RVG 6500 Systems Packaging...

Страница 9: ...DAK RVG 6500 IPS System is composed of all the KODAK RVG 6500 system components and the IPS aiming ring The IPS aiming ring enables you prior to acquisition to dynamically and visually center and alig...

Страница 10: ...Charged without charger connection 2 Sensor remote control button and the ON OFF button OFF mode Press 5 seconds to turn OFF Connecting to WiFi AP blinking Press 2 seconds to turn ON Transmitting acqu...

Страница 11: ...ling you to use the KODAK RVG 6500 within your practice area See the manufacturer guide for any detailed information on the WiFi access point Figure 4 WiFi AP Back Panel Overview Figure 5 WiFi Access...

Страница 12: ...8 Chapter 3 KODAK RVG 6500 Systems Overview...

Страница 13: ...er System Requirements Item Viewing and Acquisition Comments CPU 2 GHz Intel Duo Core RAM 2 GB RAM has a major impact on system performance Hard disk drive 1 2 GB for software installation 80 GB free...

Страница 14: ...dental imaging software has the following features Patient record management using Patient Window features Extraoral and intraoral image management using Imaging Window features Operating system Wind...

Страница 15: ...Imaging Window 2 Preview screen Indicates the 90 second activation time for acquisition Displays the acquired x ray image instantly after acquisition 3 Available sensor s Displays maximum 3 sensors w...

Страница 16: ...ed as shown in the Figure 5 The sensor name and battery status Battery status The WiFi status Wifi transmission is available Wifi transmission is available but not good WiFi transmission is not availa...

Страница 17: ...g the centering indicator IPS Aiming Ring Interface and RVG Sensor Display The IPS aiming ring interface displays the RVG sensor according to where you are positioned that is in front or behind the ai...

Страница 18: ...d Image distortion Sensor Display Sensor is centered Centering indicators are red Result Sensor active surface is fully exposed to X ray Image will have no cone cut Parallel technique not achieved Min...

Страница 19: ...KODAK RVG 6500 System_User Installation Guide SM728 _Ed01 15 The RVG Mobile Application Overview For the RVG Mobile Application overview see the relevant Chapter...

Страница 20: ...16 Chapter 4 Imaging Software Overview...

Страница 21: ...be guided by the setup software see Installing the Setup Installation Software WiFi Access Point Wired Configuration Setup You can choose to have a wired WiFi access point configuration In this confi...

Страница 22: ...nt in a visible and high location not on the floor Place the WiFi access point in a central location for a multiple access point transmission Avoid any barriers along the line of transmission for exam...

Страница 23: ...the DVD ROM drive of the computer Wait for the installation program to start If the program does not start automatically click Start Run and enter D setup exe if D is the letter for the DVD ROM drive...

Страница 24: ...alog box is displayed Click Next if you accept the default destination folder c program files Kodak Kodak Dental Imaging Software or browse to choose another destination folder 7 The KODAK Dental Imag...

Страница 25: ...ion Guide SM728 _Ed01 21 Click on the drop down list of No Intraoral Radiography Installation Select RVG 5x00 6x00 Click Next to begin the installation The InstallShield Wizard is displayed Let the in...

Страница 26: ...dialog box is displayed while the installation process continues Click Continue Anyway until the dialog box disappears 9 The Installation Complete dialog box is displayed when the installation is fini...

Страница 27: ...em incompatibility dialog box is displayed Click Download your application will close automatically Follow the on screen instructions to install the required Windows Wireless component Reboot your PC...

Страница 28: ...and follow step 10 13 Before the setting up of the KODAK RVG 6500 System procedures have with you the 14 The Setting Up the WiFi AP window is automatically displayed Follow the on screen instructions...

Страница 29: ...tient record From the toolbar click and enter the required patient information Click to access the Imaging Window 3 The Enter the licence number dialog box is displayed Enter the licence number and cl...

Страница 30: ...RVG sensor and control box holders follow these steps 1 Attach the RVG control box holder with the double face adhesive or the Velco strap supplied on the side of the X ray generator arm You can also...

Страница 31: ...asked the practitioner his preference for the position of the aiming ring on the X ray tube head with the ON OFF button on the left or right side of the X ray tube head To mount the IPS aiming ring on...

Страница 32: ...mm HY413 mounted on the ring 6 Measure from the opening of the x ray tube head 30mm Mark the 30mm with a pencil on both sides of the x ray tube head 7 On the back cover position the appropriate holdi...

Страница 33: ...h the board making sure that the ON OFF button is on the appropriate place 12 Position correctly the attachment brackets A 13 Press quickly the ON OFF button to turn ON the IPS device and check that t...

Страница 34: ...30 Chapter 5 Setting Up the KODAK RVG 6500 Systems...

Страница 35: ...Press the remote control button of the RVG control box to turn ON the device The blinking blue light indicates the sensor attempt to connect to the WiFi access point Wait for the blinking blue light...

Страница 36: ...rs you need to lock the selected RVG sensor to the computer where the acquired image must appear To lock the selected RVG sensor to your computer follow these steps 6 Press the remote control button o...

Страница 37: ...the sensor list If do the following Click to lock the sensor to your computer becomes If do the following Click to unlock from the computer it is locked to and press quickly on the remote control butt...

Страница 38: ...To prepare the selected RVG sensor follow these steps 1 Select an appropriate positioner for the region of interest and the sensor size 2 Cover with a disposable hygienic sleeves specifically designe...

Страница 39: ...remote control button several times to pre orient the sensor orientation The acquired image is displayed with the last selected orientation on the Imaging Window Optional Click To select the tooth or...

Страница 40: ...at the front LED is ON If you are positioned in the back of the aiming ring a quick press on the ON OFF button will turn on the LED on the back 5 Align the x ray tube head with the patient s tooth and...

Страница 41: ...screen of the RVG Acquisition interface The light on the remote control button blinks blue indicating the image transmission When the acquisition ends the RVG Acquisition interface disappears and the...

Страница 42: ...38 Chapter 6 Acquiring an Image...

Страница 43: ...acquired X ray images on your iPhone iPod touch Transfer acquired X ray images from your computer to your iPhone iPod touch Transfer acquired X ray images from your iPhone iPod touch to your computer...

Страница 44: ...t management software 4 Key board Edits the patient information 5 Upper Lower case button Edits lower or upper case letters 6 Number button Changes the keyboard from alphabetic to numeric keyboard 7 R...

Страница 45: ...red image 3 Back button Returns to the previous image 4 Image contrast button Enhances the different zone of interest 0 Perio Optimizes the display of periodontal tissues Endo Optimizes the contrast v...

Страница 46: ...device is connected to the Internet follow these steps 1 On the main window tap A window is displayed with different applications 2 Tap In the search field enter RVG mobile and tap The RVG Mobile Icon...

Страница 47: ...tions When the iTunes is installed on your computer appears on your desktop 4 Double click Enter the required on screen information The iTunes main window is displayed 5 Select Store iTunes Store The...

Страница 48: ...on to your device 10 Click when the upload process ends You must now connect your device to the WiFi access point Connecting The Device to the WiFi Access Point To connect your device to the WiFi acce...

Страница 49: ..._Network 6 Tap to return to the Settings window You must now configure the preference settings of the RVG Mobile Application Configuring the Preference Settings To configure the preference settings fo...

Страница 50: ...s displayed 6 In the Processing window Endo optimizes the contrast values over the entire range is selected by default We recommend that you keep this selection You can select any type of image contra...

Страница 51: ...in the field that you have selected 10 Tap to return to the RVG Mobile window The Settings window is displayed with the new selections These selection are automatically saved 11 If the settings are c...

Страница 52: ...trol button of the selected RVG control box to turn ON the device Wait for the blinking blue light A to become solid blue B 2 Turn ON your Apple device Tap to access the Patient window 3 In the Patien...

Страница 53: ...shared RVG sensors you need to lock the selected RVG sensor to the device where the acquired image must appear To lock the selected RVG sensor to your device follow these steps 1 In the Sensor list wi...

Страница 54: ...p Tap to validate If Sensor is not available locked on another device You must unlock and then lock the sensor on your device In the Sensor list window tap the selected sensor Then tap Tap to validate...

Страница 55: ...ess the Patient window 2 In the Patient window in the search field enter the patient s name and tap to open the patient s file or search by alphabetical order If you need to create or edit a patient s...

Страница 56: ...g the RVG Sensor To prepare the selected RVG sensor follow these steps 1 Select an appropriate positioner for the region of interest and the sensor size 2 Cover with a disposable hygienic sleeves spec...

Страница 57: ...o the patient s chair Optional If you are using the IPS aiming ring system press the ON button If you are in front of the aiming ring make sure that the front LED is ON If you are positioned in the ba...

Страница 58: ...unch the x ray follow these steps 1 Ask the patient to remain still 2 Position yourself either 2 meters behind the x ray generator or outside the door 3 Keep visual contact with the patient during the...

Страница 59: ...green At this stage while the count down continues you can continue acquiring other images If the count down ends and you wish to acquire other images then redo step 5 7 Check the image quality If not...

Страница 60: ...enter any comments in the yellow comment s field 11 Tap to access the dental arch window Tap and touch the selected tooth or teeth number 12 Tap to return to the previous window 13 Tap to view all the...

Страница 61: ...play the patient information 15 Tap to access the Patient window 16 When you want to transfer all the acquired images of the patients to your computer in the Patient window touch the transfer window i...

Страница 62: ...58 Chapter 7 RVG Mobile Application...

Страница 63: ...ction When you turn ON your RVG sensor the battery LED is red but the control box is solid blue The battery needs recharging Recharge the battery You can continue acquiring images but the quality will...

Страница 64: ...n becomes solid blue but when you press the control box button to acquire an image it does not turn green The RVG sensor is not locked on any device Lock the RVG sensor on the computer or the iPhone i...

Страница 65: ...the problem persists contact your representative 1 Turn Off then ON the RVG sensor 2 Click to access the RVG Acquisition interface If the problem persists contact your representative I 4 Memory alloc...

Страница 66: ...ur representative I 14 System error Close and restart the acquisition software If the problem persists contact your representative 1 Exit the KDIS 2 Click to access the RVG Acquisition interface If th...

Страница 67: ...isinfecting the RVG Sensor You must first clean the RVG sensor before disinfecting it To do so follow these steps 1 Remove the protective hygienic sleeves 2 Remove debris or organic matter from the se...

Страница 68: ...er and soap 2 Put the metal and plastic parts in separate sterilization pouch and autoclave up to 132 C 273 F before the next patient Bite blocks RINN Arm ring 1 Disassemble the metal arm and the plas...

Страница 69: ...nected to the mains outlet 1 Press down with fingers and slide the trap door A protecting the battery on the back of the control box 2 Remove carefully the connector B to remove the used battery 3 Ins...

Страница 70: ...ing green light of the battery status A on the control box indicates the charging process The first charging takes about 4hours When the green light becomes solid green B the charging is complete With...

Страница 71: ...ry with the computer Important You can use the RVG sensor to acquire an image while charging ONLY with the medical charger WARNING NEVER use the RVG sensor to acquire an image while charging with the...

Страница 72: ...eplace correctly the new 4 batteries respecting the polarities 5 Replace the front cover 6 Replace the attachment brackets A 7 Turn ON the IPS aiming ring to check that the batteries are replaced corr...

Отзывы: