background image


25

3

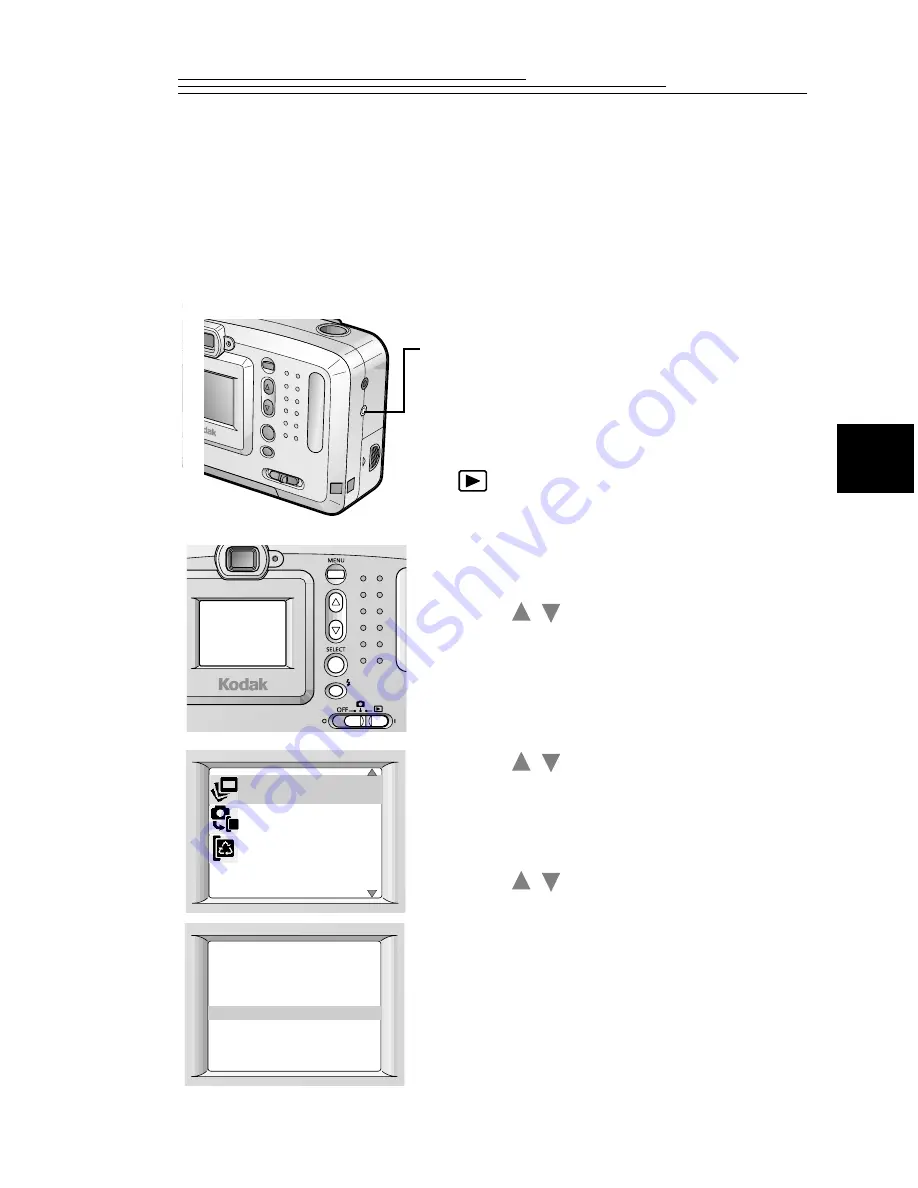
Running a Slide Show on Your Television

You can show your pictures to an audience by connecting your camera to a 
television with a KODAK Video Cable (Cat# 181-7774) and using the Slide 
Show feature. With Slide Show activated, the camera consecutively displays 
stored pictures at the selected intervals. To conserve batteries, use a KODAK-
specified AC adapter.

1

Turn off your television and camera.

2

Insert a video cable into the VIDEO OUT 
port on the side of your camera, and connect 
the other end of the cable to the video-in port 
on the television.

3

Set the Power/Mode switch to the

 position.

4

Turn the television on, and select the correct 
channel for video input.

The picture appears on the television.

5

Press a 

button until the picture from 

which you want to begin the slide show 
appears on the television.

6

Press the MENU button to display the Menu 
screen on the television.

7

Press a 

button until SLIDE SHOW is 

highlighted, and then press the SELECT 
button.

The Slide Show screen appears. 

8

Press a 

button until the time interval 

option you want is highlighted, and then press 
the SELECT button.

The pictures change according to the selected 
time interval. After showing all the stored 
pictures once, the slide show automatically 
stops.

To stop a Slide Show, press the SELECT 
button.

 /

A c c e s s e d

i n t e r n a l  memo r y .
T o   a c c e s s   c a r d ,

i n s e r t   memo r y   c a r d

CO P Y

F ORMA T

S L I D E   SHOW

S L I D E   S HOW

E X I T
3   S e c
5   S e c

1 0   S e c
2 0   S e c
3 0   S e c

 /

 /

Содержание DC3200 - 1MP Digital Camera

Страница 1: ...KODAK DC3200 Digital Camera User s Guide Visit Kodak on the World Wide Web at www kodak com ...

Страница 2: ... Eastman Kodak Company 2000 Kodak and Photolife are trademarks of Eastman Kodak Company ...

Страница 3: ...ject 9 Setting the Flash 10 Adjusting the Picture Quality 11 Adjusting the White Balance 12 Setting a Quickview for Each Picture 13 3 Reviewing Your Pictures 15 Viewing Your Pictures 16 Copying Pictures from the Camera to a Picture Card 17 Protecting Pictures from Deletion 18 Protecting a Particular Picture 18 Protecting All Stored Pictures 19 Deleting One or All of Your Pictures 20 Deleting a Par...

Страница 4: ...9 Connecting the Camera to Your Computer 30 Using the DC3200 Picture Transfer Software 32 Navigating to Your Pictures 34 6 Troubleshooting 35 7 Where to Get Help 41 Software Help 41 Kodak Online Services 41 Kodak Fax Support 41 Telephone Customer Support 42 8 Warranty and Regulatory Information 43 Limited Warranty 43 Regulatory Information 44 FCC Compliance and Advisory 44 Canadian DOC Statement 4...

Страница 5: ...evable detail color and sharpness Transfer your pictures to a computer for editing enhancement and placement into your document E mail your pictures to friends family and business associates anywhere in the world Print high quality pictures at home using KODAK Inkjet Photo Paper or take your optional KODAK Picture Card to a KODAK Picture Maker System and create photo quality enlargements at a touc...

Страница 6: ...d on the card Attaching the Wrist Strap Loading the Batteries Your camera comes with four AA batteries so you can start taking pictures immediately For guidelines for battery usage see page 50 1 Thread the small loop end of the wrist strap through the wrist strap eyelet located on the side of the camera 2 Thread the large loop end of the strap through the small loop and pull the large loop end to ...

Страница 7: ...tch to the position The green Ready light next to the viewfinder and the LCD turn on A message appears on the LCD for several seconds to indicate which medium internal memory or a Picture Card you are accessing To turn the camera off set the Power Mode switch to OFF If you are using the batteries for power and the camera is idle for approximately five minutes the Auto Power Off function automatica...

Страница 8: ...witch to the or position 2 Check the battery status symbol that appears on the LCD In the Capture mode you can turn on the LCD by pressing the SELECT button You can also use the Preview feature to keep the LCD on constantly while the camera power is turned on See Previewing a Picture Before it is Taken on page 8 Full indicates the batteries are charged and ready to use Low indicates the batteries ...

Страница 9: ...y certified Picture Cards that carry the CompactFlash logo 1 Slide and open the card slot cover located on the bottom of the camera in the direction of the arrow 2 Hold the Picture Card so the connection end with tiny holes is pointed at the camera and the small lip on the other end is facing the front of the camera The Picture Card can only be inserted one way into the camera Forcing the card may...

Страница 10: ......

Страница 11: ... the DC3200 Digital Camera you can Zoom in digitally two times closer on your subject Vary the flash settings to give you control over the type of flash needed for specific conditions Select a picture quality setting to meet your picture taking needs Adjust the white balance to obtain the natural color of a subject under different lighting conditions Preview a picture before it is taken Review a p...

Страница 12: ...ss the MENU button to display the Menu screen 3 Press a button until PREVIEW is highlighted and then press the SELECT button The Preview screen appears The current setting is checked 4 Press a button until ON is highlighted and then press the SELECT button The camera accepts the change and returns to the Menu screen 5 Press the MENU button to turn off the Menu screen The LCD displays a live image ...

Страница 13: ...der or turn Preview on see page 8 and use the LCD to frame your subject 3 Press the Shutter button half way down to lock in the exposure on the subject The green Ready light turns on when the camera is ready to take a picture 4 Press the Shutter button completely down to take a picture The green Ready light blinks as the picture is stored in the memory or on a Picture Card If the orange Ready ligh...

Страница 14: ... 5 m away from the subject 1 Set the Power Mode switch to the position 2 Press the Flash button to scroll though the flash options The flash option changes each time you press the Flash button Auto flash fires automatically when needed Ideal for everyday picture taking This is the default flash setting Off flash does not fire Ideal for taking pictures where flash is prohibited as in museums Fill f...

Страница 15: ...e Menu screen 3 Press a button until QUALITY is highlighted and then press the SELECT button The Quality screen appears The current setting is checked 4 Press a button until the desired Quality option is highlighted and then press the SELECT button BEST captures a 1 152 x 864 pixel picture in low compression BETTER captures a 1 152 x 864 pixel picture in high compression GOOD captures a 576 x 432 ...

Страница 16: ...ite balance automatically for the current lighting conditions Ideal for everyday pictures This is the default white balance setting DAYLIGHT ideal for outdoor pictures or indoor pictures under natural lighting conditions FLUORESCENT balances the green color of indoor pictures under fluorescent lighting TUNGSTEN balances the red orange color of indoor pictures under tungsten lighting The camera acc...

Страница 17: ...ighlighted and then press the SELECT button The Quickview screen appears The current setting is checked 4 Press a button until ON is highlighted and then press the SELECT button The camera accepts the change and returns to the Menu screen 5 Press the MENU button to turn the Menu screen off To turn Quickview off highlight OFF on the Quickview screen and then press the SELECT button A c c e s s e d ...

Страница 18: ......

Страница 19: ...rnal memory to an optional KODAK Picture Card Protect your important pictures from accidental erasure Delete unwanted pictures to free up space in the internal memory or on a Picture Card Select specific pictures and quantities to be printed Display and run a slide show from the camera to your television using a KODAK specified video cable Format other Picture Cards for use in your camera ...

Страница 20: ...sition The LCD turns on and the access message appears Then the last picture taken is displayed in full LCD size with the status icons and the Picture Number indicator 2 Use the buttons to scroll through the pictures 3 To view the pictures in a thumbnail format press the SELECT button 4 Use the buttons to scroll through the thumbnails The selected picture is indicated by a frame The selection fram...

Страница 21: ... Press a button until YES is highlighted 6 Press the SELECT button to copy the pictures Copying completed is displayed and then the Menu screen reappears If copying fails because not all the pictures fit on the Picture Card a message appears Insert a Picture Card with more available storage then repeat Steps 2 6 7 Press the MENU button to turn the Menu screen off A c c e s s e d memo r y c a r d T...

Страница 22: ...n appears 5 Press a button until CURRENT is highlighted and then press the SELECT button The Protect screen appears 6 Press a button until YES is highlighted and then press the SELECT button The Protect icon appears To protect another picture highlight NEXT or PREVIOUS press the SELECT button until the desired picture appears and then repeat the same procedure 7 Highlight DONE and then press the S...

Страница 23: ...he main Protect screen appears 4 Press a button until ALL is highlighted and then press the SELECT button The Protect All screen appears 5 Press a button until YES is highlighted and then press the SELECT button The protection setting is assigned to all the pictures 6 Press the MENU button to turn the Protect All screen off To cancel the protection setting for all the pictures highlight NO on the ...

Страница 24: ...s a button until DELETE is highlighted and then press the SELECT button The main Delete screen appears 5 Press a button until CURRENT is highlighted and then press the SELECT button The Delete screen appears 6 Press a button until YES is highlighted and then press the SELECT button The picture is deleted To delete another picture highlight NEXT or PREVIOUS press the SELECT button until the desired...

Страница 25: ...res 5 Press a button until YES is highlighted and then press the SELECT button to delete all the pictures No picture in internal memory on memory card appears when the deleting ends If pictures that are delete protected exist in the memory the camera deletes all other pictures and returns to the main Delete screen Press the MENU button to turn the main Delete screen off A c c e s s e d i n t e r n...

Страница 26: ...screen appears 5 Press a button until CURRENT is highlighted and then press the SELECT button The Print Order screen appears 6 Press a button until COPIES is highlighted and then press the SELECT button until the desired number of prints appears To assign another picture to this print order highlight NEXT or PREVIOUS press the SELECT button until the desired picture appears and then repeat the pro...

Страница 27: ...ed and then press the SELECT button The Print All screen appears 6 Press a button until COPIES is highlighted and then press the SELECT button until the desired number of prints appears 7 Highlight DONE and then press the SELECT button to turn off the Print All screen The print order is accepted 8 Press the MENU button to turn off the main Print Order screen To cancel the print order for all the p...

Страница 28: ... the SELECT button The main Print Order screen appears 5 Press a button until INDEX is highlighted and then press the SELECT button The Index Print screen appears 6 Press a button until YES is highlighted and then press the SELECT button The index print order is accepted 7 Press the MENU button to turn the main Print Order screen off To cancel the index print order highlight CANCEL on the Index Pr...

Страница 29: ...he correct channel for video input The picture appears on the television 5 Press a button until the picture from which you want to begin the slide show appears on the television 6 Press the MENU button to display the Menu screen on the television 7 Press a button until SLIDE SHOW is highlighted and then press the SELECT button The Slide Show screen appears 8 Press a button until the time interval ...

Страница 30: ... all pictures in the internal memory are erased freeing up space for new pictures 1 Insert a Picture Card to be formatted or remove the card from the camera to format the internal memory 2 Set the Power Mode switch to the or position 3 Press the MENU button to display the Menu screen 4 Press a button until FORMAT is highlighted and then press the SELECT button The Format screen appears 5 Press a b...

Страница 31: ...pictures from the camera memory or Picture Card to your computer System Requirements Windows 95 Windows 98 Windows 98 Second Edition Windows NT Workstation 4 0 SP3 SP6 or Windows 2000 Professional operating system PC AT compatible personal computer with Pentium 90 MHz microprocessor minimum with CD ROM drive Color display monitor with a minimum resolution of 640 x 480 and 256 colors 16 or 24 bit r...

Страница 32: ... the KODAK CD Software will start If the first install window does not automatically appear open My Computer double click the CD icon then double click the Setup Setup exe application 4 Follow the on screen instructions to install the software 5 Restart the computer when the software installation is complete The system will not operate normally unless the computer is restarted after installation U...

Страница 33: ... the camera memory or on an optional KODAK Picture Card A CompactFlash card reader to transfer pictures stored on a Picture Card CF card readers provide a fast and easy alternative to serial cable connections For details about available accessories ask a dealer of KODAK products or visit our Web site at http www kodak com go accessories Once the camera is connected to a computer and the software i...

Страница 34: ...n available 9 pin serial port on the computer Serial ports are usually labeled COM1 and COM2 or A and B If your computer has a 25 pin port you need to attach a 9 pin adapter available at your local computer store to the port before attaching the serial cable to the computer If the ports are not labeled see your computer User s Guide for a diagram that illustrates the external ports 2 Plug the othe...

Страница 35: ...s highlighted and then press the SELECT button The camera is ready to communicate with the computer If you get a message on your computer stating that the camera is not connected refer to the Troubleshooting chapter To cancel the PC Connection mode press the MENU button PC CONNE C T PR I NT ORDE R DE L E T E PROT E C T P C CONNE C T E X I T ON ...

Страница 36: ... pictures from the internal memory eject the Picture Card before starting the software To display pictures from a Picture Card insert the Picture Card before starting the software 1 To start the DC3200 Picture Transfer Software click the Start button on the desktop From the Programs menu choose Kodak then DC3200 then KODAK DC3200 The DC3200 Picture Transfer Software communicates with the camera an...

Страница 37: ...ments My Pictures Pictures are copied into this new folder Example If the date is August 1 2000 the pictures are copied into the folder named 2000 08 01 If a picture has the same name as a file in the destination folder it is automatically saved using a name with a _n suffix where n is a number Example If the file DCP_0001 JPG already exists a picture having the same name is saved using the name D...

Страница 38: ...in the DCIM 100K3200 folder is DCP_0001 JPG When you copy pictures to the computer or delete pictures from the memory the camera uses consecutive numbers for subsequent pictures For example if the last picture taken was DCP_0007 JPG the next picture is DCP_0008 JPG When you insert the Picture Card into another DC3200 Digital Camera the next picture is derived by incrementing either the highest exi...

Страница 39: ...e camera See page 3 The shutter button does not work The camera is not turned on Turn on the camera See page 3 The Power Mode switch is not set to Set the Power Mode switch to The green Ready light is blinking The camera is processing a picture Wait until the Ready light stops blinking before attempting to take another picture The red Ready light is on The internal memory or Picture Card is full T...

Страница 40: ...number of pictures remaining is below 998 The camera is operating normally The power suddenly turns off The camera was not operated for more than five minutes and the Auto Power Off function turned off the power Set the Power Mode switch to OFF and then back to or Part of the picture is missing Something was blocking the lens when the picture was taken Keep hands fingers or other objects away from...

Страница 41: ...m from the subject Stored pictures are damaged The Picture Card was inserted or removed when the green Ready light was blinking Make sure the Ready light is not blinking before inserting or removing a Picture Card The picture is not clear The lens is dirty Clean the lens See page 52 The subject was too close when a picture was taken Stand at least 2 ft 0 6 m away from the subject The subject or ca...

Страница 42: ...he COM port setting to Auto Search or to a specific COM port The communication speed setting in the software is not adjusted Set the speed setting to 9 600 bps If communication is successful gradually raise the speed to optimize communication time There is a conflict with another serial device such as infrared communication internal fax modem or other communication system Refer to the serial devic...

Страница 43: ...line Some Advanced Power Management utilities on laptops can turn off ports to save battery life See the Power Management section of the laptop User s Guide to disable this feature The Battery Monitor or other such software runs constantly Close that software before starting the KODAK Software Computer Monitor Problem Cause Solution The image on the monitor is jagged or inappropriately colored The...

Страница 44: ...d is not inserted in the camera Insert a Picture Card See page 5 Warning Messages Message Cause Solution Internal memory is full Memory card is full The internal memory or Picture Card is full and cannot hold additional pictures Transfer pictures to a computer see page 30 delete pictures see page 20 or insert a Picture Card with available memory see page 5 Access error on memory card Card requires...

Страница 45: ... manual or at any of the resources listed in this chapter Software Help For help with any software packaged with your camera contact the software manufacturer Kodak Online Services Kodak Fax Support World Wide Web http www kodak com click Service and Support U S and Canada 1 800 508 1531 Europe 44 0 131 458 6962 U K 44 0 131 458 6962 ...

Страница 46: ...n of installation CD Camera serial number Telephone Numbers U S call toll free 1 800 235 6325 between the hours of 9 00 a m and 8 00 p m Eastern Standard Time Monday through Friday Canada call toll free 1 800 465 6325 between the hours of 9 00 a m and 8 00 p m Eastern Standard Time Monday through Friday Europe call the Kodak Digital Imaging Support Centre number associated with your location or th...

Страница 47: ...uring the warranty period subject to any conditions and or limitations stated herein Such replacement is the sole remedy under this warranty If it is necessary to replace the entire product it may be replaced with a remanufactured product Limitations Request for Warranty service will not be accepted without proof of date of purchase such as a copy of the original dated KODAK DC3200 Digital Camera ...

Страница 48: ...s resulting from the purchase use or failure of the product regardless of cause or for breach of any written or implied warranty is expressly disclaimed and excluded herefrom Your Rights Some states or jurisdictions do not allow exclusion or limitation of incidental or consequential damages so the above limitation or exclusion may not apply to you Some states or jurisdictions do not allow limitati...

Страница 49: ... the equipment off and on the user is encouraged to try to correct the interference by one or more of the following measures 1 reorient or relocate the receiving antenna 2 increase the separation between the equipment and the receiver 3 connect the equipment to an outlet on a circuit different from that to which the receiver is connected 4 consult the dealer or an experienced radio TV technician f...

Страница 50: ......

Страница 51: ...iginal default settings Specifications Printing guidelines Battery usage guidelines Care and maintenance Original Camera Default Settings Your camera is set to these values when you take the camera out of the box for the first time Feature Setting Preview Off Flash Auto Quality Better White Balance Auto Quickview On Slide Show 5 seconds PC Connect Off ...

Страница 52: ... card Viewfinder Virtual image ASA ISO Sensitivity 100 Flash Range 5 to 8 ft 1 5 to 2 4 m Lens Type Optical quality glass Maximum Aperture F 3 6 Focal Length 39 mm equivalent to 35mm camera 5 4 mm actual Focus Distance fixed 2 ft 0 6 m to infinity Power Batteries 4 AA size 1 5 volt alkaline or AA size 1 2 volt Ni MH rechargeable DC Input KODAK AC Adapter Cat 122 0557 Video Out NTSC Dimensions Widt...

Страница 53: ...ore time More complex pictures increase the printing and drying time Color printing is more memory intensive than black and white If your computer gives you an insufficient memory message you may need to close some applications change some settings or add additional memory Color prints may not photocopy as clearly as black and white If you plan to photocopy documents consider printing the document...

Страница 54: ... These include 1 5 volt alkaline and rechargeable 1 2 volt Nickel Metal Hydride Ni MH Replace all batteries of a set at the same time New batteries should not be mixed with used ones Do not mix rechargeable and nonrechargeable batteries Do not mix alkaline or Ni MH types of batteries Do not mix different grades or brands of batteries Failure to observe this precaution may result in some batteries ...

Страница 55: ...llow the manufacturer s instructions and all federal state and local regulations Kodak suggests customers take advantage of any community battery recycling programs that may exist in your area Contact your local waste remover or recycler for details Caution Hot Surface When removing batteries allow to cool before touching since the batteries may be hot For charging Ni Cd or Ni MH batteries only wi...

Страница 56: ...e smell coming from the camera immediately turn off the camera wait a few minutes until the camera cools and then remove the batteries Clean the lens and back LCD screen Do not use cleaning solutions unless they are designed specifically for camera lenses Do not wipe the camera lens or LCD screen with chem ically treated eyeglass lens tissue as it may scratch the lens 1 Blow gently on the lens or ...

Страница 57: ...Ready Light 4 Cleaning 52 Close up Mode 9 CompactFlash Card 5 Card Reader 29 Card Slot 5 Computer Communication Settings 33 Connecting 30 Connecting Computer 30 Television 25 Copying Pictures 17 D Daylight Setting 12 DC3200 Picture Transfer Software 27 Default Camera Settings 47 Deleting Pictures 20 Difficulties 35 E Ejecting a Picture Card 5 F FCC Compliance and Advisory 44 Flash Auto 10 Fill 10 ...

Страница 58: ...emory Card 5 Memory Internal 2 N Navigating to Pictures 34 O Off Flash 10 On Off Camera 3 Orange Ready Light 9 P Paper KODAK Inkjet 49 Picture Card Card Slot 5 Ejecting 5 Formatting 26 Inserting 5 Reader 29 Picture Quality Setting 11 Pictures Copying 17 Deleting 20 Navigating to 34 Printing 22 Protecting 18 Reviewing 15 Taking 7 Preparing to Take Pictures 2 Printer Improving Results 49 Printing Pi...

Страница 59: ...te Balance 12 Shutter Button 9 Slide Show 25 Software DC3200 Picture Transfer 27 Help 41 Installing 27 Using 32 Specifications 48 System Requirements 27 T Taking Pictures 7 TelePhoto 9 Television Connecting 25 Troubleshooting 35 Tungsten Setting 12 U Using the Batteries 50 Using the Software 32 V Video Cable 25 Video Out 25 W Warning Batteries 51 Flash 10 Green Ready Light 5 Orange Ready Light 9 R...

Страница 60: ......

Отзывы: