Kodak C360 - EASYSHARE Digital Camera, Руководство пользователя
Kodak C360 - EASYSHARE цифровая камера - удобная в использовании камера с высоким качеством изображения. Узнайте больше о настройке и использовании этой камеры, скачав бесплатное Руководство пользователя на manualshive.com. Будьте готовы к тому, чтобы запечатлеть каждый момент вашей жизни с помощью Kodak C360 - EASYSHARE!
Поделиться
Скачать


Отзывы:
Нет отзывов
Похожие инструкции для C360 - EASYSHARE Digital Camera

Lumix H-X015
Бренд: Panasonic Страницы: 26

Lumix H-H020A
Бренд: Panasonic Страницы: 26

Lumix DMC-FX01
Бренд: Panasonic Страницы: 13

H-RS100400
Бренд: Panasonic Страницы: 26

MLX-807
Бренд: Lasonic Страницы: 1

XUV500
Бренд: Mahindra Страницы: 12

00176614
Бренд: Hama Страницы: 17

DVISplitter2-DL
Бренд: G&D Страницы: 24

IPG1022ESX3
Бренд: Lilin Страницы: 18

ACM-8511
Бренд: ACTi Страницы: 12

PB-Mycro
Бренд: Pro-Built Tools Страницы: 24

TR-D5123IR3
Бренд: TRASSIR Страницы: 2

180-View 180NT-P-CM
Бренд: Tamron Страницы: 39

CV505-M
Бренд: Marshall Electronics Страницы: 2

MOBILE PHOTO DISPLAY S4 PDS040
Бренд: JOBO Страницы: 8

Lumix LX7
Бренд: Panasonic Страницы: 226

Lumix DMCFX700EP
Бренд: Panasonic Страницы: 208
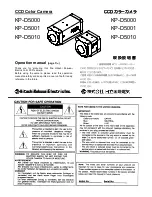
KP-D5000
Бренд: Hitachi Страницы: 54


