background image

36

4-5  LCD Setup

Setup

Setup

Setup

Setup

Setup

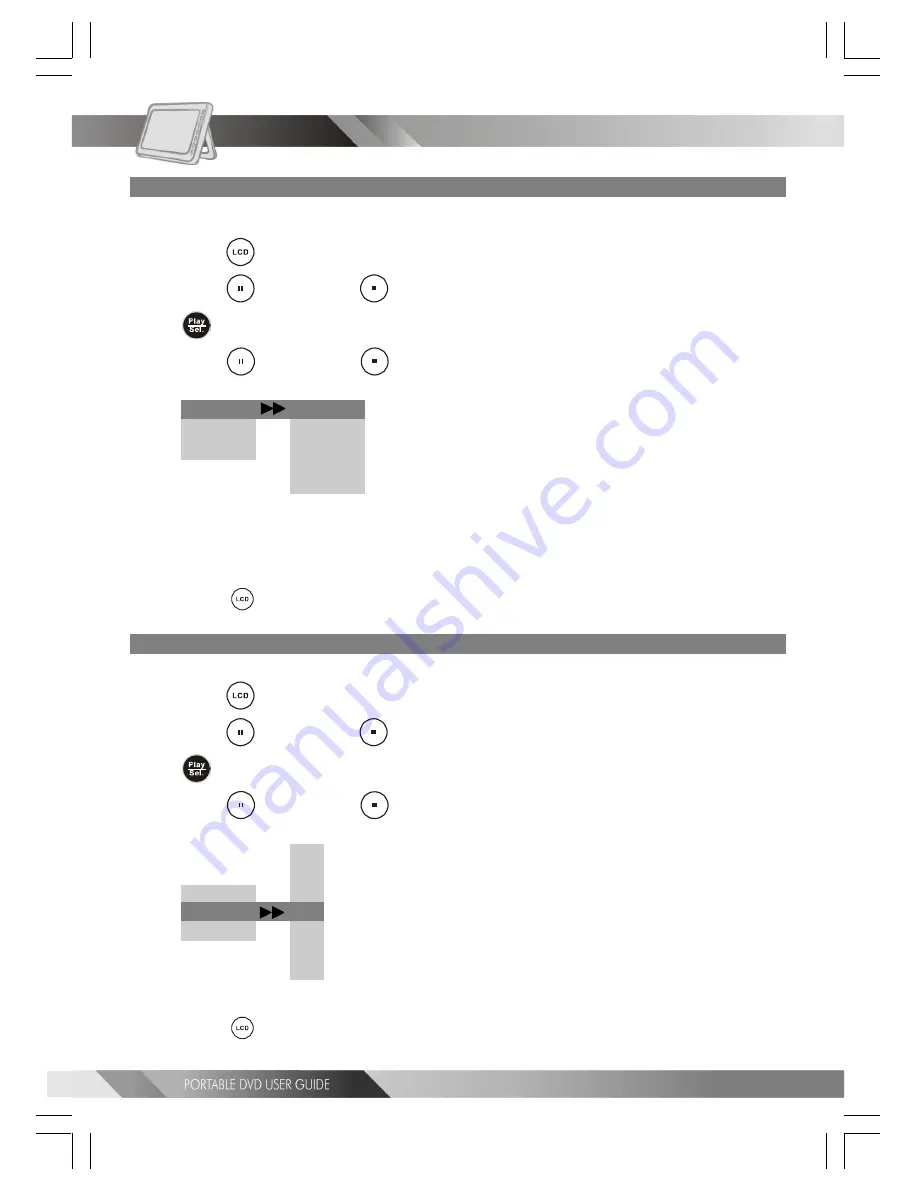
Panel Setting

The portable DVD player provides five panel adjustment options: “Normal”, “16:9”, “4:3”, “Zoom” or
“Close”.

1

Press 

 <LCD>, the LCD setting box show on the screen.

2

Press 

 <UP> button / 

 <DOWN> button to select “Panel”, and then  press

 <PLAY/SEL.>.

3

Press 

 <UP> button / 

 <DOWN> button to choose the preferred panel

setting. The panel will change to the selected setting.

Panel  

Panel  

Panel  

Panel  

Panel  


Nor

Nor

Nor

Nor

Nor mal

mal

mal

mal

mal

Color

Color

Color

Color

Color

16:9

16:9

16:9

16:9

16:9

Bright

Bright

Bright

Bright

Bright

4:3

4:3

4:3

4:3

4:3

Zoom

Zoom

Zoom

Zoom

Zoom

Close

Close

Close

Close

Close

<<

 NOTE

>>

When you choose “Zoom” in the panel setting, the up and down edges are cut off.
When you choose “Close” in the panel setting, the LCD turns off and the power indicator will
blink in yellow light.

*To finish setup operation

---Press 

 <LCD> 

again until the LCD setting box disappears.

Color Setting

1

Press 

 <LCD>, the LCD setting box show on the screen.

2

Press 

 <UP> button / 

 <DOWN> button to select “Color”, and then  press

 <PLAY/SEL.>.

3

Press 

 <UP> button / 

 <DOWN> button to choose the preferred color

setting. The panel will change to the selected setting.

+ 3

+ 3

+ 3

+ 3

+ 3

+ 2

+ 2

+ 2

+ 2

+ 2

Panel

Panel

Panel

Panel

Panel

+ 1

+ 1

+ 1

+ 1

+ 1

Color   

Color   

Color   

Color   

Color   

  0

  0

  0

  0

  0

Bright

Bright

Bright

Bright

Bright

     ----- 1

11

11

     ----- 2

22

22

     ----- 3

33

33

*To finish setup operation

---Press 

 <LCD> 

again until the LCD setting box disappears.

Содержание 82-184-00170

Страница 1: ...Portable DVD Player User Guide 82 184 00170 Playable Disk Format DVD CD CD R CD RW MMC SD card Svenska English ...

Страница 2: ...splaying Subtitles A 11 Changing Subtitle Language B 12 Viewing From Another Angle 12 Mute the DVD Player 12 Using a DVD Menu 13 Using the Menu Function 13 Chapter 2 Audio CD Chapter 2 Audio CD Chapter 2 Audio CD Chapter 2 Audio CD Chapter 2 Audio CD 2 1 Audio CD Playback 14 Basic Playback 14 Stopping Playback 14 Rapid Advance and Rapid Reverse 14 Skipping Ahead or Back to Tracks 15 Pause 15 Displ...

Страница 3: ...ystem Setting 26 Video Out Setting 27 4 3 AUDIO Setup 29 Digital Out Setting 29 Analog Out Setting 30 4 4 Custom Setup 31 MMC SD Setting 31 Parental Control Setting DVD 32 Password Setting DVD 33 Angle Mark Setting DVD 34 Default Setting 35 4 5 LCD Setup 36 Panel Setting 36 Color Setting 36 Bright Setting 37 Chapter 5 F Chapter 5 F Chapter 5 F Chapter 5 F Chapter 5 For Y or Y or Y or Y or Your R o...

Страница 4: ... interference to radio communications However there is no guarantee that interference will not occur in a particular installation If this equipment does cause harmful interference to radio or television reception which can be determined by turning the equipment off and on the user is encouraged to try to correct the interference by one or more of the following measures Reorient or relocate the rec...

Страница 5: ...s of time 13 Refer all servicing to qualified service personnel Servicing is required when the apparatus has been damaged in any way such as when the power supply cord or plug is damaged liquid has been spilled or objects have fallen into the apparatus the apparatus has been exposed to rain or moisture does not operate normally or has been dropped 14 AmbientTemperature 0 400 C Outdoor use or wet l...

Страница 6: ...and may cause serious damage to the unit Do not attempt to disassemble the unit Do not put any foreign object on the disc tray Keep away from water magnet Keep the unit away from flower vases tubs sinks etc If liquids are spilled into the unit serious damage could occur Never bring a magnet or magnetized object near the unit Stacking Place the unit in a horizontal position and do not place anythin...

Страница 7: ...or NTSC formats Please refer to the table below to find the appropriate format for your region Connecting to a multi system TV Connecting to a NTSC TV Connecting to a PAL TV Selecting the type of disc for the type of TV connected ...

Страница 8: ...n it a menu screen will appear on the screen 5 Press or the number button s to select the preferred title NOTE To select a title input the number i e 1 for chapter 1 10 for chapter 10 and etc 6 Press PLAY SEL The player now starts playing the selected item Stopping Playback and Returning to The Menu Screen If a Menu Screen Is Available on The Disc Press MENU The portable DVD player stops playback ...

Страница 9: ...Chapters You can skip a specific chapter or track Skipping Ahead Press NEXT during playback Skips a chapter each time you press the button Skipping Back Press PREVIOUS during playback When you press the button once midway through a chapter the portable DVD player returns to the beginning of the chapter being played back The player skips a chapter each time you press the button Still Picture PAUSE ...

Страница 10: ...ress three times Disc Repeat disc Press four times Off Repeat cancelled To return to normal playback Press 1 ALL REPEAT several times until Off appears on the screen NOTE Repeat playback works only with discs for which the elapsed playing time appears on the player s display during playback Repeat playback may not work correctly with some DVDs 1 1 DVD Playback continued DVD DVD DVD DVD DVD ...

Страница 11: ...mes it may indicate that language is not available on the disc When you turn on or remove the disc the portable DVD player will playback the language which is selected at the initial setting If you select a language which is not recorded on the disc the portable DVD player will playback a prior language programmed on the disc Clearing Displaying Subtitles A If a disc provides subtitles you can cho...

Страница 12: ...title language which is selected at the initial setting If you select a subtitle language which is not recorded on the disc the portable DVD player will playback a prior subtitle language programmed on the disc Viewing From Another Angle Some DVD discs may contain scenes which have been shot simultaneously from a number of different angles For these discs the same scenes can be viewed from each of...

Страница 13: ...hen this feature is used 1 Press TITLE in stop mode The DVD menu available on the disc now appears 2 Press to select the preferred item 3 Press PLAY SEL You now enter to the selected item To enter other menu screen Repeat steps 2 and 3 To return to the previous menu screen Press TITLE Using the MENU Function 1 Press PLAY SEL 2 Press MENU A DVD chapter menu with brief broadcast of each paragraph no...

Страница 14: ...isc without touching its surfaces position it with the printed title side facing up align it with the guides and place it in its proper position 4 Close the disc cover For audio CDs without playback control The portable DVD player starts to playback For audio CDs provided with playback control A menu appears after a few seconds Stopping Playback Press STOP once to prestop Press STOP twice to stop ...

Страница 15: ... a track each time the button is pressed Pause Press PAUSE once during playback The player will pause playback To return to normal playback Press PLAY SEL Displaying Track Information Displaying Track Information Press INFO during playback Press INFO a number of times the elapsed time track number and other information will show on the screen To stop displaying track information Press INFO a numbe...

Страница 16: ... the slide show To pause slide show Press PAUSE the slide show will pause To stop slide show Press STOP then enter Thumbnail mode Note Press TITLE to enter Thumbnail mode To resume slide show Press PLAY SEL again Slide Show 1 Press NEXT to view the next picture or PREVIOUS to view the previous picture 2 Press RIGHT button or LEFT button to rotate the picture Press RIGHT button to rotate right by 9...

Страница 17: ... want to view the selected picture in its original size press PLAY SEL When you view the picture in its original size you can press STOP to view the pictures in thumbnail 3 Press NEXT or PREVIOUS to view the next or previous thumbnail page Special F Special F Special F Special F Special Functions unctions unctions unctions unctions 3 1 Playing Kodak Picture CDs continued ...

Страница 18: ... SEL Press INFO the current picture number total picture numbers and other information will show on the screen Press the number button corresponding to the order of the picture then press PLAY SEL The portable DVD player will begin the slide show To pause slide show Press PAUSE the slide show will pause To stop slide show Press STOP then enter the File Manager To resume slide show Press PLAY SEL a...

Страница 19: ...o pause playback Press PAUSE To stop playback Press STOP then enter to the File Manager Note Press TITLE to enter Thumbnail mode To resume playback Press PLAY SEL again ThumbnailMode 1 Press TITLE to enter Thumbnail mode While in Thumbnail mode there are 20 pictures per page for viewing 2 Press to select the picture in the thumbnail If you want to view the selected picture in its original size pre...

Страница 20: ...P button DOWN button to select OSD and then press PLAY SEL 4 Press UP button DOWN button to select the preferred language 5 Press PLAY SEL To return to the SETUP MENU screen Press LEFT button To finish the setup operation Press SETUP to exit or select EXIT from SETUP MENU screen Language Setup Move Select SETUP Quit OSD Menu Audio Subtitle English French German Italian Spanish 4 1 Language Setup S...

Страница 21: ...N button to select Menu and then press PLAY SEL 4 Press UP button DOWN button to select the preferred language 5 Press PLAY SEL Language Setup Move Select SETUP Quit OSD Menu Audio Subtitle English Chinese Japanese French German To return to the SETUP MENU screen Press LEFT button To finish the setup operation Press SETUP to exit or select EXIT from SETUP MENU screen 4 1 Language Setup continued S...

Страница 22: ...referred language 5 Press PLAY SEL ORIGINAL The top priority language of each disc will always playback first Language Setup Move Select SETUP Quit OSD Menu Audio Subtitle English Chinese Japanese French German 4 1 Language Setup continued Setup Setup Setup Setup Setup To return to the SETUP MENU screen Press LEFT button To finish the setup operation Press SETUP to exit or select EXIT from SETUP M...

Страница 23: ...OWN button to select the preferred language 5 Press PLAY SEL Language Setup Move Select SETUP Quit OSD Menu Audio Subtitle English Chinese Japanese French German To return to the SETUP MENU screen Press LEFT button To finish the setup operation Press SETUP to exit or select EXIT from SETUP MENU screen For your reference If the language selected is not recorded on the disc the portable DVD player w...

Страница 24: ...n Press SETUP to exit or select EXIT from SETUP MENU screen 4 3 Pan Scan Select 4 3 PS for a conventional size TV set Video material formatted in the pan scan style has the left and right edges trimmed 4 3 Letter Box Select 4 3 LB for a conventional size TV set Black bands appear at top and bottom of screen letter box style 16 9 Wide Select 16 9 for a wide screen TV set Played in FULL size Setting...

Страница 25: ...aver and then press PLAY SEL 4 Press UP button DOWN button to select On or Off 5 Press PLAY SEL The waiting time of the screen saver is set to 10 minutes To return to the SETUP MENU screen Press LEFT button To finish the setup operation Press SETUP to exit or select EXIT from SETUP MENU screen 4 2 Screen Setup continued Setup Setup Setup Setup Setup Screen Setup Move Select SETUP Quit TV Type Scre...

Страница 26: ... 2 Press UP button DOWN button to select Screen Setup and then press PLAY SEL 3 Press UP button DOWN button to select TV System and then press PLAY SEL 4 Press UP button DOWN button to select the appropriate TV system for your clearest view 5 Press PLAY SEL To return to the SETUP MENU screen Press LEFT button To finish the setup operation Press SETUP to exit or select EXIT from SETUP MENU screen S...

Страница 27: ... to select Video Output and then press PLAY SEL 4 Press UP button DOWN button to select the preferred video output setting 5 Press PLAY SEL To return to the SETUP MENU screen Press LEFT button To finish the setup operation Press SETUP to exit or select EXIT from SETUP MENU screen Screen Setup Move Select SETUP Quit TV Type Screen Saver TV System Video Output S Video P SCAN Setup Setup Setup Setup ...

Страница 28: ...y connected to your TV and the portable DVD player If your TV doesn t support P Scan feature press STOP Troubleshooting What if the screen turns black while operating Solution Press Mode to switch to S Video mode Setup Setup Setup Setup Setup 4 2 Screen Setup continued Screen Setup Move Select SETUP Quit TV Type Screen Saver TV System Video Output S Video P SCAN Please make sure your TV support P ...

Страница 29: ... to select the preferred digital out setting 5 Press PLAY SEL To return to the SETUP MENU screen Press LEFT button To finish the setup operation Press SETUP to exit or select EXIT from SETUP MENU screen For your reference If you have a Dolby Digital 5 1 or DTS capable amplifier you must set the audio output to SPDIF RAW If you have a 2 channel Dolby Digital amplifier you must set the audio output ...

Страница 30: ...n the stop mode 2 Press UP button DOWN button to select Audio Setup and then press PLAY SEL 3 Press UP button DOWN button to select Analog Out and then press PLAY SEL 4 Press UP button DOWN button to select the preferred analog out setting 5 Press PLAY SEL Audio Setup Move Select SETUP Quit Digital Out Analog Out 2 Channel 4 3 Audio Setup continued Setup Setup Setup Setup Setup ...

Страница 31: ...AY SEL 4 Press UP button DOWN button to select On or Off and then press PLAY SEL Important If you set the MMC SD setting to On the portable DVD player can only read MMC SD card The portable DVD player can t playback any discs While the disc is played back you can only press the Mode button to switch to MMC SD mode Custom Setup Move Select SETUP Quit MMC SD Parental Ctrl Password Angle Mark On Off ...

Страница 32: ...utton to select the preferred ratings 6 Press PLAY SEL Rating Explanations 3 PG Parental Guidance suggested 4 PG13 Material is unsuitable for children under the age of 13 6 R Restricted children under 17 would not be admitted without an accompanying parent or adult guardian 7 NC17 No children under the age of 17 not recommended viewing for children under age 17 To return to the SETUP MENU screen P...

Страница 33: ...rd and then press PLAY SEL Factory pre set password 0000 5 Enter your new password and then press PLAY SEL 6 Re enter your password to verify it and then press PLAY SEL To return to the SETUP MENU screen Press LEFT button To finish the setup operation Press SETUP to exit or select EXIT from SETUP MENU screen 4 4 Custom Setup continued Setup Setup Setup Setup Setup Custom Setup Move Select SETUP Qu...

Страница 34: ... DOWN button to select On or Off and then press PLAY SEL NOTE Pressing the ANGLE button will change camera angles for movies that support this feature regardless of whether the ANGLE MARK feature is On or Off To return to the SETUP MENU screen Press LEFT button To finish the setup operation Press SETUP to exit or select EXIT from SETUP MENU screen 4 4 Custom Setup continued Setup Setup Setup Setup...

Страница 35: ...PLAY SEL 4 Press RIGHT button to select Read and then press PLAY SEL EXCEPTION The viewer rating and the password setting will NOT be changed even though you re set to the default setting To return to the SETUP MENU screen Press LEFT button To finish the setup operation Press SETUP to exit or select EXIT from SETUP MENU screen 4 4 Custom Setup continued Setup Setup Setup Setup Setup Custom Setup M...

Страница 36: ... Close Close Close Close Close NOTE When you choose Zoom in the panel setting the up and down edges are cut off When you choose Close in the panel setting the LCD turns off and the power indicator will blink in yellow light To finish setup operation Press LCD again until the LCD setting box disappears Color Setting 1 Press LCD the LCD setting box show on the screen 2 Press UP button DOWN button to...

Страница 37: ...hen press PLAY SEL 3 Press UP button DOWN button to choose the preferred bright setting The panel will change to the selected setting 3 3 3 3 3 Panel Panel Panel Panel Panel 2 2 2 2 2 Color Color Color Color Color 1 1 1 1 1 Bright Bright Bright Bright Bright 0 0 0 0 0 1 1 1 1 1 2 2 2 2 2 3 3 3 3 3 To finish setup operation Press LCD again until the LCD setting box disappears ...

Страница 38: ...ture distortion may appear This is not a malfunction Completely distorted picture or no color The disc format is not compatible to the TV set used PAL NTSC in picture Picture is distorted during rapid The picture will be somewhat distorted at times this is normal advance or rapid reverse No rapid advance or rapid reverse Some discs may have sections which prohibit rapid advance or rapid reverse pl...

Страница 39: ...f the disc is brought from a cold to a warm environment moisture may form on the disc Wipe this moisture off with a soft dry lint free cloth before using the disc Improper disc storage You can damage discs if you store them in the following places Areas exposed to direct sunlight Humid or dusty areas Areas directly exposed to a heat outlet or heating appliance Disc which cannot be played with this...

Страница 40: ...o 0 6 mm thin discs which are adhered to each other Since the thinner the disc the higher the density at which the information can be recorded a DVD disc has a greater capacity than a single 1 2 mm thick disc Since the two thin discs are adhered to each other there is the potential to achieve double sided play sometime in the future for even longer duration play Subtitles These are the printed lin...

Страница 41: ...Bärbar DVD spelare Bruksanvisning Spelbara skivformat DVD CD CD R CD RW MMC SD kort ...

Страница 42: ...ing A 11 Byta textningsspråk B 12 Byta kameravinkel 12 Stänga av ljudet för DVD spelaren 12 Använda DVD menyer 13 Använda menyfunktionen 13 Kapitel 2 Audio CD Kapitel 2 Audio CD Kapitel 2 Audio CD Kapitel 2 Audio CD Kapitel 2 Audio CD 2 1 Audio CD avspelning 14 Normal avspelning 14 Stoppa avspelning 14 Snabbavspelning framåt och bakåt 14 Hoppa framåt eller bakåt till spår 15 Paus 15 Visa spårinfor...

Страница 43: ...n typ av TV 24 Ställa in skärmsläckare 25 Ställa in TV system 26 Ställa in Video Out 27 4 3 AUDIO inställningar 29 Ställa in Digital Out 29 Ställa in Analog Out 30 4 4 Egna inställningar 31 MMC SD inställningar 31 Ställa in barnlås DVD 32 Ställa in lösenord DVD 33 Ställa in kameravinkelsymbol DVD 34 Förinställningar 35 4 5 LCD inställningar 36 Ställa in skärmen 36 Färginställningar 36 Ljusstyrka 3...

Страница 44: ...orsaka radiostörningar om den installeras och används felaktigt och i strid mot instruktionerna Men det finns inga garantier för att störningar inte kan uppstå i vissa fall Om utrustningen orsakar störningar på radio eller tv mottagning vilket du avgör genom att slå på och av utrustningen kan du försöka åtgärda problemet genom något av följande Rikta om eller placera om mottagarantennen Öka avstån...

Страница 45: ...åskoväder eller om enheten inte ska användas under lång tid 13 Alla reparationer skall utföras av behörig servicepersonal Service krävs om apparaten har skadats till exempel om nätsladden eller stickkontakten blivit skadad vätska har spillts på apparaten eller föremål har hamnat i apparaten apparaten har utsatts för regn eller fukt den inte fungerar normalt eller har tappats i golvet 14 Omgivande ...

Страница 46: ... interna delar i apparaten detta kan förorsaka att enheten skadas allvarligt Försök inte plocka isär enheten Placera inga främmande föremål på skivfacket Undvik kontakt med vatten magneter Placera enheten bort från blomvaser badkar diskhoar etc Om vätska hamnar i enheten kan allvarliga skador uppstå Undvik att föra en magnet eller något magnetiskt föremål nära enheten Placering Placera enheten på ...

Страница 47: ...lade i PAL eller NTSC format I tabellen nedan hittar du rätt format för din region Anslutning till en TV med flera system Anslutning till en NTSC TV Anslutning till en PAL TV Välja typ av skiva för den anslutna TV apparaten ...

Страница 48: ...gra menyer Om det finns en eller flera titlar på skivan visas en menyskärm på skärmen 5 Tryck på eller sifferknapparna för att välja önskad titel MÄRK För att välja en titel mata in motsvarande nummer dvs 1 för kapitel 1 10 för kapitel 10 och så vidare 6 Tryck på PLAY SEL Nu spelas den valda titeln Stoppa avspelning och återgå till menyskärmen om skivan har en meny Tryck på MENU Avspelningen avbry...

Страница 49: ...16 x32 Hoppa framåt eller bakåt till kapitel Du kan hoppa över ett kapitel eller spår Hoppa framåt Tryck på NÄSTA under avspelning För varje knapptryckning hoppas nästa kapitel över Hoppa bakåt Tryck på FÖREGÅENDE under avspelning Om du trycker på knappen en gång under avspelning av ett kapitel hoppar DVD spelaren till början på det aktuella kapitlet För varje knapptryckning hoppas nästa kapitel ö...

Страница 50: ... Tryck tre gånger för Skiva Repetera skiva Tryck fyra gånger för Off Repetering avstängd För att återgå till normal avspelning Tryck på 1 ALL REPEAT flera gånger tills Off visas på skärmen MÄRK Repetering fungerar endast på skivor som visar spelad tid på displayen under avspelning Repeterad avspelning kanske inte fungerar korrekt på vissa DVD skivor 1 1 DVD avspelning fortsättning DVD DVD DVD DVD ...

Страница 51: ... När du sätter på spelaren eller tar ut en skiva spelas det språk som valts som förinställning Om du försöker välja ett språk som inte finns på skivan används det närmast föregående tillgängliga språket på skivan Dölja Visa textning A Om skivan spelats in med textning kan du ställa in att gömma eller visa denna Detta fungerar bara på skivor som innehåller textning Tryck på SUBTITLE under avspelnin...

Страница 52: ...lning Om du försöker välja ett språk som inte finns på skivan används det närmast föregående tillgängliga språket på skivan Byta kameravinkel Vissa DVD skivor innehåller scener som har tagits från flera olika kameravinklar På en sådan skiva kan du titta på en och samma scen från olika kameravinklar med hjälp av ANGLE knappen Kameravinklarna varierar beroende på vad som spelats in på den aktuella s...

Страница 53: ... de flesta skivor 1 Tryck på TITLE i stoppläge Nu visas skivmenyn 2 Tryck på för att välja önskat menyalternativ 3 Tryck på PLAY SEL Det markerade menyalternativet aktiveras För att gå till en annan menyskärm upprepa steg 2 och 3 För att återgå till föregående menyskärm Tryck på TITLE Använda MENY funktionen 1 Tryck på PLAY SEL 2 Tryck på MENU En kapitelmeny visas med korta klipp av varje kapitel ...

Страница 54: ... skivytan placera den med den tryckta sidan uppåt i markeringarna på skivluckan och se till att den är korrekt placerad 4 Stäng skivluckan För audio CD utan playback control DVD spelaren börjar avspelningen För audio CD med playback control En meny visas efter några få sekunder Stoppa avspelning Tryck på STOPP en gång för att ställa enheten i stoppläge Tryck på STOPP två gånger för att stoppa avsp...

Страница 55: ...yckning hoppas nästa spår över Paus Tryck på PAUS en gång under avspelning Avspelningen ställs nu i pausläge För att återgå till normal avspelning Tryck på PLAY SEL Visa spårinformation Visa spårinformation Tryck på INFO under avspelning Tryck på INFO flera gånger för att visa spelad tid spårnummer samt annan information på skärmen Stänga av funktionen Tryck på INFO flera gånger tills informatione...

Страница 56: ...ildspel Tryck på STOPP och ställ bildspelet i miniatyrläge Märk Tryck på TITLE för att aktivera miniatyrläget För att starta bildspelet igen Tryck på PLAY SEL igen Bildspel 1 Tryck på NÄSTA för att visa nästa bild eller FÖREGÅENDE för att visa föregående bild 2 Tryck på HÖGER eller VÄNSTER för att rotera bilden Tryck på HÖGER för att rotera bilden medsols 90 grader Tryck på VÄNSTER för att rotera ...

Страница 57: ... markerade bilden i i originalstorlek tryck på PLAY SEL När en bild visas i originalstorlek kan du trycka på STOPP för att visa den i miniatyrläge 3 Tryck på NÄSTA för att visa nästa bild eller på FÖREGÅENDE för att visa föregående bild Specialfunktioner Specialfunktioner Specialfunktioner Specialfunktioner Specialfunktioner 3 1 Spela Kodak Picture CD fortsättning ...

Страница 58: ... aktuella bilden totalt antal bilder samt annan information på skärmen Tryck sedan på motsvarande sifferknappar för bilderna och sedan på PLAY SEL Bildspelet visas För att pausa ett bildspel Tryck på PAUS för att ställa ett bildspel i pausläge För att stänga av ett bildspel Tryck på STOPP och ställ spelaren i filhanteringsläge För att starta bildspelet igen Tryck på PLAY SEL igen Filhanteraren 1 I...

Страница 59: ...a avspelning i pausläge Tryck på PAUS Stoppa avspelning Tryck på STOPP och ställ spelaren i filhanteringsläge Märk Tryck på TITLE för att aktivera miniatyrläget För att starta bildspelet igen Tryck på PLAY SEL igen Miniatyrläge 1 Tryck på TITLE för att aktivera miniatyrläget I miniatyrläge visas 20 bilder per sida 2 Tryck på för att välja önskad bild Om du vill titta på den markerade bilden i orig...

Страница 60: ...UPP NER för att välja OSD och tryck sedan på PLAY SEL 4 Tryck på UPP NER för att välja önskat språk 5 Tryck på PLAY SEL För att återgå till SETUP skärmen Tryck på VÄNSTER För att avsluta Tryck på SETUP för att avsluta eller välj EXIT från SETUP skärmen Language Setup Move Select SETUP Quit OSD Menu Audio Subtitle English French German Italian Spanish 4 1 Språkinställningar Inställningar Inställnin...

Страница 61: ...sedan på PLAY SEL 4 Tryck på UPP NER för att välja önskat språk 5 Tryck på PLAY SEL Language Setup Move Select SETUP Quit OSD Menu Audio Subtitle English Chinese Japanese French German 4 1 Språkinställningar fortsättning Inställningar Inställningar Inställningar Inställningar Inställningar För att återgå till SETUP skärmen Tryck på VÄNSTER För att avsluta Tryck på SETUP för att avsluta eller välj ...

Страница 62: ...ternativ innebär att det första inspelade språket på skivan alltid spelas först Language Setup Move Select SETUP Quit OSD Menu Audio Subtitle English Chinese Japanese French German 4 1 Språkinställningar fortsättning För att återgå till SETUP skärmen Tryck på VÄNSTER För att avsluta Tryck på SETUP för att avsluta eller välj EXIT från SETUP skärmen Tänk på Om du försöker välja ett språk som inte fi...

Страница 63: ...t språk 5 Tryck på PLAY SEL Language Setup Move Select SETUP Quit OSD Menu Audio Subtitle English Chinese Japanese French German För att återgå till SETUP skärmen Tryck på VÄNSTER För att avsluta Tryck på SETUP för att avsluta eller välj EXIT från SETUP skärmen Tänk på Om du försöker välja ett språk som inte finns på skivan används det först inspelade språket på skivan 4 1 Språkinställningar forts...

Страница 64: ...från SETUP skärmen 4 3 Pan Scan Välj 4 3 PS för en vanlig TV apparat Skärmbilder i pan scan storlek beskärs i vänster och höger kant 4 3 Letter Box Välj 4 3 LB för en vanlig TV apparat Svarta fält visas upptill och nertill på TV skärmen letter box format 16 9 Wide Välj 16 9 för en bredbilds TV Ställ in storleksalternativet FULL Du måste också ställa in alternativet FULL för TV skärmen Illustration...

Страница 65: ...SEL 4 Tryck på UPP NER för att välja On eller Off 5 Tryck på PLAY SEL Skärmsläckaren är inställd till att aktiveras efter 10 minuter För att återgå till SETUP skärmen Tryck på VÄNSTER För att avsluta Tryck på SETUP för att avsluta eller välj EXIT från SETUP skärmen 4 2 Skärm inställningar fortsättning Screen Setup Move Select SETUP Quit TV Type Screen Saver TV System Video Output On Off Inställnin...

Страница 66: ...ör att välja Screen Setup och tryck sedan på PLAY SEL 3 Tryck på UPP NER för att välja TV System och tryck sedan på PLAY SEL 4 Tryck på UPP NER för att välja önskat TV system 5 Tryck på PLAY SEL 4 2 Skärm inställningar fortsättning Inställningar Inställningar Inställningar Inställningar Inställningar Move Select SETUP Quit Screen Setup TV Type Screen Saver TV System Video Output NTSC PAL Auto För ...

Страница 67: ... och tryck sedan på PLAY SEL 4 Tryck på UPP NER för att välja önskad videosignal 5 Tryck på PLAY SEL Screen Setup Move Select SETUP Quit TV Type Screen Saver TV System Video Output S Video P SCAN 4 2 Skärm inställningar fortsättning Inställningar Inställningar Inställningar Inställningar Inställningar För att återgå till SETUP skärmen Tryck på VÄNSTER För att avsluta Tryck på SETUP för att avsluta...

Страница 68: ...l din TV och den bärbara DVD spelaren Om din TV inte stöder P Scan tryck på STOPP Felsökning Om skärmen blir svart Åtgärd Tryck på Mode för att växla till S Video läge 4 2 Skärm inställningar fortsättning Screen Setup Move Select SETUP Quit TV Type Screen Saver TV System Video Output S Video P SCAN Please make sure your TV support P Scan Continue Press PLAY Stop Press STOP 4 Inställningar Inställn...

Страница 69: ...ställning 5 Tryck på PLAY SEL Audio Setup Move Select SETUP Quit Digital Out Analog Out SPDIF PCM SPDIF RAW Off 4 3 Audio inställningar Inställningar Inställningar Inställningar Inställningar Inställningar För att återgå till SETUP skärmen Tryck på VÄNSTER För att avsluta Tryck på SETUP för att avsluta eller välj EXIT från SETUP skärmen Tänk på Om du har en Dolby Digital 5 1 eller DTS förstärkare ...

Страница 70: ... PLAY SEL 4 Tryck på UPP NER för att välja önskad inställning 5 Tryck på PLAY SEL 4 3 Audio inställningar fortsättning Inställningar Inställningar Inställningar Inställningar Inställningar Audio Setup Move Select SETUP Quit Digital Out Analog Out 2 Channel För att återgå till SETUP skärmen Tryck på VÄNSTER För att avsluta Tryck på SETUP för att avsluta eller välj EXIT från SETUP skärmen ...

Страница 71: ...NER för att välja On eller Off och tryck sedan på PLAY SEL Viktigt Om du ställer in MMC SD inställningen till On kan DVD spelaren bara läsa MMC SD kort Inga skivor kan spelas Under avspelning av en skiva kan du trycka på knappen Mode för att växla till MMC SD läge Custom Setup Move Select SETUP Quit MMC SD Parental Ctrl Password Angle Mark On Off Inställningar Inställningar Inställningar Inställni...

Страница 72: ...vån första gången 5 Tryck på UPP NER för att välja önskad nivå 6 Tryck på PLAY SEL Förklaringar av nivåerna 3 PG I sällskap av förälder Parental Guidance suggested 4 PG13 Olämpligt för barn under 13 år 6 R Restriktion ej för barn under 17 utan sällskap av vuxen 7 NC17 Olämpligt för barn under 17 För att återgå till SETUP skärmen Tryck på VÄNSTER För att avsluta Tryck på SETUP för att avsluta eller...

Страница 73: ...sinställda lösenordet 0000 5 Mata in det nya lösenordet och tryck på PLAY SEL 6 Mata in det nya lösenordet igen för att bekräfta och tryck på PLAY SEL Custom Setup Move Select SETUP Quit MMC SD Parental Ctrl Password Angle Mark t Old _ _ _ _ New _ _ _ _ Verify _ _ _ _ Inställningar Inställningar Inställningar Inställningar Inställningar 4 4 Egna inställningar fortsättning För att återgå till SETUP...

Страница 74: ... eller Off och tryck sedan på PLAY SEL MÄRK Om du trycker på knappen ANGLE ändras kameravinkeln för filmer med flera kameravinklar oavsett om funktionen ANGLE MARK är på eller av On eller Off Custom Setup Move Select SETUP Quit MMC SD Parental Ctrl Password Angle Mark On Off 4 4 Egna inställningar fortsättning Inställningar Inställningar Inställningar Inställningar Inställningar För att återgå til...

Страница 75: ...ÖGER för att välja Read och tryck sedan på PLAY SEL UNDANTAG Nivåinställningen för visning och lösenordet återställs INTE även om du återgår till fabriksinställningarna Custom Setup Move Select SETUP Quit Parental Ctrl Password Angle Mark Default Read Inställningar Inställningar Inställningar Inställningar Inställningar 4 4 Egna inställningar fortsättning För att återgå till SETUP skärmen Tryck på...

Страница 76: ...e Close Close MÄRK Alternativet Zoom innebär att skärmbilden beskärs i över och underkant Alternativet Close innebär att skärmen stängs av och strömindikatorn blinkar med gult ljus För att avsluta Tryck på LCD igen tills LCD inställningsrutan försvinner Färginställningar 1 Tryck på LCD för att visa LCD inställningsrutan på skärmen 2 Tryck på UPP NER för att välja Color och tryck sedan på PLAY SEL ...

Страница 77: ...selected setting Tryck på UPP NER för att välja önskad inställning Den önskade ljusstyrkan ställs nu in 3 3 3 3 3 Panel Panel Panel Panel Panel 2 2 2 2 2 Color Color Color Color Color 1 1 1 1 1 Bright Bright Bright Bright Bright 0 0 0 0 0 1 1 1 1 1 2 2 2 2 2 3 3 3 3 3 Inställningar Inställningar Inställningar Inställningar Inställningar För att avsluta Tryck på LCD igen tills LCD inställningsrutan...

Страница 78: ...Torka bort fingeravtryck från skivan med en mjuk trasa torka från mitten och utåt mot kanten Ibland kan små bildstörningar uppstå Detta är normalt Kraftiga bildstörningar eller ingen färgbild Skivformatet är inte kompatibelt med TV apparaten PAL NTSC Bildstörningar uppstår vid snabbavspelning Ibland uppstår smärre bildstörningar Detta är normalt framåt eller bakåt Snabbavspelning framåt eller bakå...

Страница 79: ...repor som kan förorsaka missljud eller att ljudet hoppar Om skivor flyttas direkt från en kall till en varm plats kan det bildas fukt på skivan Torka av fukten med en mjuk torr och luddfri trasa innan skivan spelas Felaktig skivförvaring Skivorna kan skadas om de förvaras på följande platser Områden utsatta för direkt solljus På fuktiga eller dammiga platser Områden direkt utsatta för värmeutsläpp...

Страница 80: ...6 mm tunna skivor som sitter ihop Ju tunnare skiva desto högre densitet som information kan spelas in med därför har en DVD skiva högre kapacitet än en 1 2 mm tjock skiva Eftersom de två tunna skivorna sitter ihop finns även möjlighet att i framtiden kunna spela in på båda sidor av skivan och på så sätt uppnå ännu längre avspelningstid Textning Detta är texten som visas längst ner på skärmen med e...

Отзывы: