background image

Doing more with your camera

12

www.kodak.com/go/easysharecenter

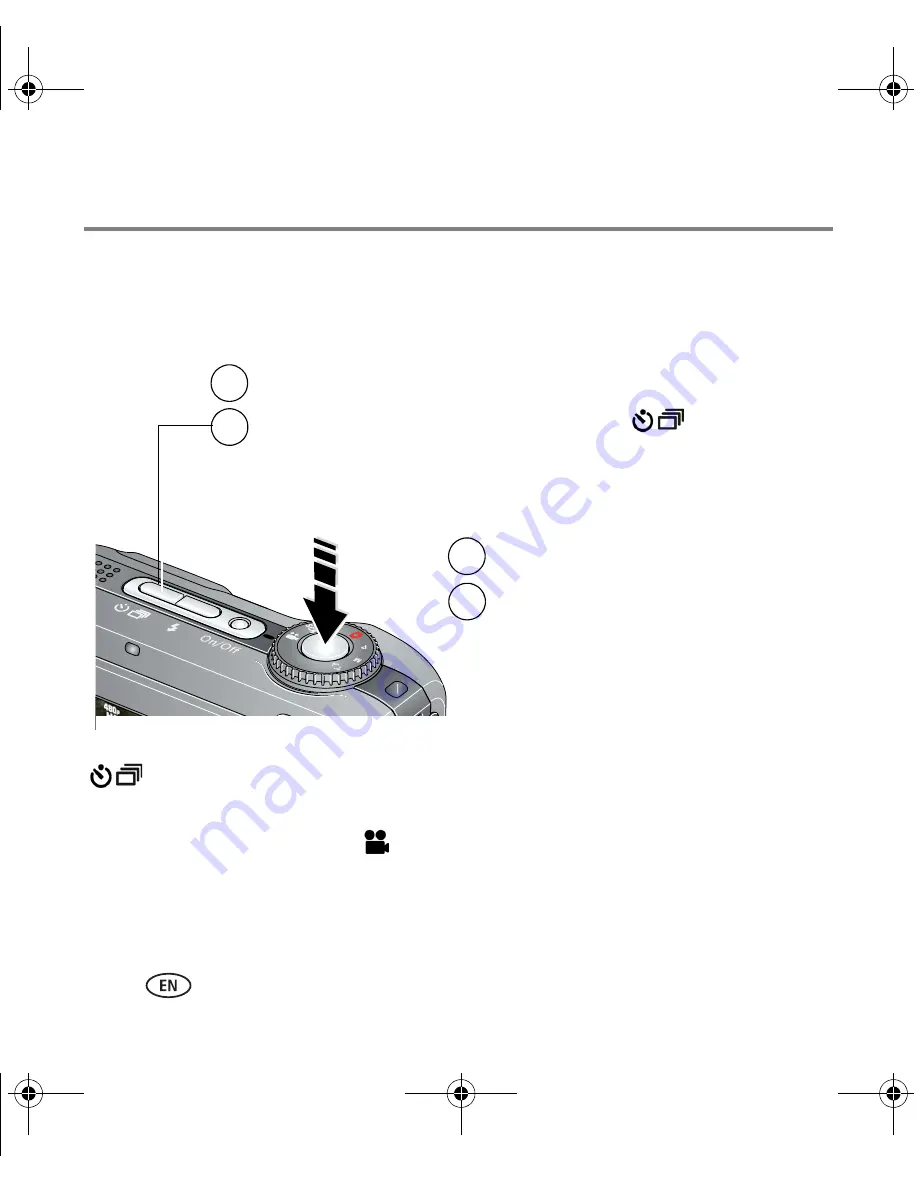
Using the self-timer

Use the self-timer when you want to be included in a picture, or to ensure a steady 
Shutter button press.

To cancel the self-timer before the picture is taken, press the Self-timer/Burst button 

, or press the Shutter button completely down.

Use the same procedure to use the self-timer in Video mode, but:

Turn the Mode dial to Video 

.

Press the Shutter button completely down.

NOTE:  The video stops when no storage space remains. Only the 2- and 10-second options are available in 

video mode.

1
2

Place camera on a tripod or flat surface.

Compose the scene.

Press the Shutter button halfway, then 
completely down.

• Once for a 10-second delay (so you have time to get into the scene)


• Again for a 2-second delay (for a steady, auto-shutter release on a tripod)


• Again for 2-shot (one picture taken after 10 seconds and another picture

In most Still modes, press the Self-Timer/Burst button:

taken 8 seconds later)

4

3

The picture is taken after the delay.

urg_00929.book  Page 12  Wednesday, June 18, 2008  2:21 PM

Содержание 8070039

Страница 1: ...user guide Before connecting any cables install the software that was included with your camera Follow the on screen instructions Kodak lithium digital camera battery CRV3 non rechargeable Kodak Li Ion rechargeable digital camera battery KLIC 8000 rechargeable 2 AA lithium batteries non rechargeable Alkaline batteries are NOT compatible urg_00929 book Page 1 Wednesday June 18 2008 2 21 PM ...

Страница 2: ...ing on the camera Setting the language date time See the Extended user guide www kodak com go z1485support to change OK to accept to change OK to accept Language Date Time for previous next field urg_00929 book Page 2 Wednesday June 18 2008 2 21 PM ...

Страница 3: ...485support 2 Pictures Videos 1 2 1 Press the Shutter button halfway to focus When the Ready light turns green press the Shutter button completely down Press the Shutter button completely down and release To stop recording press the Shutter button again Framing marks Ready light Smart Capture mode Video mode urg_00929 book Page 3 Wednesday June 18 2008 2 21 PM ...

Страница 4: ...odak EasyShare printer dock or camera dock May be sold separately For dock compatibility visit www kodak com go dockcompatibility To purchase accessories visit www kodak com go z1485accessories To use an EasyShare dock see its Getting Started Guide Turn on camera 3 Connect USB cable 1 Turn off camera Kodak EasyShare software opens on your computer and prompts you through the transfer process 2 USB...

Страница 5: ...a built in Help system It describes every setting for every menu choice If you learn nothing else about your camera learn how to use on camera Help Because the more you know your camera the more confident you become See the Extended user guide www kodak com go z1485support Turn off Help Scroll through a Help topic OK Press the Menu button then highlight a menu choice Press 1 2 Menu urg_00929 book ...

Страница 6: ...erred pictures to your computer Visit www kodak com go z1485support and www kodak com go easysharecenter for the Extended user guide interactive troubleshooting and repairs interactive tutorials FAQs downloads accessories printing information product registration Keep learning Finish reading this book so you can take and share your best pictures urg_00929 book Page 6 Wednesday June 18 2008 2 21 PM...

Страница 7: ...ISH Front view 1 Mode dial 6 Self timer Burst button 2 Shutter button 7 Flash 3 Self timer Video light 8 Speaker 4 On Off button 9 Microphone 5 Flash button 10 Lens 5 4 1 9 6 8 2 10 3 7 urg_00929 book Page 7 Wednesday June 18 2008 2 21 PM ...

Страница 8: ...Ready light 11 Share button 4 Info button 12 Menu button 5 Delete button 13 Review button 6 Wide angle W button 14 Battery compartment 7 Telephoto T button 15 Tripod socket 8 Slot for optional SD or SDHC card 16 Dock connector 2 1 9 10 11 12 13 14 15 3 4 5 6 7 8 16 urg_00929 book Page 8 Wednesday June 18 2008 2 21 PM ...

Страница 9: ... You can choose the best picture size and aspect ratio for your needs just press the Menu button and choose Picture Size 3 2 the best choice when making 4 x 6 prints 16 9 wide screen 4 3 the default setting Program More creative control page 20 Manual High ISO People in low light scenes Scene Point and shoot simplicity when taking pictures under special conditions Panorama Stitching 2 or 3 picture...

Страница 10: ...s Telephoto T or Wide Angle W to zoom in out 3 Take the picture Remember Use the auto focus framing marks page 3 As you zoom in move further from your subject Use digital zoom to get up to 5X beyond optical zoom while taking pictures Press Telephoto T to the maximum optical zoom Digital zoom is not available in Smart Capture mode Optical zoom Digital zoom urg_00929 book Page 10 Wednesday June 18 2...

Страница 11: ...low light hold the camera steady or use a tripod Not available in Smart Capture mode Red eye Reduction Preflash A preflash fires shrinking the eye pupil before the picture is taken Digital Correction A preflash does not fire the camera corrects red eye Flash to subject distance in Smart Capture mode Wide angle 19 ft 5 8 m Telephoto 10 2 ft 3 1 m Press the button repeatedly to scroll through flash ...

Страница 12: ...utton completely down NOTE The video stops when no storage space remains Only the 2 and 10 second options are available in video mode 1 2 Place camera on a tripod or flat surface Compose the scene Press the Shutter button halfway then completely down Once for a 10 second delay so you have time to get into the scene Again for a 2 second delay for a steady auto shutter release on a tripod Again for ...

Страница 13: ...Picture size Pictures time remaining Storage location Low battery Camera mode Flash Self timer Burst Focus mode Date stamp Tag name Framing marks Histogram Aperture ISO speed Shutter speed Exposure compensation Focus zone White balance Auto focus control Zoom indicator Exposure metering Framing grid urg_00929 book Page 13 Wednesday June 18 2008 2 21 PM ...

Страница 14: ...ts Using the undo delete feature If you accidentally delete a picture video use Undo Delete to retrieve it This feature is available only immediately after you delete a picture video in Review mode when the Undo Delete option appears 1 Press to highlight Undo Delete 2 Press OK The deleted picture video appears 3 Select Exit to exit the Delete menu urg_00929 book Page 14 Wednesday June 18 2008 2 21...

Страница 15: ...view 1 Press the Review button then the Menu button 2 Press to highlight a tab Review to view pictures videos Edit to edit pictures videos Setup for other camera settings 3 Highlight a setting then press OK Choose an option then press OK urg_00929 book Page 15 Wednesday June 18 2008 2 21 PM ...

Страница 16: ...o find a picture 2 Press the Menu button then to highlight the Edit tab 3 Press to highlight Sound Tag then press the OK button 4 Follow the screen prompts The sound tag is applied to your picture Press the Menu button to exit the menu Playing a sound tag 1 Press the Review button then to find a tagged picture 2 Press to play the sound tag 3 Press to adjust the volume 4 Press the OK button to stop...

Страница 17: ...3 Press to highlight the Date Favorite or Tag tab then to select a folder 4 Press to highlight a folder then press OK If you chose a Month Year folder press OK to see the Day folders When you are finished choosing tabs and folders highlight Exit and press OK 5 To see the results of your search highlight Save then press OK Pictures are displayed in multi up view Press to view them Press the Telepho...

Страница 18: ...r of prints Perfect Touch tech Picture number Image storage location Review mode Protected Low battery Selected picture Tag Relative picture location Email tag Favorite tag Video length Video number Image storage location Review mode Protected Selected video Scroll arrows Low battery Tag Relative video location urg_00929 book Page 18 Wednesday June 18 2008 2 21 PM ...

Страница 19: ...ngs Press the Info button for information about camera settings and options 1 Press the Menu button 2 Press to highlight a menu tab Capture for the most common picture taking settings Capture for other picture taking settings Setup for other camera settings 3 Highlight a setting then press OK Choose an option then press OK See the Extended user guide www kodak com go z1485support urg_00929 book Pa...

Страница 20: ...sh are maintained for P and M modes even when you change modes or turn off the camera Mode For Press to control Ease of auto shooting with full access to most menu options The camera automatically sets the shutter speed and aperture f stop based on the scene lighting Exposure compensation how much light enters the camera ISO speed and focus mode For definitions page 21 The highest level of creativ...

Страница 21: ...ings may be unavailable see P and M color options The arrows disappear when you cannot make further value changes 3 Take a picture Aperture also known as f stop control the size of the lens opening which determines the depth of field Smaller f stop numbers indicate a larger lens opening good for portraits and low light conditions Aperture Shutter speed Exposure compensation White selectable Grey n...

Страница 22: ...d M modes NOTE A higher ISO may produce unwanted grain or noise in a picture Focus mode select a large or concentrated area of focus Focus mode Description Normal AF Focus setting for general picture taking Macro Sharpness and detail in pictures at close range Use available light instead of flash if possible The camera automatically sets the focus distance depending on the zoom position The close ...

Страница 23: ... function visit www kodak com go z1485support and select Interactive Troubleshooting Repairs Shutter button does not work Turn on the camera page 2 Wait until the Ready light stops blinking red before attempting to take another picture Transfer pictures to the computer page 4 delete pictures from the camera page 14 or insert a card with available memory page 8 Camera freezes up when a card is inse...

Страница 24: ...en removing the battery allow it to cool it may be hot Follow all warnings and instructions supplied by the battery manufacturer Use only batteries approved for this product to avoid risk of explosion Keep batteries out of the reach of children Do not allow batteries to touch metal objects including coins Otherwise a battery may short circuit discharge energy become hot or leak Do not disassemble ...

Страница 25: ...circumstances beyond Kodak s control This warranty does not apply when failure is due to shipping damage accident alteration modification unauthorized service misuse abuse use with incompatible accessories or attachments such as third party ink or ink tanks failure to follow Kodak s operation maintenance or repacking instructions failure to use items supplied by Kodak such as adapters and cables o...

Страница 26: ...However there is no guarantee that interference will not occur in a particular installation If this equipment does cause harmful interference to radio or television reception which can be determined by turning the equipment off and on the user is encouraged to try to correct the interference by one or more of the following measures 1 reorient or relocate the receiving antenna 2 increase the separa...

Страница 27: ...SS 210 and FCC Rules Operation is subject to the following two conditions 1 this device may not cause harmful interference and 2 this device must accept any interference received including interference that may cause undesired operation EU It is the final user s responsibility to discard this equipment into an approved segregated collection scheme to enable its suitable treatment disposal and to i...

Страница 28: ...Use of this product in any manner that complies with the MPEG 4 visual standard is prohibited except for use by a consumer engaging in personal and non commercial activities Russian GOST R Eastman Kodak Company Rochester NY 14650 AIO 40 urg_00929 book Page 28 Wednesday June 18 2008 2 21 PM ...

Страница 29: ...support 29 China RoHS Eastman Kodak Company Rochester New York 14650 Eastman Kodak Company 2008 Kodak EasyShare and Perfect Touch are trademarks of Eastman Kodak Company 4F8396_en urg_00929 book Page 29 Wednesday June 18 2008 2 21 PM ...

Отзывы: