KOCASO M776H Скачать руководство пользователя страница 45


41 

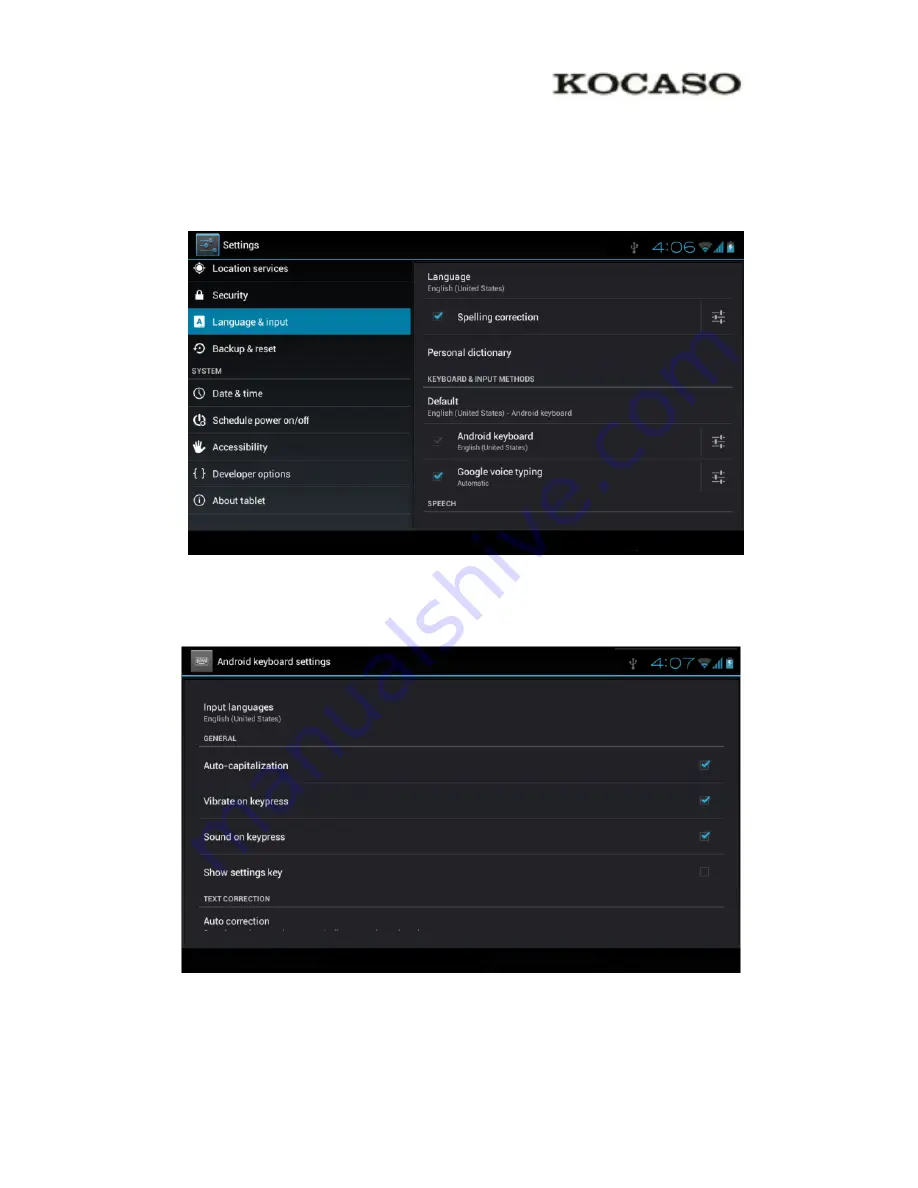
3.14 Language and Input Method 

Click  setting,  select  language  and  input  method,  choose  language  to  switch 

language, 


Picture 3.55 

Click 

setting

, choose 

language and input,

 choose 

Android keyboard setting, 

click 

input language, 

as Picture 3.56


Picture 3.56 


Содержание M776H

Страница 1: ...reen 2 2 4 Usage of Touch Screen 3 2 5 Home Page 4 2 6 Visit Application Procedures 7 2 7 USB Connection 7 2 8 Typing words 8 2 9 Operation Technique 10 3 Basic Setting 10 3 1 SIM Management 10 3 2 Wi...

Страница 2: ...Video 48 4 3 Photo Gallery 48 4 4 Camera 49 4 5 FM Radio 50 5 Communication Function 52 5 1 Phone 52 5 2 Text Message 52 5 3 Contact List 53 6 Internet 54 6 1 Browser 54 6 2 Email 56 7 GPS Function 58...

Страница 3: ...nufacturer permitted accessories to avoid damages to the product with possibly warranty loss Please kindly insert your SIM Card as follow Disclaimer The screenshots are for Android reference only They...

Страница 4: ...liability for the information offered in this document Box Contents Android Tablet PC Device charger DC 5V 2A USB Cable OTG Cable Earphone Canvas Bag Stylus Pen User Manual Note The IMEI number can be...

Страница 5: ...o below status icons New email Airplane Mode on USB connected USB debugging connected Return button Downloading Setting button Display recently used application Home button Current electric volume WIF...

Страница 6: ...menus display recently browsed history 2 2 Startup and Shutdown Startup Long press POWER key for three seconds you can enter into startup picture The system enters into screen lock status please unloc...

Страница 7: ...the main screen menu and application procedure in your TABLET Click When you want to use the screen keyboard typing or choose application in the main interface you only need to touch it by your finger...

Страница 8: ...t wallpaper folder widgets and shortcut Picture 2 2 The extended home page The home page can be extended beyond the wideness of screen to provide more space which you can put new added shortcuts and w...

Страница 9: ...e icon can also overlay several icons as Picture 2 4 2 Then click the overlayed icons the applications can be folded as Picture 2 5 Click the unnamed folder in the black box it will popup the hidden k...

Страница 10: ...appear icons 2 Drag the icon to the above of the remove icon till the icon become red then move your finger to delete the icon Change the wallpaper of desktop 1 In home page long press any blank spac...

Страница 11: ...nts you have to conduct storage configuration for your Tablet 1 Connect the TABLET and computer by USB cable the reminder column will show the remind information 2 Open the reminder board please view...

Страница 12: ...g finishes click shutdown the USB storage configuration to uninstall Notice When the TABLET is connected with USB cable and you open the USB storage configuration you can t view the memory card throug...

Страница 13: ...ed words typing methods in your TABLET 4 Tick the typing method you want Use and switch of input method Picture 2 8 1 switch the capital and small letter 2 switch the mode of words input 3 click to in...

Страница 14: ...e application shortcut icons in the desktop In the application interface or widgets interface long press any icon to switch into desktop automatically drag and hold the icon you can move to any positi...

Страница 15: ...choose SIM Management and click video call choose defaulted SIM card when makes video call as Picture 3 3 Picture 3 3 3 1 3 Message Click settings in main menu choose SIM Management click message choo...

Страница 16: ...ose SIM management click data connection choose the defaulted SIM card as Picture 3 5 Picture 3 5 3 2 Wireless and Internet 1 Connect Wi Fi 1 In the main menu or interface choose setting application p...

Страница 17: ...if it has password it will popup the password window enter password click connect Picture 3 6 2 Network 1 Click icon in right top as Picture 3 7 Picture 3 7 2 Input network SSID the wireless network n...

Страница 18: ...Notice when WIFI signal appears the right bottom will remind you available WLAN network as Picture 3 6 4 Keep WI FI on during sleep 1 Click icon in right top of Picture 3 8 select advanced 2 Click Kee...

Страница 19: ...surroudings click search device in right above then TABLET will automatically search the bluetooth device nearby As picture 3 10 Picture 3 10 1 Click the available Bluetooth device it will popup requ...

Страница 20: ...3 10 as Picture 3 12 select rename tablet you can rename it as you want Picture 3 12 2 Check visibility timeout Select visibility timeout setting in Picture 3 12 choose the time you want to set as Pi...

Страница 21: ...icture 3 12 you can view download and upload files 4 Bluetooth advanced setting Choose Bluetooth advanced setting in Picture 3 12 enter into Picture 3 14 Picture 3 14 5 File transmission Open file tra...

Страница 22: ...wo Bluetooth devices distance is quite far or connection is cut off the Bluetooth will remind you with sound 3 4 Data Usage Check SIM card data usage as Picture 3 15 Picture 3 15 Check WI FI data usag...

Страница 23: ...ed on WIFI and GSM can t get any signal then airplane mode is turned off WIFI and GSM module will recover to previous state 3 5 2 VPN Open VPN click add VPN network as Picture 4 17 Input name and serv...

Страница 24: ...k setting application in main menu 2 Click more when Wi Fi is well connected open network share and portable hotspot Picture 3 19 Picture 3 20 3 Click keep WI FI hotspots on choose open time 4 Return...

Страница 25: ...d should be more than 8 numbers 3 5 4 Mobile Networks 1 3G service Click 3G service as Picture 3 22 choose available defaulted SIM card GSM is 2G network and WCDMA is 3G network Picture 3 22 2 Access...

Страница 26: ...transmitters data through GPRS the webpage it visit belongs to wap webpage and CMNET support www browse mobile phone network it can also log in webpage in computer And the charges are also different 3...

Страница 27: ...S data prior mode After Open GPRS data prior mode systems will priority chooses your network 3 6 Contextual Model 1 Open settings click contextual model as Picture 3 26 Picture 3 26 2 Click standard t...

Страница 28: ...ET will vibrate when someone calls you 2 Volume In picture 3 27 click volume you can set ringtone notice and alarm volume as Picture 3 28 Picture 3 28 3 Voice call Ringtone In picture 3 27 click voice...

Страница 29: ...one In Picture 3 27 click video call ringtone to choose video call ringtone as Picture 3 30 Picture 3 30 Note Except standard silent meet outdoor are only for selection they can t be set 3 7 Display 3...

Страница 30: ...ness volume As Picture 4 31 Picture 3 31 4 Click OK after brightness is adjusted 3 7 2 Wallpapers 1 Click setting application 2 Click display click wallpaper 3 You can choose different wallpapers as y...

Страница 31: ...s turned off system won t rotate TABLET screen by G sensor 3 7 4 Sleep 1 Click setting appliation 2 Click display 3 Click sleep 4 Set the sleep time as you want as Picture 3 33 Picture 3 33 3 7 5 Font...

Страница 32: ...ABLET it will remind HDMI connector is connected 2 Click HDMI setting as Picture 3 35 Picture 3 35 1 Audio Open audio to realize HDMI audio output 2 Never Click never TABLET will never sleep 3 Video R...

Страница 33: ...OSD position setting TABLET will adjust OSD position setting as Picture 4 37 Picture 3 37 3 8 Storage Open setting function click memory click preferred install location you can choose isntall new ap...

Страница 34: ...ge space 3 Internal storage 1 System storage System storage is the spcae TABLET leave for system file as Picture 3 38 it can t be viewed Picture 3 38 2 Internal storage Internal storage is TABLET loca...

Страница 35: ...SD card You can check storage space SD card available space unmount SD card and erease SD card as Picture 3 40 Picture 3 40 Safely remove SD card 1 Click setting application 2 Click memory 3 Click un...

Страница 36: ...Battery Click setting function select battery you can view the battery situation as Picture 3 41 Picture 3 41 3 10 Application program 1 Click setting application in Apps 2 Select application after en...

Страница 37: ...33 Picture 3 42 1 View internal storage used space and left space as Picture 3 43 Picture 3 43...

Страница 38: ...34 1 View the working device used space and available space as Picture 3 44 Picture 3 44 3 11 Account and Sync 1 Select setting application 2 Open account and sync as Picture 3 45 Picture 3 45...

Страница 39: ...ck add an account as Picture 3 46 Picture 3 46 4 After successfully load it will open the sync function as Picture 3 47 Picture 3 47 3 12 Location service Click setting select location service as Pict...

Страница 40: ...pen GPS satellite you can use GPS to positioning TABLET 3 GPS Assistance Open GPS Assistance it can insrease the speed of GPS positioning but you need to insert SIM card and use data transimission 4 E...

Страница 41: ...ing A GPS you can inscease positioning speed through network 6 A GPS settings Click A GPS setting enter into Picture 3 50 Picture 3 50 7 Disable after reboot Click disable after reboot when you reboot...

Страница 42: ...etwork request TABLET can get your location through network 9 Network used Open network used you can choose network type as Picture 3 51 Picture 3 51 10 Server Click server it can switch location serv...

Страница 43: ...rtup or screen is locked Set unlocked picture 1 Click setting application in main interface 2 Click safe 3 Click locked the screen 4 Choose picture in text setting area 5 Click next following the remi...

Страница 44: ...Set unlock password 1 Click setting application in main interface 2 Click safe 3 Click screen locked 4 Set password in text seting area 5 Set new password letters and numbers and then click continue...

Страница 45: ...t Method Click setting select language and input method choose language to switch language Picture 3 55 Click setting choose language and input choose Android keyboard setting click input language as...

Страница 46: ...nguage list as Picture 3 57 Picture 3 57 Return to langauge and input method click default as Picture 3 58 select input method you want to use Picture 3 58 3 15 Backup and Reset Connect Wi Fi and logi...

Страница 47: ...and time 4 Turn off auto setting zone 5 Click Zone Selecting then choose the zone lists Slide down the list to view more zones 6 Click Date setting then click upper or down buton to adjust date month...

Страница 48: ...ick Setting application procedure 2 Click fixed tine startup and shutdown 3 Operate as below Picture 3 61 Picture 3 61 Click it into fixed time startup setting Click it into fixed time shutdown settin...

Страница 49: ...62 Picture 3 62 3 18 4 Install webpage script It will allow you install webpage scrip when you open system but it will increase the risk when you are browsing webpage 3 19 Engineer Selection 3 19 1 US...

Страница 50: ...n 3 19 5 Show screen update If you open screen refresh it will display related area when the area is refreshing 3 19 6 Show CPU usage After open CUP usage in the right top of TABLET will show CPU usag...

Страница 51: ...r into music player in menu or desktop click music icon to enter into music player click the music you want to play as Picture 4 1 Picture 4 1 Picture 4 2 Album Pause play Next song Previous song Arti...

Страница 52: ...video files in SD card and photo gallery will classify these photos and videos in folder You can apply photo gallery to view and edit photos set the photos as wallpaper and watch the video View pictur...

Страница 53: ...1 Click menu key to display menu selection 2 Then click crop click and drag related area to adjust the cropper 3 Click cropper and drag it inside and outside to adjust the image 4 After adjust the si...

Страница 54: ...tion as Picture 4 5 Picture 4 5 Click search to search FM band as Picture 4 6 Open speaker Play pause Enter into channel list Save button Previous channel Next channel Current frequency View the pictu...

Страница 55: ...setting as Picture 4 7 and choose the selection you want to add Picture 4 7 Save channels Click button in the main interface to save the channel and the channel will be saved in channels list Note Yo...

Страница 56: ...ne application procedure Operate as Picture 5 1 Picture 5 1 5 2 Text Message 1 Enter into main menu choose application procedure Display phone numbers Dial phone numbers The area of dial phone numbers...

Страница 57: ...ture 5 2 5 3 Contact List Click Contact list in the main interface enter into the contact list as Picture 5 3 Picture 5 3 Directly input phone number Add receiver Send message Attach some files Menu d...

Страница 58: ...click button enter into add contact interface 6 Internet 6 1 Browser In case of Wi Fi or mobile internet is connected well Please refer to Chapter 3 1 for wireless and internet setting click IE browse...

Страница 59: ...k start enter into related webpage then you can browse the website information as Picture 6 1 2 and you can click the menu you can refresh save to bookmarks share page bookmarks history and setting th...

Страница 60: ...mail address and password 3 Click Next step button choose your email type is POP3 or IMAP 4 Click Next Step button to check whether the email box servicer can receive or send emails 5 Input the email...

Страница 61: ...ess Menu key Menus will popup 4 Click Edit to enter into new email editing interface 5 Input the receiver s email address 6 Input the subject and email content 7 If you want to add attachment click me...

Страница 62: ...2 Enter into setting interface click icon enter into below picture 7 1 Picture 7 1 When positioning successfully the blue parts will turn to green color and it shows the latitude longitude height spee...

Страница 63: ...procedure enter into below interface as Picture 8 1 There are clock picture music and homepage buttons Picture 8 1 8 2 Calculator 1 Click 2 Enter into the basic board of calculator 3 Soft touch the n...

Страница 64: ...ments or the folder in the TF card it also will share the files install apk etc In the main menu or desktop click the document manager icon to enter into documents manager Picture 8 3 a Copy cut delet...

Страница 65: ...interface as Picture 9 4 you can operate the file or folder Picture 8 4 b Paste the copy or cut file choose the file you want to paste choose right top icon to enter into Picture 8 5 choose right top...

Страница 66: ...e choose any file long press it it will popup share choose the share way you want in the list Picture 8 7 d Install apk file Choose the file suffixed apk in the file manager you can install the third...

Страница 67: ...ick recorder icon to enter into record interface click record key to start record Click Stop key to stop recording Click Play key to play the recorded sound The system will auto remind you to use or a...

Страница 68: ...es this takes a strong fingernail or some similar item to peel it off Q Should I perform a Firmware Update Not necessarily This is actually intended if obscure issues with the tablet occur Unless you...

Страница 69: ...ues If this seems like abnormally poor performance just let us know Q Why does my screen not respond properly when I use the touchscreen This may be a couple of different things If this only occurs wh...

Отзывы: