background image

KOBIL Smart Card Terminal Manual 


Page 

9

4.3 

Connecting to PC with Windows Operating System 

The smart card terminal will be ready for operation as soon as it is connected 
to your PC. It requires no configuration. In order to enable your application to 
access the smart card terminal you need to install a driver. The subsequent 
sections will discuss the installation process in detail. 

4.3.1  Product: KAAN Standard Plus USB / SecOVID Reader Plus USB 

Note: Before connecting the KAAN Standard Plus / SecOVID Reader Plus you 
will have to install a driver! 
 
Note for Windows NT users: Windows NT will not support the USB variation of 
the smart card terminal at present. 

Step 1: Installing the Driver 

Start your PC. The smart card terminal 

has not yet been connected

. Insert 

the driver CD enclosed. The set-up should start automatically. In case it does 
not, use the Explorer to start the set-up manually. 
 

Note: Please quit all running programs before starting the set-up, 
because the PC will automatically reboot once the set-up has been 
executed.  

Step 2: Shutting down the Computer 

Setup will now cause your computer to shut down. Please switch off your 
computer off as soon as it has shut down.


Содержание KAAN Standard Plus

Страница 1: ......

Страница 2: ...ntained in this manual is subject to change without prior notification with no legal claims arising out of this fact Information that was unavailable until after this manual went into print may be found where applicable in the file README TXT on the enclosed data medium For further information on KOBIL smart card terminals technical assistance and other KOBIL security products confer the internet ...

Страница 3: ... Computer 13 Step 3 Connecting the Smart card Terminal 13 Step 4 Rebooting the Computer 15 How to Insert the Smart card 15 Function of the C button 16 4 4 Installing the Software 17 5 Security relevant Functions 18 5 1 Secure PIN Input 20 5 2 Secure PIN Change 21 5 3 SecOVID 23 5 3 1 SecOVID Online Mode 24 5 3 2 SecOVID Offline Mode 25 6 System Overview 27 7 The CT API 29 7 1 Functions 29 7 2 CT_i...

Страница 4: ...10 7 Read Binary 51 10 8 Write Binary 52 10 9 Reset 53 10 10 Reset CT 54 10 11 Request ICC 55 10 12 Deactivate 57 10 13 Eject ICC 58 10 14 Get Status 59 10 15 Input 60 10 16 Output 61 10 17 Perform Verification 62 10 18 Modify Verification Data 65 10 19 Reset 1 67 10 20 Set Interface Parameter 68 10 21 Freeze 69 10 22 Wait Freeze 70 10 23 ICC Application Commands 71 10 24 Selecting Synchronous ICC...

Страница 5: ...esponse DOs the designations of the functional units in the functional unit data object have been corrected in the following manner 01 ICC1 02 ICC2 40 display 50 keyboard V 1 2 DEC 3 02 Deployment area replacing the battery V 1 1 NOV 21 02 SecOVID online synchronous protocols TAGS table 9 image labels V 1 0 NOV 13 02 Initial version ...

Страница 6: ...ogramming Interface for German cash card type HTSI Host Transport Service Interface IA5 International Alphabet No 5 ICC Integrated Circuit Card ID Identification INS Instruction Byte KSS KAAN serial interface Protocol commands etc KVK Kranken Versicherten Karte German public health insurance card LED Light Emitting Diode P1 Parameter Byte 1 P2 Parameter Byte 2 PTS Protocol Type Select SAD Source A...

Страница 7: ... Device base station Quick guide for start up Image 1 shows the three security labels of the smart card terminal Since the smart card terminal is offering a variety of security related functions it is essential for the three decals displayed on the backside of the smart card terminal security labels to show that the housing has not been tampered with Please make sure that none of the three securit...

Страница 8: ...ers for MS Windows 9x ME NT 2000 XP as well as for Linux Solaris HP UX and OS 2 are enclosed Drivers for MS DOS versions 5 0 and higher as well as for MS Windows 3 1 can be obtained from KOBIL Systems upon request You will find other drivers as well as updated versions in the internet under www kobil com Image 1 Arrangement of Buttons and Security Labels ...

Страница 9: ... Plus SecOVID Reader Plus you will have to install a driver Note for Windows NT users Windows NT will not support the USB variation of the smart card terminal at present Step 1 Installing the Driver Start your PC The smart card terminal has not yet been connected Insert the driver CD enclosed The set up should start automatically In case it does not use the Explorer to start the set up manually No...

Страница 10: ...of your PC cf Image 2 Afterwards place the smart card terminal in the base station When doing so make sure that the triangular markings on the smart card terminal are exactly aligned with those of the base station cf Image 4 below Image 2 b Use the USB cable enclosed to connect the smart card terminal directly to a free USB port at your PC cf Image 3 Image 3 Note If you are using a USB hub please ...

Страница 11: ... the drivers is being displayed You may simply skip his warning message by clicking on Continue Installation How to Insert the Smart card Thanks to its card tray the KAAN Standard Plus SecOVID Reader Plus allows you to insert both smart cards of credit card size ID 1 format and smaller SIM cards ID 000 format Before inserting a normal smart card please make sure that the tray has been removed from...

Страница 12: ...ain visible Afterwards reinsert the emplaced card into the device cf Image 5 Image 5 Function of the C Button During the secure PIN input or during PIN change via the keyboard of the KAAN Standard Plus SecOVID Reader Plus the C button serves the purpose of deleting the digit last entered Pressing the C button before any digit has been entered or after all entered digits have been deleted will caus...

Страница 13: ... automatically If it does not use the Explorer to start the set up manually Note Please quit all running programs before starting the set up because the PC will automatically reboot once the set up has been executed Step 2 Shutting down the Computer The set up will now shut down your computer Please switch your computer off as soon as it has shut down Step 3 Connecting the Smart card Terminal Firs...

Страница 14: ...use into the adapter cf Image 6 Afterwards place the smart card terminal in its base station Make sure when doing so that the triangular markings are exactly aligned with those of the base station cf Image 8 below Image 6 b Use the Y cable enclosed to connect the smart card terminal directly to the serial interface COM1 or COM2 of the PC nine pin socket The power is supplied through a PS 2 adapter...

Страница 15: ...ng message regarding the digital signature of the drivers is displayed You may simply skip his warning message by clicking on Continue Installation How to Insert the Smart card Thanks to its card tray the KAAN Standard Plus SecOVID Reader Plus allows you to insert both smart cards of credit card size ID 1 format and smaller SIM cards ID 000 format To insert a normal smart card please make sure tha...

Страница 16: ...ain visible Afterwards reinsert the embedded card into the device cf Image 9 Image 9 Function of the C button During the secure PIN input or during PIN change via the keyboard of the KAAN Standard Plus SecOVID Reader Plus the C button serves the purpose of deleting the digit last entered Pressing the C button before any digit has been entered or after all entered digits have been deleted will caus...

Страница 17: ...he steps as displayed on the screen Note Please quit all running program before starting the driver set up because your PC will automatically reboot after executing the driver set up Download updated version of the driver software under www kobil com Optionally you may install the files for software development in your workstation You will need these files only if you intend to develop application...

Страница 18: ...oved or destroyed Image 1 Arrangement of Buttons and Security Labels This is the only way to guarantee that the smart card terminal is functioning properly The security labels are printed on a special film making it impossible to remove a given label without destroying it Another security feature is the special imprint When exposed to UV light the lettering KOBIL will become visible The security l...

Страница 19: ...rd Terminals Replacing the batteries In case the batteries of your SecOVID Reader Plus need to be replaced you can request KOBIL Systems GmbH to take care of it against a charge In the process the batteries and the label on the battery compartment will be replaced To this end you will find a corresponding order form on our homepage http www kobil com Please note that the battery will only be repla...

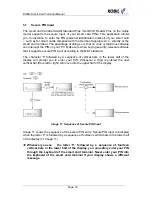
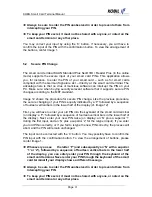
Страница 20: ...ng to the MKT standard The character P followed by a sequence of vertical bars in the lower half of the display will prompt you to enter your PIN Whenever a digit is entered the next vertical bar from left to right will move into the upper half of the display Image 11 Sequence of Secure PIN Input Image 11 shows the sequence of the secure PIN entry Secure PIN input is indicated when the letter P is...

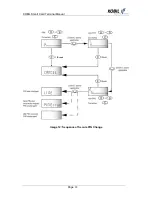
Страница 21: ...dicated by a P followed by a sequence of fourteen vertical bars in the lower half of the display cf Image 12 First you will have to enter your old PIN into the keyboard of the smart card terminal on display a P followed by a sequence of fourteen vertical bars in the lower half of the display Next enter your new PIN twice on display an N plus a superior 1 during the first input and an N plus a supe...

Страница 22: ...KOBIL Smart Card Terminal Manual Page 22 Image 12 Sequence of Secure PIN Change Break ...

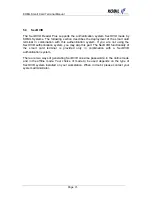
Страница 23: ...tem If you are not using the SecOVID authentication system you may skip this part The SecOVID functionality of the smart card terminal is provided only in combination with a SecOVID authentication system There are two ways of generating SecOVID one time passwords in the online mode and in the offline mode Your choice of mode to be used depends on the type of SecOVID system installed on your workst...

Страница 24: ... insert your SecOVID smart card and to enter your smart card PIN Next the secure PIN input confer Section 0 is used to accept the PIN of your SecOVID smart card If your SecOVID secured application supports more than one generator the proper generator will automatically be selected and will not need to be defined The SecOVID one time password will then be passed on to the application you called No ...

Страница 25: ...he string 0P000000 prompting you thereby to enter your PIN The 0 preceding the P indicates that the SecOVID generator 0 has been selected Use the key combination of F plus a digit button for the number of the respective generator to select another SecOVID generator where applicable The default setting is always generator 0 Contact your system administrator to find our whether your system is using ...

Страница 26: ...KOBIL Smart Card Terminal Manual Page 26 Image 14 SecOVID Offline ...

Страница 27: ...nfer Chapter 2 Abbreviations A description of this protocol is available from KOBIL Systems upon request Values deviating from the default settings of the transmission parameters can be set with the help of an application command Select Parameter from the API Image 15 System Overview 2 During operation you can switch back and forth among different types of smart cards i e diverse applications can ...

Страница 28: ... SLE 4418 and SLE 4428 I2C Bus 3 Phillips data sheet PCF8582E 2 Telephone cards 3 SLE 4401 SLE 4402 SLE 4403 SLE 4433 Table 3 Supported Protocols The flexible addressing of the T 1 protocol allows you to address various components of the card reader with the same ISO 7814 4 structured commands Image 16 Addressing the Card Reader Components via the API 3 Not supported by SecOVID Reader Plus ...

Страница 29: ...ed in excerpts A full version may be downloaded from the internet under the address http www ct api de The software included in the package contains a CT API driver in the form of a Windows DLL for 32 bit This must be interlinked with your own applications The versions for Solaris Linux and other operating system are also found on the enclosed CD 7 1 Functions The Card Terminal Application Program...

Страница 30: ..._init function should be called during the start of each program If an error occurs during the initialization of the interface the function will return the value 1 otherwise the value 0 Function char CT_init unsigned short ctn unsigned short pn Parameters Parameter Name Parameter Type Significance ctn Input parameter Logical card terminal number pn Input parameter Interface port number Table 5 Par...

Страница 31: ... terminal number 0 255 dad Input output parameter Destination address confer Table 7 sad Input output parameter Source address confer Table 7 lenc Input parameter Length of command in bytes command Input parameter CT control or application command lenr Input output parameter Length of the response in bytes response Input parameter Response to the command Table 6 Parameter for CT_data Device Addres...

Страница 32: ...ogical card terminal number Table 8 Parameters of CT_close For return codes confer Table 9 7 5 General Return Codes of the CT API Functions The return codes of all functions are homogenously listed in the following table Return Code Value Significance OK 0 Function call up was successful ERR_INVALID 1 Invalid parameter or value ERR_CT 8 CT error terminal not operational ERR_TRANS 10 Irremediable t...

Страница 33: ...at these can be evaluated as responses as well unsigned char response 300 field for the response of the function unsigned char command 300 Commands have a maximum length of 300 characters here int i unsigned int lenr int ct_port 2 Example COM 2 int ctn 1 first terminal Select logical terminal number and port COM2 if CT_init ctn ct_port OK Return Code OK printf nCard reader cannot be reached Port r...

Страница 34: ...ad 2 source Host PC dad 0 destination card lenr sizeof response maximum length of response command 0 0x00 CLA command 1 0xb0 INS command 2 0x00 P1 command 3 0x00 P2 command 4 0x00 Le printf Read binary return code d nData CT_data ctn dad sad 5 command lenr response for i 0 i lenr i printf 02x response i DEACTIVATE ICC sad 2 source HOST dad 1 destination CardTerminal lenr sizeof response maximum le...

Страница 35: ...ions The defined tags have the same significance for all files and commands of the car reader Length Length is coded in one or three bytes If the value of the first byte is somewhere in the range between 0 and 254 this reflects the length The value 255 indicates that the subsequent two bytes will state the length in the form of Hi Byte Lo Byte Value The value field uses various coding rules that a...

Страница 36: ...nce cards 10 Freeze 30 Serial switch on of the CT 40 Software update 80 EMV module 03 Memory size Integer The module to which the memory size relates is identified by the context 08 Update key Integer Index of keys for software updates 0E Card terminal number CTN Port assignment This tag may appear more than once if the driver supports several ports and CTs Matrix 1 byte card terminal number 2 byt...

Страница 37: ...n of the HOST PC 1E CWT Integer CWT in ms 1F BWT Integer BWT in ms 20 Physical properties of the smart card reader unit Enumeration 10 Ejector 30 Locking mechanism 40 Mini ICC 80 Uni colored LED 81 Bi colored LED 90 Acoustic signal A0 Transparent mode is supported 21 Status of smart card reader unit Enumeration 00 no ICC inside the reader unit 01 ICC in reader unit not activated 02 ICC in reader u...

Страница 38: ...otocol parameter Enumeration t b d 30 Freeze events Enumeration 01 ICC in contact unit 1 02 ICC in contact unit 2 03 no ICC in contact unit 1 04 no ICC in contact unit 2 40 Bit length Integer Bit length in machine cycles 41 CGT Integer CGT in etu 42 BWT Integer BWT in machine cycles 43 CWT Integer CWT in machine cycles 44 Protocol parameter in transparent mode Enumeration 00 Direct convention 01 I...

Страница 39: ...The file system always contains an active file that is referenced for the commands Read Binary Write Binary Erase Binary and Verify The active file is selected with the command Select File The active file can also be a directory After the reset the master file is set as active file 9 1 File Control Information The file control information consists of 10 bytes and has the following structure Byte S...

Страница 40: ...5 0 reserved Bit 6 0 reserved Bit 7 0 reserved Bit 8 MSB 0 reserved 4 5 Internal use 16 Bit binary pointer Table 12 Coding the Directory Entries The first entry of a given directory refers to the super ordinate directory parent At the root of the file system which is the master file the master file itself serves as super ordinate directory Directories can be read like normal files but not be inscr...

Страница 41: ...ly in the host driver Host configuration file ID FF 10 Host status file ID FF 11 Table 13 Card Reader File System One needs to differentiate between configuration files and status files Configuration files describe the properties of the card reader of a module or of a function unit They are not writable and their contents will not change Status files show the status of the card reader of a given m...

Страница 42: ...of the configuration and the properties of the HOST driver Tag Significance 0F Matrix for the representation of the link between the logical card terminal number the physical port and the type of interface 1C IFSC information field size for reception at the card reader end 1D IFSD information field size for reception at the host end Table 15 HOST Status File 9 6 CT Configuration File CT Configurat...

Страница 43: ...ocols 11 Supported baud rates 12 Options for the character component 13 Options for the block component 1E CWT 1F BWT Table 17 HOST CT Configuration File 9 8 HOST CT Status File HOST CT Status File ID 60 21 Set parameters of the HOST CT interface Tag Significance 03 Size of the protocol buffer 10 Supported protocols 11 Baud rate 12 Options for the character component 13 Options for the block compo...

Страница 44: ...ation File ID 70 20 Description of the supported properties of the ICC1 interface ID 71 20 Description of the supported properties of the ICC2 interface Tag Significance 03 Size of the protocol buffer 20 Supported options 22 Supported protocols Table 21 ICC Configuration File 9 12 ICC Status File ICC Status File ID 70 21 Status at the ICC1 interface ID 71 21 Status at the ICC2 interface Tag Signif...

Страница 45: ... inserted in contact unit 1 In the case of card terminals having several switching options the non communicating interfaces are deactivated by sending a command 10 1 CT Application Commands The syntax of the commands and the responses complies with ISO 7816 4 The commands also support the expanded file format The command structure as well as the response structure are represented in the two follow...

Страница 46: ... type var Reset CT 20 11 device rsp type Request ICC 20 12 device var var Time in sec Get Status 20 13 device var Deactivate ICC 20 14 device 00 Eject ICC 20 15 device var var Time in sec Input 20 16 50 var var Parameters var Output 20 17 40 00 var Parameters Perform Verification 20 18 device 00 var Parameters Modify Verif Data 20 19 device 00 var Parameters Reset1 20 1F device rsp type var Set In...

Страница 47: ...the representation of the individual commands SW1 SW2 Significance Possible causes 90 00 Error free processing 67 00 Incorrect length The structure of the command does not comply with ISO 7816 4 6E 00 CLA is not supported This command class on display is not supported 6A 00 incorrect parameter P1 and or P2 P1 or P2 shows an invalid value A value displayed for P1 or P2 is not supported by this impl...

Страница 48: ...nd Coding CLA 00 INS 0E P1 P2 Offset of the first byte to be erased Lc 0 or 2 Data field Where available Lc 2 Offset of the first byte not to be erased If not available Lc 0 all bytes up to the end of the data area will be erased Le leer Table 27 Coding the Erase Binary Command Special Status Displays SW1 SW2 Significance Possible Causes 69 85 Command not possible Erasing is not possible for the s...

Страница 49: ...2 bytes Verification of the user code bits 64 79 for the 4402 protocol CAUTION In case of successful verification the Bits 80 through 95 will be erased as a side effect Among other things these bits contain the error counter 81 4 bytes Verification of the frame code bits 320 351 for the 4402 protocol CAUTION In case of successful verification the frame memory bits 112 though 319 will be erased as ...

Страница 50: ...n active file within the CT file system The new file must be located in the active directory or must be the master file Exempt from this rule are the files in the host driver that can be directly addressed If Select File fails there will be no active file If the new active file is a directory this directory will become the new active directory Coding CLA 00 INS A4 P1 00 selection by file identifie...

Страница 51: ...bytes Table 34 Coding the Read Binary Command Special Status Displays SW1 SW2 Significance Possible Causes 69 82 No access authorization Reading of the file or the directory is password protected and the password verification has not been successfully performed yet 69 85 Access not possible There exists no active file or active directory Reading access is blocked 6B 00 Offset outside of file 62 82...

Страница 52: ...2 Significance Possible Causes 63 01 Premature end of file The end of the memory space reserved for the file was reached before the Lc bytes were written 65 00 Writing not possible Memory error 69 82 No access authorization The writing access to the file is password protected and the password verification has not been successfully performed yet 69 85 Command not possible There exists no active fil...

Страница 53: ... by a synchronous card the protocol byte is unknown 62 A6 No ATR compliant with ISO 7816 3 The ATR was received with the I2C protocol not compliant with ISO 7816 3 62 A7 no ATR compliant with ISO 7816 3 no protocol selected It was not possible to receive an ATR either in compliance with ISO 7816 3 nor to read the ATR with the I2C protocol 64 00 Reset unsuccessful It was not possible to execute a s...

Страница 54: ...lity within the public German healthcare systems subject to arrangement Coding CLA 20 INS 11 P1 00 terminal 01 ICC1 02 ICC2 only SecOVID Reader Plus P2 00 no responses 01 entire ATR 02 only historical characters as response Lc Empty Data field Empty Le Empty or 00 Table 40 Coding the Reset CT Command Special Status Displays Confer Reset command ...

Страница 55: ...lenge Coding CLA 20 INS 12 P1 Device 01 ICC1 02 ICC2 only SecOVID Reader Plus P2 Bits b8 b5 0 no display message A display message will show only if entered into the data field F no display message Bits b4 b1 0 no response data 1 entire ATR 2 only historical characters Lc Empty or length of data field Data field Empty or waiting period in seconds or TLV with the tags 50 display text coded as IA5 8...

Страница 56: ...7816 3 62 A7 No ATR compliant with ISO 7816 3 no protocol selected No ATR was received ISO 7816 3 nor was it possible to read the ATR with the I2C protocol 64 00 Reset unsuccessful No reset was executed for the card 64 01 Reset break The cancel button was pressed 64 A2 ICC not activated ICC was removed from the contact unit after the activation and reinserted 64 A3 Protocol not supported The ATR o...

Страница 57: ...t card Coding CLA 20 INS 14 P1 Device 01 ICC1 02 ICC2 P2 00 Lc Empty Data field Empty Le 00 Table 43 Coding of the Deactivate Command Special Status Displays SW1 SW2 Significance Possible causes 90 00 Command successful 64 A1 No ICC No ICC was activated Table 44 Special Status Displays for the Deactivate Command ...

Страница 58: ... display message will show whenever one is entered into the data field F0 no display message Lc 0 1 or length of data field Data field If available 1 byte will state the timeout until removal of the card or TLV structure 50 display text coded as IA5 limited set of characters 80 waiting period in seconds coded integer Le Empty Table 45 Coding the Eject ICC Command Special Status Displays SW1 SW2 Si...

Страница 59: ...units P1 00 80 status of ICC specified in P1 Lc Empty Data field Empty Le 00 Table 47 Coding the Get Status Command Special Status Displays SW1 SW2 Significance Possible Causes 90 00 Command successful Table 48 Special Status Displays for the Get Status Command Response DOs Value of P2 Significance 46 Manufacturer string 80 For each ICC one byte b8 b1 b3b2 01 ICC deactivated b3b2 10 ICC activated ...

Страница 60: ...ay 02 input is shown on the display in the form of the characters Lc Empty or length of data field Data field Empty or TLV with the Tags 50 display text coded as IA5 taking the limited set of characters into account confer Table 52 80 waiting period in seconds coded integer Le 00 Table 50 Coding the Input Command The default value for the timeout of the input is set at 15 seconds prior to the firs...

Страница 61: ...sible Causes 90 00 Command successful Table 53 Special Status Displays for the Output Command The following table lists the text displayed for possible ASCII characters text n d no display For all other values the character will be displayed Exceptions are the values 00 08 0A 0C and 20 which generate no output text display text display text display text display text display 30 0 3f 4e N 5d 6c L 31...

Страница 62: ...sponse For more details confer Chapter 5 1 Coding CLA 20 INS 18 P1 01 CT ICC interface 1 02 CT ICC interface 2 only SecOVID Reader Plus P2 00 user authentication via PIN pad Lc Length of data field Data field TLV with the Tags confer also ISO IEC 7816 6 on this point 52 command to perform control byte see below insert position raw command 4 50 display text for challenge to enter PIN is being ignor...

Страница 63: ...01 08 FF FF FF FF FF FF FF FF Insert position is 06 that is the sixth byte after the beginning of the Verify CHV command Once the PIN has been successfully entered the following command is sent to the card A0 20 00 01 08 34 37 31 32 FF FF FF FF After the input request consisting of the character P and fourteen vertical bars the PIN to be entered usually between four and eight digits is displayed o...

Страница 64: ...If the input request is not followed by the input of the next digit within 15 seconds default value or if more than 5 seconds expire between the input of the next consecutive digits no command will be sent to the smart card the standard display text CANCEL will be issued through the display and the return code SW1 SW2 6400 will be returned If the user simply forgot to press the confirmation button...

Страница 65: ...Plus P2 00 User authentication via PIN pad Lc Length of data field Data field TLV with the tags on this point confer also ISO IEC 7816 6 52 command to perform control byte cf 10 17 insert position OLD insert position NEW raw command 5 50 display text for the request for PIN input default P is being ignored 80 timeout in seconds BCD coded up to the input of the first digit is being ignored Le Empty...

Страница 66: ...Verification Data command in the smart card terminal begins with the output of the standard display text P The data object 52 Command to Perform should always be the last tag in the data field After the old PIN or the resetting code has been entered the standard display text N is issued bearing a superior 1 in the upper left hand corner of the screen After the new PIN has been entered the standard...

Страница 67: ... Command 10 19 Reset 1 Reset 1 executes a reset for asynchronous smart cards and provides the ATR If the interface to the smart card has already been activated it will not be completely deactivated before the reset and the power supply VCC remains consistent Note The Reset1 command was implemented in order to support the non ISO compliant protocol switch of some smart cards Coding CLA 20 INS 1F P1...

Страница 68: ...meter The Set Interface Parameter command effects the reset of the protocol of the protocol parameters or of the other adjustable properties at the identified interface When resetting the HOST CT interface the setting of the new parameters is effected after the transmission of the response from the Set Interface Parameters command A resetting of the protocol or of the protocol parameters at the IC...

Страница 69: ...the freeze status In the freeze status the card reader retains its current status and waits for the event identified by the freeze command to occur The freeze status begins with the transmission of the response to the freeze command The freeze status is simulated in the CT API DLL The freeze status is terminated as soon as one of the events identified by the freeze command has occurred or if a syn...

Страница 70: ...led up during a multiple thread process while CT_data Wait Freeze is being processed CT_data will be terminated with the return code ERR_HTSI Coding CLA 80 INS 71 P1 Timeout in minutes P2 Timeout in seconds Lc Empty Data field Empty Le Empty Table 66 Coding the Wait Freeze Command If the value 00 is entered in P1 and P2 no timeout will be performed Wait Freeze will not return until the freeze even...

Страница 71: ...y to forward the data addressed to an ICC or received from there to the respective destination address in transparent form That is each command to an ICC that is received by the HOST interface generally causes a response by an ICC to be transmitted to the HOST interface There are two instances that take exception to this principle The card terminal allows for access to synchronous smart cards by p...

Страница 72: ...next data transmission 64 A9 Irremediable ICC Protocol error An irremediable protocol error occurred during the communication with the ICC 64 AA PTS protocol error An error occurred during the PTS with the ICC 64 AB WTX error Communication with the ICC was interrupted because an extension of the waiting period requested by the HOST was denied 65 AB WTX error memory contents changed The communicati...

Страница 73: ...01 The data of the synchronous ICC are treated as a sequence of bytes the file is implicitly selected during the activation of the server module Attribute File 3F81 The data of the synchronous ICC are treated as a sequence of bytes Each data byte is followed by an attribute byte Bit 1 the bit of the lowest value of the attribute byte indicates whether the byte is read only protected The significan...

Отзывы: