Kobian VQ2220 Скачать руководство пользователя страница 7


     7

Audio Mode

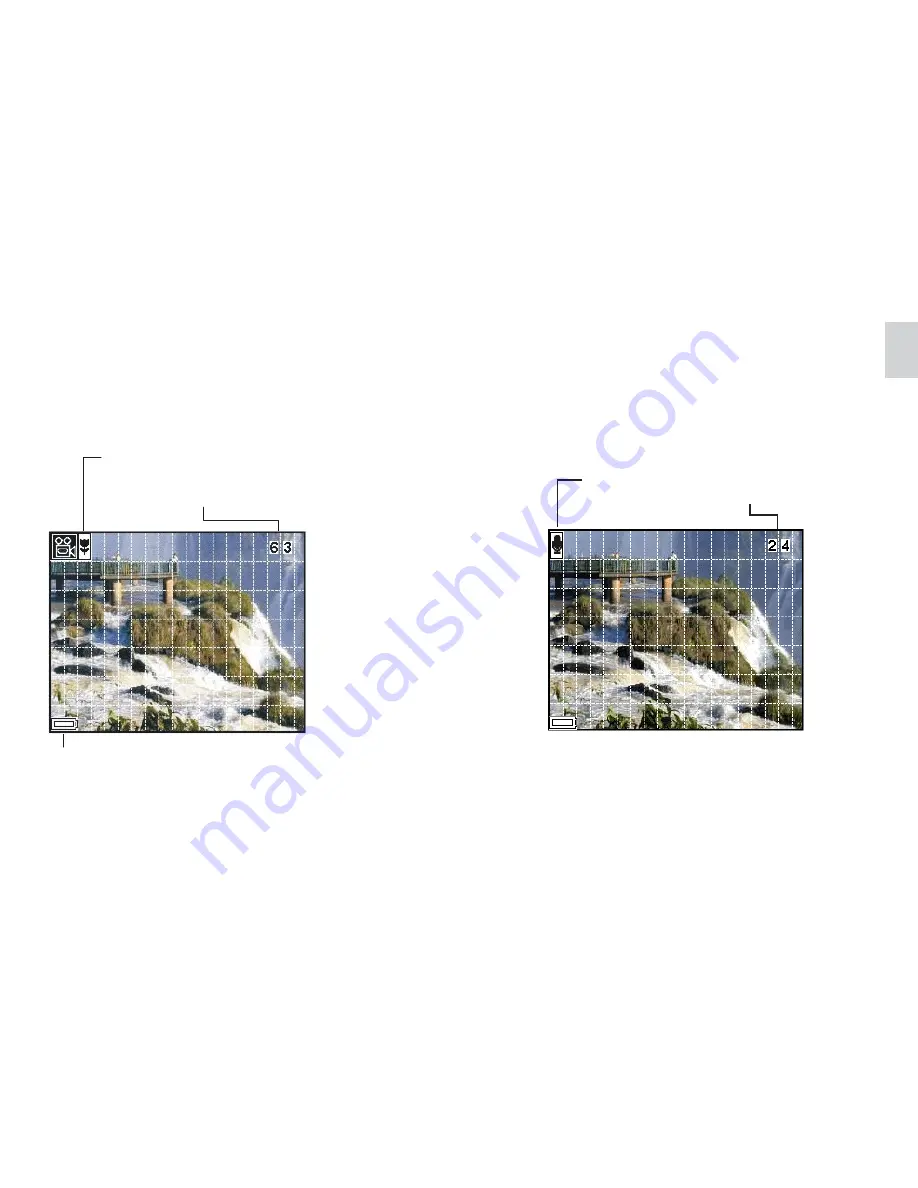
Memory capacity (Remaining
time (second) of storable audio).

F o c u s    M o d e    ( M a c r o / N o r m a l ) 

B a t t e r y    L e v e l 

M e m o r y    c a p a c i t y    -   R e m a i n i n g    t i m e ( s e c o n d )    o f    s t o r a b l e    v i d e o 
                                                              -   D e p e n d    o n    c a m e r a ' s    s t o r a g e    m e m o r y 

Video Mode

Audio Mode

Содержание VQ2220

Страница 1: ...iew 5 Top View 5 Monitor 6 1 Getting Started 8 1 1 Check List 8 1 2 Installing the Batteries 8 1 3 Installing the memory card 9 1 4 Turning the Camera On and Off 10 1 5 Checking the battery level 10 1 6 Automatic power off function 11 2 Camera Setting 12 2 1 Checking Camera Status 13 ...

Страница 2: ...ing the Pictures 24 3 1 Taking a Picture 24 3 2 Recording Macro Pictures 25 3 3 Recording Continuous Pictures 26 3 4 Recording a Video clip 27 3 5 Recording a Audio clip 28 3 6 Previewing the Pictures 29 3 7 Using Digital Zoom 30 3 8 Protect Picture s Against Deletion 31 3 9 Deleting Picture s from the Camera 32 4 Installing the Software onto a Computer 33 4 1 Installing the Software 33 ...

Страница 3: ... the Pictures on a computer 37 6 Using your camera as a Web Cam 38 6 1 Specification for Web Cam Mode 38 6 2 Setting up 38 6 3 Making a call 39 7 Troubleshooting Problems 40 7 1 Troubleshooting on camera 40 7 2 Error Message 42 8 Appendix 43 8 1 Technical Specifications 43 8 2 Operation Safety and Maintenance 45 8 2 1 Operation 45 8 2 2 Safety 45 8 2 3 Maintenance 45 ...

Страница 4: ...4 8 3 Using Your Batteries 46 8 4 Regulatory Information 46 8 4 1 Federal Communications Commission FCC Radio Frequency Interference Statement 47 8 4 2 Attention 47 ...

Страница 5: ...12345678901 123456789012345678901 123456789012345678901 123456789012345678901 123456789012345678901 12345678901234567890 12345678901234567890 12345678901234567890 12345678901234567890 12345678901234567890 Back View Bottom View Product Overview FrontView Battery Cover Tripod Socket Mode Selector Flash ViewFinder Macro Mode Switch Lens Power button Sutter button USB connector Multi Selector DISP but...

Страница 6: ...tor Photo Mode Exposure compensation Exposure compensation value Focus Mode Macro Normal Battery Level Memory capacity Remaining number of storable images Zoom factor Flash Mode Auto Flash On Flash Off W hite Balance AUTO DAYLIGHT SHADE TUNGSTEN FLUORESCENT Image Quality Fine Normal Image Size Large Middle Small Continuous shooting ...

Страница 7: ...Mode Memory capacity Remaining time second of storable audio Focus Mode Macro Normal Battery Level Memory capacity Remaining time second of storable video Depend on camera s storage memory Video Mode Audio Mode ...

Страница 8: ...talling the Batteries 4 x AAA Alkaline batteries are supplied with the camera Please insert the batteries according to the following steps Camera UserManual CD ROM USBCable W ristStrap 4xAAA Batteries Soft Case Protect Zoom factor Playback Mode ...

Страница 9: ...off open the battery cover and gently insert the memory card into the bottom until it is fully seated The label on the memory card should face the back side of the camera and make sure the card edge is inside the slot The 8M onboard memory and estimated capacities Recordable Images Audio and Video shown as below Use 8M Onboard Memory Fine Normal 2048 x 1536 9 12 1600 x 1200 12 16 800 x 600 37 51 V...

Страница 10: ...attery level Check the battery power level before taking pictures Turn the camera on and check the bat tery power level on the bottom left of the LCD monitor You can see the battery level sign on the follow ing mode Manual photo mode Auto photo mode Video mode and Audio mode When the battery power level is low you will see the camera screen shows as below Battery is full Battery power is low Pleas...

Страница 11: ...Your camera is designed to switch to power sav ing status automatically and save battery life af ter one minute or two minutes of non use Press any button to reactivate the camera or power turn off after 60 seconds in power saving status ...

Страница 12: ...e Auto Photo mode Audio mode Video mode EXPOSURE WB SETTING FORMAT 2 1 7 1 3 1 0 0 7 0 3 0 0 0 3 0 7 1 0 1 3 1 7 2 0 Manual Photo Mode Only AUTO DAYLIGHT SHADE TUNGSTEN FLUORESCENT DATE TIME DATE STYLE BEEP IMAGE SIZE QUALITY SELF TIMER LANGUAGE POWER SAVING 2001 01 01 00 00 ON OFF NORMAL FINE 2 3 4 5 6 7 8 9 10 1 Min 2 Min OFF NO YES LARGE MIDDLE SMALL Manual Photo Mode Only ...

Страница 13: ...will see the display shows the active features 2 Press one time to clean the feature icons 3 Press one more time to change to LCD off 3 Press one more time to return to the original display 2 1 Checking Camera Status Power the camera on browse the LCD monitor in the back side of the camera to check which settings are active If feature icon is not displayed it means that the particular feature is n...

Страница 14: ...ess one time to 2 Press choose function from the buttom of LCD display 4 Press to confirm 5 Set up completed 1 Turn on the camera 3 Press up or down to choose from 2 to 2 EV compensation 2 Press 2 3 Function Setting Press and choose the functions you want to set up from the LCD monitor 2 3 1 Exposure Compensation Setting 2 3 2 White Balance Setting ...

Страница 15: ...tems you would like to set up and see the following instruction to complete the settings z z z z z Date and Time Setting 5 Press to set Year and to move to the next 6 Repeat the same steps to set DAY TIME step by step 1 Turn on the camera in Auto Photo Mode 4 Press to DATE TIME 7 Press to return main frame 2 Press 3 Press two times to ...

Страница 16: ... Turn on the camera in Auto Photo Mode 4 Press one time to DATE STYLE and press 5 Press to select and press to confirm 6 Press to return main frame 3 Press two times to 2 Press z z z z z Date Style Setting ...

Страница 17: ...17 1 Turn on the camera in Auto Photo Mode 2 Press 4 Press two times to BEEP and press 5 Press to select and press to confirm 6 Press to return main frame 3 Press two times to z z z z z Beep Setting ...

Страница 18: ...18 3 Press two times to 2 Press z z z z z Image Size 4 Press 4 times to IMAGE SIZE and press 1 Turn on the camera in Auto Photo Mode 5 Press to select and press to confirm 6 Prss to reture main frame ...

Страница 19: ...19 z z z z z Quality 1 Turn on the camera in Auto Photo Mode 5 Press to select and press to confirm 2 Press 6 Prss to reture main frame 4 Press 5 times to QUALITY and press 3 Press two times to ...

Страница 20: ...ss to choose from 2 to 10 seconds 1 Turn on the camera in Auto Photo Mode 2 Press 3 Press two times to 7 Press to confirm 8 Press to return main frame 4 Press 6 times to SELF TIMER 5 Press z z z z z Self Timer ...

Страница 21: ...21 1 Turn on the camera in Auto Photo Mode 2 Press 3 Press two times to 4 Press 7 times to LANGUAGE 5 Press 6 Press to select and press to confirm 7 Press to return main frame z z z z z Language Setting ...

Страница 22: ...22 1 Turn on the camera 2 Press 3 Press two times to 4 Press 8 times to POWER SAVING 5 Press 6 Press to select and press to confirm 7 Press to return main frame z z z z z Power Saving Setting ...

Страница 23: ...23 2 Press 3 Press 3 times to 4 Press to select YES or NO and press to confirm 5 The camera will return to main frame after the set up is completed 1 Turn on the camera 2 3 4ToFormataMemoryCard ...

Страница 24: ...s by using viewfinder or LCD monitor 3 Press and hold the shutter button halfway down to lock AE and check the image To cancel the recording release the shut ter button 4 Hold the camera steadily and press the shutter button fully down Press the shutter button shown as below Before releasing shutter Half press Fully depressed Shutter Button ...

Страница 25: ...25 3 2 Recording Macro Pictures When you want to take a picture in a short distance you must set the selector to marcro You can frame close object at the distance of 20cm and take pictures ...

Страница 26: ...ess the RIGHT button to set burst mode 2 Repeat Take a Picture to take pictures When taking pictures at burst mode the camera will take five pictures continuously at 800 x 600 Remark You can use the burst mode at Manual Photo and Auto Photo mode Presss RIGHT button ...

Страница 27: ...r movie 3 Fully depress the Shutter release button again to stop recording Remark The camera records movies up to 15 frames per seconds in CIF size 320 X 240 pixels The file is recorded in AVI format DOS file extension avi Rec Fully depress the Shutter release button again to stop recording Fully depress the Shutter release button to start recording ...

Страница 28: ...s the Shutter release button to start recording your audio 3 Fully depress the Shutter release button again to stop recording Remark The camera records audio at 8KHz 4 bit Rec Fully depress the Shutter release button again to stop recording Fully depress the Shutter release button to start recording ...

Страница 29: ...camera 2 You can preview the pictures you took and use the multiselector to change the images 3 When there is no image in the memory card you will see the screen shown as below Press the Left button and move the picture forward Press the Right button and move the picture backward ...

Страница 30: ... Switch the mode dial to mode or mode and turn on the camera 2 Press the multi selector or to select the zoom rate up to 4 0x 0 2 step this camera build in with 4 times digital zoom 3 3 x 3 0 Press Press Press Press 3 x 2 4 x 2 8 ...

Страница 31: ... mode dial to mode and turn on the camera 2 Press button and then press 2 times to select function 3 After setting this image will not be deleted from camera Press Press two times to and press to confirm 1 3 100V2210 100V2210 100V2210 100V2210 1 3 1 3 1 3 ...

Страница 32: ...ial to mode and turn on the camera 2 Press button and then use to select or to delete one picture or all pictures 1 3 100V2210 Press This Printing Setting function will be available only for images storaged in SD card Press to delete all pictures Press to confirm ...

Страница 33: ...case needed while the installation 4 1 Installing the Software z Before you installing the software remem ber to close all other software applications you are using on your computer z Insert the CD supplied into the CD ROM driver of your computer z The user interface screen of the CD will au tomatically be launched z Please follow the instructions to complete the installation 1 Choose the language...

Страница 34: ...34 6 The system is ready to start setup click next if you want to complete the installation click cancel if you want to abort 7 Start to install please wait 8 Installtion completed ...

Страница 35: ...nitor 640 x 480 pixels or greater with 16 bit RGB or more color 800 x 600 pixels or more full color monitor recommended CD ROM Driver Required for installation Interface USB interface Accessories Standard mouse keyboard and stereo speakers 4 2 Computer system requirements We recommend the following minimum requirements for transferring and editing the images from camera to personal computer ...

Страница 36: ...cting to your computer This camera is equipped with a Universal Serial Bus USB for Win 98 Win 98SE Win 2000 Win Me and Win XP that is capable of direct connection to your computer via a USB cable Alternatively you can insert the memory card in a PC card slot or card reader where it will function as an additional disk 1 Open the USB connector Video output connector cover of the camera 2 Connect the...

Страница 37: ...ding mode Foldername 100V2210 Filename DSCIOOOO XXX DSCI stands for default file name for all image recorded OOOO stands for the serial number for the image recorded XXX if XXX shows JPG it is for still image if XXX shows AVI it is for moving image if XXX shows WAV it is for audio file For Win 98 users the drive recognizing the camera is E ...

Страница 38: ...lable USB port on your PC 3 Put your camera on the top of your PC monitor or another flat surface VideoResolution 160x 120 176x144 240x180 320x240 352x288 640x 480 VideoFormat RGB24 FrameRate 15fps VGA 30fps CIF canbeachievedbyPentiumIII 500 MHz 64MBRam ExposureRange On Off selectable Whitebalance Autoor Manual 4 modemanual daylight shade tungsten fluorescent Speaker Build in ...

Страница 39: ...you want to call and press the Place Call button To find your own IP address go to Start and click Run Type in winipcfg andclickOK IPconfigurationwindowwill appear and you can see your IP address 3 If you need further help on how to use Microsoft NetMeeting select the help under the manual bar and choose the topic you need Or you can visit the following website http www microsoft com windows netme...

Страница 40: ...ion activated zReplace battery zTurn the power on Image is not recorded when the shutter button is depressed zMode selector is set to off zMemory card is not compatible zMemory card is full zFlash unit is being charged zSet the mode selector to on zChoose a correct memory card zDelete some images zWait till the charging finished LCD is blank or images on the LCD are not clear zBright sunlight or h...

Страница 41: ...sh to auto or flash on zSet it to photo mode Color is different from the LCD screen while recording zBright sunlight or high intensity light is shining directly into the lens during recording zMove to a location or place the camera to prevent lens directly from shine Playback Pictures are not displayed zMode is not set to play zThe memory card does not contain picture data zAll image data in the m...

Страница 42: ...r of images z Transfer the images you want to save to a computer z Insert a new memory card This card can not be used z Wrong card z Memory card may be physically damaged z Check and make sure the card is compatible with this device z Check that there is no dirt in the connector or contact with service center for repair otherwise insert a new memory card if the damaged can t be recovered Battery L...

Страница 43: ...x 1200 800 x 600 Video Capture Resolution 320 240 w audio recording up to 15 frames per second M emory Capacity Internal 8M B N AND Gate Flash M emory External SD memory card Picture Capacity Quality setting Fine Please refer to Page 9 Video Capacity 63 sec video recording at 320 240 Audio Capacity voice recording about 29 min Exposure Range Auto M anual AE range 2EV to 2EV in 1 3 steps ...

Страница 44: ...r 1 5 TFT panel preview frame rate 30fps Environment Operating Temperature 0 to 40 o C 30 104 o F Storage Temperature 20 to 60 o C Operating Humidity 15 90 RH Storage Humidity up to 90 RH Power requirements 4 x batteries 1 5V Alkaline or 1 2V NiCd or Ni MH rechargeable Dimension 97 x 28 x 63 mm W x D x H Weight Approx 110g without battery Supplied Accessories User manual CD ROM English Spanish Ger...

Страница 45: ...ther injury z Do not use in the presence of flammable gas to prevent explosion or fire z Turn off immediately in the even of malfunction such as smoke or unusual smell from the camera or adaptor Turn off and remove the batteries and ask service center for inspection z Do not disassemble by yourself to prevent any injury by the internal parts Turn off and remove the batteries and ask service center...

Страница 46: ...vision z Rechargeable batteries are only to be charged under adult supervision z Non rechargeable batteries are not to be recharged z Insert the batteries with the right instruction or polarity z Do not mix up the different types of batteries or new and used batteries z Do not dispose the batteries in fire z Remove the batteries from the camera if they are exhausted or not in use These instruction...

Страница 47: ...ommunications However there is no guarantee that interference will not occur in a particular installation If this equip ment does cause harmful interference to radio or television reception which can be determined by turning the equipment off and on the user is encouraged to try to correct the interference by one or more of the following measures Reorient or relocate the receiving antenna Increase...

Отзывы: