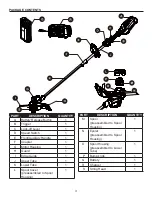
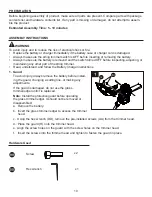
Kobalt 1438122 Скачать руководство пользователя страница 13

13

ASSEMBLY INSTRUCTIONS

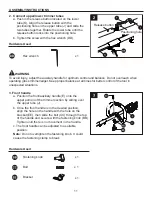
5. To Install the cutting line

Note: 

For 0.080 in. (2.0 mm) nylon line, do not put

         more than 13 feet of cutting line in at a time.

 
a.   Remove battery before installing new line.
b.   Line up the slots on the bump knob (P) with the

      slots on the spool cover (L).

c.   Insert line through the eyelet (N). Push

      line until it exits the opposite string head hole.


 d.   Pull the line through until there is an equal amount

       of line on each side.
 e.   Turn the bump knob (P) counterclockwise to begin

       winding the string into the string head (S). Leave

       approximately 5 inches of string protruding out of

       each side of the head.

Slots

Содержание 1438122

Страница 1: ...1438122 MODEL KST 2540 06 Español p 22 Serial Number Purchase Date Questions problems missing parts Before returning to your retailer call our customer service department at 1 888 3KOBALT 1 888 356 2258 8 a m 8 p m EST Monday Friday ATTACH YOUR RECEIPT HERE ...

Страница 2: ... 381 mm Line diameter 0 080 in 2 0 mm Cutting capacity Dual line Weight without battery 7 7 lbs 3 5 kg Product Specifications 2 Package Contents 3 Hardware Contents 4 Symbols 5 Safety Information 7 Preparation 10 Assembly Instructions 10 Operating Instructions 16 Care and Maintenance 18 Troubleshooting 19 Warranty 20 Replacement Parts List 21 ...

Страница 3: ... G Motor Housing 1 H Guard 1 I Edge Guide 1 J Upper Tube 1 K Lower Tube 1 L Spool Cover preassembled to Spool Housing 1 PART DESCRIPTION QUANTITY M Spool preassembled to Spool Housing 1 N Eyelet preassembled to Spool Housing 1 O Spool Housing preassembled to Lower Tube 1 P Bump knob 1 Q Battery 1 R Charger 1 S String Head 1 PACKAGE CONTENTS ...

Страница 4: ...4 HARDWARE CONTENTS not shown actual size Screw preassembled to the Guard H Qty 2 Fastening Knob Qty 1 Bolt Qty 1 Hex Wrench Qty 1 Bracket Qty 1 ...

Страница 5: ...rbits etc per minute Direct Current Type or a characteristic of current Safety Alert Indicates a potential personal injury hazard Read The Operator s Manual To reduce the risk of injury user must read and understand operator s manual before using this product Eye Protection Always wear eye protection with side shields marked to comply with ANSI Z87 1 Wet Conditions Alert Do not expose to rain or u...

Страница 6: ...e Vision Safety Mask for use over eyeglasses or standard safety glasses with side shields Always use eye protection that is marked to comply with ANSI Z87 1 SYMBOL SIGNAL MEANING DANGER Indicates an imminently hazardous situation which if not avoided will result in death or serious injury WARNING Indicates a potentially hazardous situation which if not avoided could result in death or serious inju...

Страница 7: ...or energizing appliance that have the switch on invites accidents Do not force tool Use the correct tool for your application The correct tool will do the job better and safer at the rate for which it is designed Do not operate the equipment while bare foot or when wearing sandals or similar lightweight foot wear Wear protective footwear that will protect your feet and improve your footing on slip...

Страница 8: ...ructions Do not open or mutilate the batteries Released electrolyte is corrosive and may cause damages to the eyes or skin It may be toxic if swallowed Do not place battery tools or their batteries near fire or heat This will reduce the risk of explosion and possibly injury Batteries can explode in the presence of a source of ignition such as pilot light To reduce the risk of serious personal inju...

Страница 9: ...he risk of fire Have servicing performed by a qualified repair person using only identical replacement parts This will ensure that the safety of the product is maintained Do not modify or attempt to repair the appliance or the battery pack as applicable except as indicat ed in the instructions for use and care Ambient temperature range String trimmer storage emperature range 4 F 20 C 158 F 70 C St...

Страница 10: ...ng or maintaining any other part of the string trimmer Read understand and follow the Battery Charger instructions 1 Guard To avoid injury always remove the battery before install ing the guard changing a cutting line or making any adjustments If the guard is damaged do not use the grass trimmer edger until it is replaced Note Install the protective guard before operating the grass trimmer edger I...

Страница 11: ...or better control of the tool in unexpected situations 3 Front handle a Position the front auxiliary handle E onto the upper portion of the trimmer section by sliding over the upper tube J b Once the front handle is in the desired position align the hole on the handle with the hole on the bracket EE then slide the bolt CC through the top of the handle and secure with the fastening knob BB Tighten ...

Страница 12: ...fore installing the guard changing a cutting line or making any adjustments 4 To remove the cutting line a Remove the battery from the trimmer b Turn the string trimmer over to access the spool c Remove the spool cover L by pressing on the two tabs parallel to each other on the sides of the spool cover L d Remove the spool M from the spool housing O and remove any excess line e Reinstall the spool...

Страница 13: ...he slots on the bump knob P with the slots on the spool cover L c Insert line through the eyelet N Push line until it exits the opposite string head hole d Pull the line through until there is an equal amount of line on each side e Turn the bump knob P counterclockwise to begin winding the string into the string head S Leave approximately 5 inches of string protruding out of each side of the head ...

Страница 14: ...er over to access the spool c Remove the spool cover L by pressing on the two tabs parallel to each other on the sides of the spool cover L d Remove the spool M from the spool housing O e While holding the bump knob firmly pull it out f Replace with a new bump knob Reinstall the spool and spool housing ...

Страница 15: ...to a cutting swath of 15 in a Remove the battery from the string trimmer b Remove both screws on the cut off blade with a Phillips head screwdriver c Rotate the cut off blade 180 d Replace both screws in the cut off blade Note Set the cut off blade to 13 in for greater runtime Set the cut off blade to 15 in for greater cutting area 7b To remove a Press the battery release button A on the string tr...

Страница 16: ...art c Release the trigger B to stop CAUTION Always allow 5 seconds or more for the cutting line spool to stop rotating after releasing the trigger Do not invert the grass trimmer edger or place your hands under the protective guard until the grass trimmer edger spool has come to a complete stop 2 Lengthening the line While the string trimmer is operating the cutting line gets worn down and becomes...

Страница 17: ...he line will cut as soon as it leaves the guard and the clippings are thrown away from you To produce a smoothly trimmed area move the grass trimmer edger out of the area being cut with consistent speed and height Use only the tip of the cutting line to do the trimming especially near walls and fences Trimming with the side of the cutting line may overload the motor wear out the line faster and br...

Страница 18: ...ve battery from the tool 1 Remove dirt and debris from guard using a paint brush not included 2 Clean dirt and debris off of motor cover and connection joints 3 Clean the grass in the air vents after trimming 4 Clean line cutter blades by using a wire brush and spraying with an appropriate degreaser ...

Страница 19: ...he latches on the battery compartment snap into place 2 Charge the battery according to the instructions included with your model 3 Call 1 888 3KOBALT 1 888 356 2258 for technical service Trimmer smokes during operation 1 Trimmer damaged 1 Do not use the string trimmer Trimmer head will not advance line 1 The motor shaft or trimmer head is bound with grass 2 Not enough line in the spool 3 Trimmer ...

Страница 20: ... purchase for a free replacement or refund or call 1 888 3KOBALT 1 888 356 2258 for warranty service This warranty is void if defects in materials or workmanship or damages result from repairs or alterations which have been made or attempted by others or the unauthorized use of nonconforming parts the damage is due to normal wear damage is due to abuse including overloading of the tool beyond capa...

Страница 21: ...rtment at 1 888 3KOBALT 1 888 356 2258 8 a m 8 p m EST Monday Friday PART DESCRIPTION PART BB Fastening knob 341201444 CC Bolt 322051444 DD Hex wrench 329011444 E Front auxiliary handle 341191444A EE Bracket 33304877B H Guard C1101005 00 S String head C1101008 00 Printed in China ...

Отзывы: