6
OPERATING INSTRUCTIONS
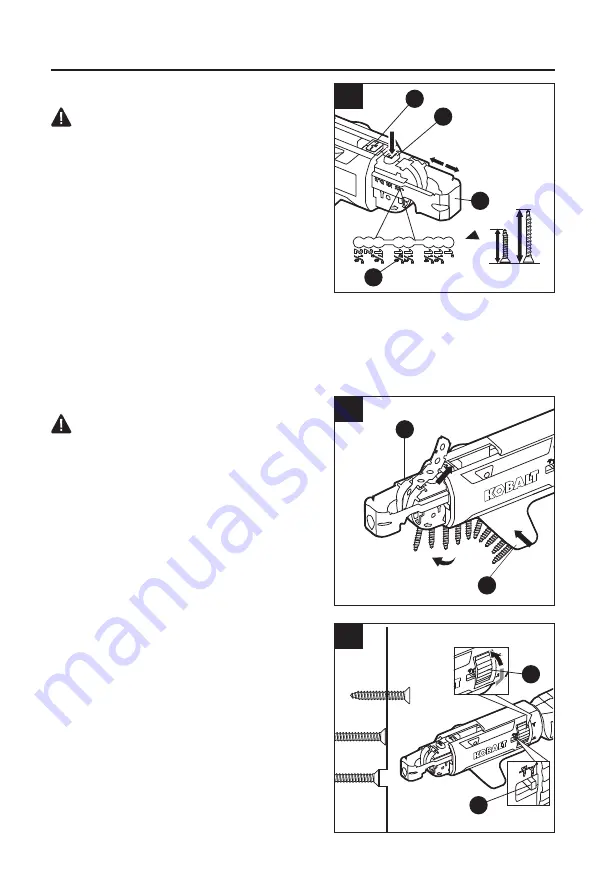
1. Setting Screw Length
WARNING
• Remove the battery before carrying out any
work on the power tool.
a. Press screw-length-adjustment button (E) and
hold it.
b. Pull or push the depth stop (A) to manually
adjust to the length of the screws you are
using.
c. The rib on the attachment will align with the
desired screw-length grooves on the screw
scale (B).
d. Release the locking button (F). Make sure that
the ribs snap into place and the depth stop is secured to the attachment before beginning
operation.
NOTICE:
Be sure that the raised ribs aligns with the groove on the screw scale and snap into
place properly. Improper adjustment of the depth stop can cause damage during operation.
2. Installing Screw Strips
WARNING
• Remove the battery before carrying out any
work on the power tool.
• Insert screw strips from the guide shaft (D) to
the guide rail (C).
NOTICE:
Be sure that the screw strip aligns with
the groove on the screw shaft and rail and insert it
into place. Improper operation can cause damage
during operating.
3. Adjusting Screw-in Depth
The depth can be adjusted by turning the depth-
adjustment dial (I). Begin each new job by driving
several test screws in scrap material to check and
adjust the depth setting.
a. Turn the depth-adjustment dial (I) clockwise
for less depth and counterclockwise for more
depth. The indicator on the display for screw-in
depth (H) can also help to show the depth.
b. Test drive screws in scrap material until you
obtain the desired depth.
2
D
C
3a
I
H
1″~2 1/8″
1
E
A
B
F


