ASSEMBLY INSTRUCTIONS
9
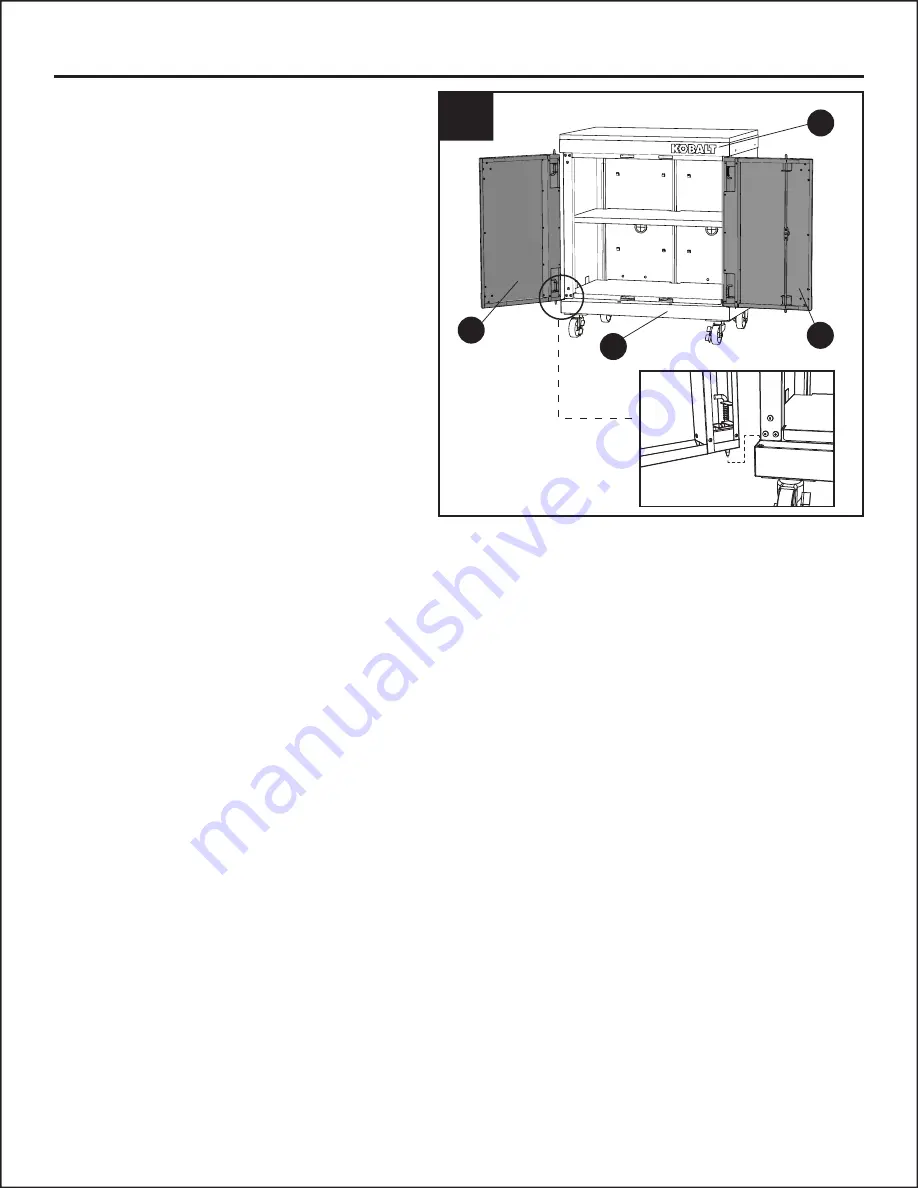
7. Lift and pull the L-shaped pivot pin on the
edge of the left door (I), aligning the
assembling holes of the base panel (E)
and top panel (F), then release. Repeat
for right door (J).
7
I
J
F
tooltip
E
Страница 1: ...partment at 1 888 3KOBALT 1 888 356 2258 8 a m 8 p m EST Monday Sunday ATTACH YOUR RECEIPT HERE ITEM 2368779 MODEL 0019002 28 IN 2 DOOR BASE CABINET Español p 11 KOBALT and logo design are trademarks or registered trademarks of LF LLC All rights reserved SM20259 A STEP BY STEP VIDEO ON HOW TO ASSEMBLE THE TOOLS NEEDED SCAN ME ...
Страница 2: ... for wood top Maximum load for bottom shelf Maximum load for adjustable shelf Maximum total load 100 lbs 100 lbs 100 lbs 300 lbs Package Contents 3 Hardware Contents 4 Safety Information 4 Preparation 5 Assembly Instructions 6 Troubleshooting 10 Warranty 10 Replacement Parts List 10 ...
Страница 3: ...ht back panel Left side panel Right side panel Base panel Top panel Bottom shelf PART DESCRIPTION QUANTITY H I J K L M 1 1 1 2 2 1 Adjustable shelf Left door Right door Fixed caster Swivel caster with brake Wood top PART DESCRIPTION QUANTITY B M D I J E C L G H A K F ...
Страница 4: ... or alter this unit for anything outside the designed function of storage Use care when handling and assembling metal plates Lock wheels when the product is not being moved The metal may have sharp edges or corners The use of protective gloves is recommended Close and lock the doors before moving this product Always remember to use proper lifting techniques when moving the boxed or assembled unit ...
Страница 5: ...the unit under any circumstances Do not leave children unattended near this product Cabinet may tip over if improperly opened Always use common sense and be cautious when using this product CAUTION Before beginning assembly of product make sure all parts are present Compare parts with package contents list and hardware contents above If any part is missing or damaged do not attempt to assemble the...
Страница 6: ...ether Tighten the screws Note Be sure to keep the back panels on a soft surface such as carpeting or a piece of cardboard to protect them from scratches 2 Slide preassembled screws into key slots of the assembled unit from Step 1 to connect left side panel C and right side panel D to the assembled unit Tighten the screws 1 2 B A A C A A B D C B ...
Страница 7: ...ded to use a rubber mallet to tap the components together Hardware Used 4 Check and verify the holes in front edge of base panel E and top panel F are aligned with the holes in left side panel C and right side panel D If not check and make sure the base panel E and top panel F are located at the right place Tighten the ST4 8 x 10 mm screws AA to the holes to make the unit securely fixed AA x 12 ST...
Страница 8: ...oks on the unit Note If the hooks are flatted during assembly use a slotted screwdriver not included to recover them 6 A H C G C D Hardware Used 5 Mount the two fixed casters K to the base panel E using M8 x 25 mm bolts BB M8 mm spring washers CC and M8 mm flat washers DD Repeat this process for the swivel casters with brake L on the opposite side of the base panel E Lock the swivel casters with b...
Страница 9: ...LY INSTRUCTIONS 9 7 Lift and pull the L shaped pivot pin on the edge of the left door I aligning the assembling holes of the base panel E and top panel F then release Repeat for right door J 7 I J F tooltip E ...
Страница 10: ...f Adjustable shelf Left door Right door Fixed caster Swivel caster with brake Wood top 2368779 A 2368779 B 2368779 C 2368779 D 2368779 E 2368779 F 2368779 G 2368779 H 2368779 I 2368779 J 106453 FC 106453 SC 2368779 M 106453 R 106453 PS 106453 RG 2368779 HDWR 2368779 HDWR 2368779 HDWR 2368779 HDWR 106453 LK 106453 LK DESCRIPTION PART R S T AA BB CC DD EE FF Door magnet Door L shape pivot pin spring...
Страница 11: ...la tienda llame a nuestro Departamento de Servicio al Cliente al 1888 3KOBALT 1 888 356 2258 de lunes a domingo de 8 a m a 8 p m hora estándar del Este ADJUNTE SU RECIBO AQUÍ KOBALT y el diseño del logotipo son marcas comerciales o marcas registradas de LF LLC Todos los derechos reservados UN VIDEO PASO A PASO SOBRE CÓMO ENSAMBLAR Y LAS HERRAMIENTAS NECESARIAS ESCANÉEME ...
Страница 12: ...arga máxima para la repisa inferior Carga máxima para la repisa ajustable Carga total máxima 45 35 kg 45 35 kg 45 35 kg 136 07 kg Contenido del paquete 13 Aditamentos 14 Información de seguridad 14 Preparación 15 Instrucciones de ensamblaje 16 Solución de problemas 20 Garantía 20 Lista de piezas de repuesto 20 ...
Страница 13: ...erdo Panel posterior derecho Panel lateral izquierdo Panel lateral derecho Panel de base Panel superior Repisa inferior PIEZA DESCRIPCIÓN CANTIDAD H I J K L M 1 1 1 2 2 1 Repisa ajustable Puerta izquierda Puerta derecha Rueda fija Rueda giratoria con freno Cubierta de madera PIEZA DESCRIPCIÓN CANTIDAD ...
Страница 14: ... función de almacenamiento para la que se diseñó Tenga cuidado al manipular y ensamblar las placas de metal Bloquee las ruedas cuando no desee mover el producto El metal puede tener bordes o esquinas afiladas Se recomienda el uso de guantes de protección Cierre y asegure las puertas antes de desplazar el producto Siempre recuerde usar técnicas adecuadas de levantamiento cuando mueva la unidad ya s...
Страница 15: ... No deje a los niños sin supervisión cerca de este producto El gabinete puede volcarse si se abre incorrectamente Siempre use el sentido común y tenga cuidado al usar este producto PRECAUCIÓN Antes de comenzar a ensamblar el producto asegúrese de tener todas las piezas Compare las piezas con la lista del contenido del paquete y la lista de aditamentos anteriores No intente ensamblar el producto si...
Страница 16: ...s posteriores Apriete los tornillos Nota asegúrese de mantener los paneles posteriores sobre una superficie suave como una alfombra o un trozo de cartón para evitar rayarlos 2 Deslice los tornillos preensamblados en los chaveteros de la unidad ensamblada en el Paso 1 para conectar el panel C y el panel del lado derecho D a la unidad ensamblada Apriete los tornillos 1 2 B A A C A A B D C B ...
Страница 17: ... de goma para unir los componentes Aditamentos utilizados 4 Compruebe y verifique que los orificios en el borde frontal del panel de base E y el panel superior F estén alineados con los orificios en el panel lateral izquierdo C y el panel lateral derecho D De lo contrario compruebe y asegúrese de que el panel de base E y el panel superior F estén ubicados en el lugar correcto Apriete los tornillos...
Страница 18: ...dad Nota si los ganchos se aplanan durante el ensamblaje use un destornillador de ranura plana no se incluye para recuperarlos Aditamentos utilizados 5 Monte las dos ruedas giratorias fijas K en el panel base E con pernos M8 x 25 mm BB arandelas de resorte M8 mm CC y arandelas planas M8 mm DD Repita este proceso para las ruedas giratorias con freno L en el lado opuesto del panel base E Bloquee las...
Страница 19: ...9 7 Levante y jale del pasador giratorio en forma de L ubicado en el borde de la puerta izquierda I alinee los orificios de ensamblaje del panel de base E y el panel superior F luego suelte Repita para la puerta derecha J 7 I J F E ...
Страница 20: ...l derecho Panel de base Panel superior Repisa inferior Repisa ajustable Puerta izquierda Puerta derecha Rueda fija Rueda giratoria con freno Cubierta de madera 2368779 A 2368779 B 2368779 C 2368779 D 2368779 E 2368779 F 2368779 G 2368779 H 2368779 I 2368779 J 106453 FC 106453 SC 2368779 M 106453 R 106453 PS 106453 RG 2368779 HDWR 2368779 HDWR 2368779 HDWR 2368779 HDWR 106453 LK 106453 LK DESCRIPCI...