Knox KN-DC20MP Скачать руководство пользователя страница 3

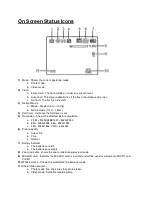
On Screen Status Icons 


1) 

Mode - Shows the current operating mode: 

a.  Photo mode. 
b.  Video mode.  

2) 

Flash  

a.  Force flash: The flash will be on under any environment. 
b.  Auto flash: The camera determines if the flash should be used or not. 
c.  No flash: The flash is turned off. 

3) 

Normal/Macro 

a.  Mode -  Mode (0.5m – infinity). 
b.  Macro mode (11cm – 18cm). 

4) 

Self-timer - Indicates the Self-timer is set 

5) 

Resolution - Shows the selected picture resolution 

a.  20 M = 5184X3888;14M = 4320x3240 
b.  8M = 3264x2448; 5M = 2592x1944 
c.  3M = 2048x1536; VGA = 640x480  

6) 

Picture quality 

a.  Super fine 
b.  Fine. 
c.  Normal 

7) 

Battery indicator 

a.  The batteries are full. 
b.  The batteries are empty.  

8) 

Zoom indicator - shows the zoom ratio during preview mode 

9) 

MicroSD card - Indicates the MicroSD card is inserted and will be used as storage for PHOTO and 
VIDEO 

10) 

White balance - Shows the selected White-balance mode. 

11) 

Photo/Video counter –  

a.  Photo mode: No. of pictures that can be taken. 
b.  Video mode: Available recording time.    

Содержание KN-DC20MP

Страница 1: ...xtra lighting when shooting in the dark the best shooting distance is within 1 5m 6 Lens Captures the image a Note Keep the lens clean Dirt and fingerprints will affect the quality of the picture 7 Bu...

Страница 2: ...ack mode press it to move to the right portion of the photo d In Video Playback mode press it for fast forward 14 Mode switch Press this button to switch between movie and still capture mode a In Play...

Страница 3: ...solution Shows the selected picture resolution a 20 M 5184X3888 14M 4320x3240 b 8M 3264x2448 5M 2592x1944 c 3M 2048x1536 VGA 640x480 6 Picture quality a Super fine b Fine c Normal 7 Battery indicator...

Страница 4: ...y card slot which may damage both the camera and the MicroSD memory card 2 The MicroSD memory card must be formatted before taking photographs See the following section for more information 3 Formatti...

Страница 5: ...itch to the front monitor Use the front monitor as a viewfinder to aim at yourself Press the Shutter button to take a photo of yourself 8 Self Timer Setting Set the camera to photo mode Press the Menu...

Страница 6: ...ake them under protection from being deleted by the camera follow the instructions below Press the Playback button to get into Photo playback mode Press the Left or Right button to select the photogra...

Страница 7: ...lowing the above 1 5 procedures Specifications Sensor 14 0 Mega pixels CMOS sensor Image resolution o 20 Mega pixels 5184X3888 o 14 Mega pixels 4320X3240 o 8 0 Mega pixels 3264x2448 o 5 0 Mega pixels...

Страница 8: ...ant to Part 15 of the FCC Rules These limits are designed to provide reasonable protection against harmful interference in a residential installation This equipment generates uses and can radiate radi...

Отзывы: