


OPERATING INSTRUCTIONS
12
BASIC DRILL PRESS OPERATIONS
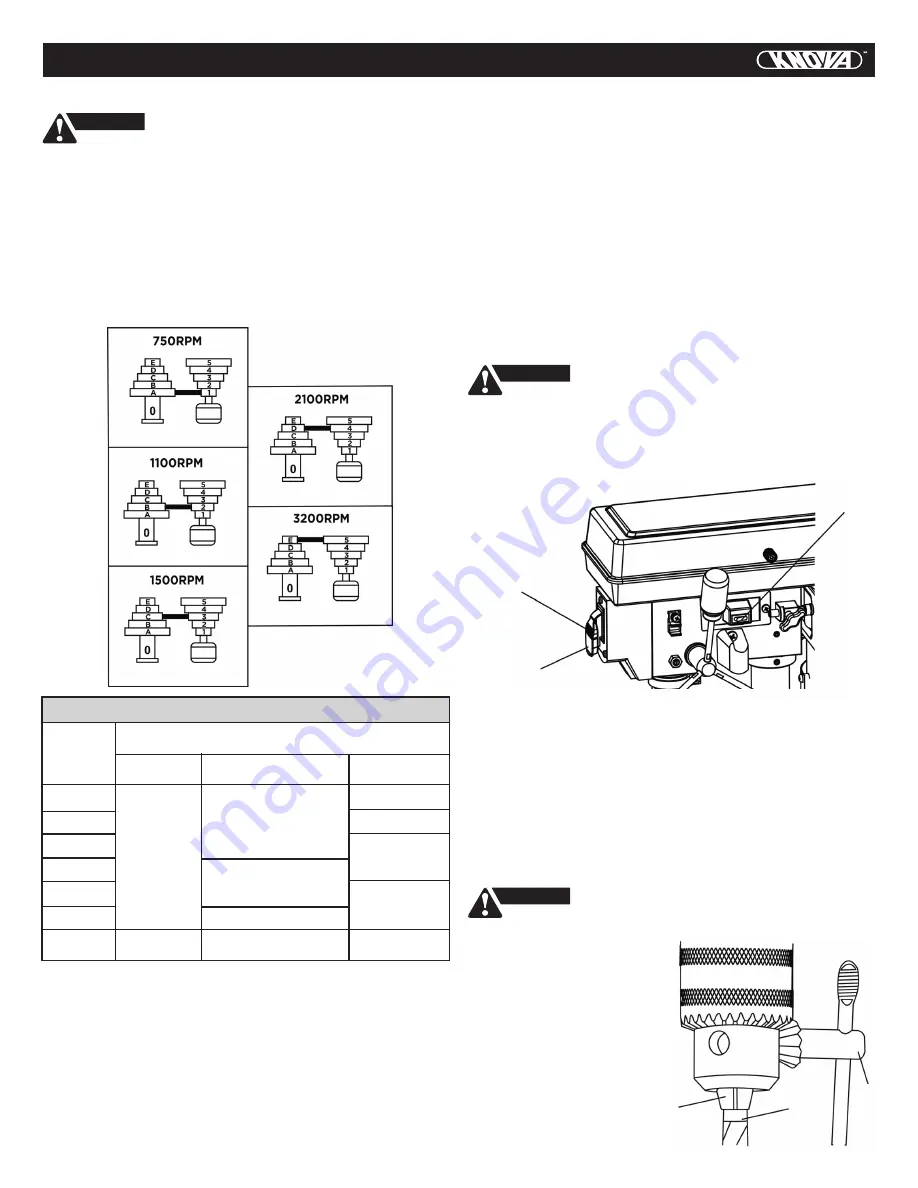
SPEEDS AND BELT PLACEMENT (FIG. Q)
This drill press has five operating speeds. Please see the
chart below for each speed and the placement of the belt to
obtain those speeds. This chart is also put on the inside of
pulley cover for reference.
WARNING
• To avoid possible injury, keep the pulley cover
closed while tool is in operation.
• Never connect the plug to the power source outlet
until all installations and adjustments are completed
and you have read and understood the safety and
operation instructions.
BELT: A-1
BELT: B-2
BELT: C-3
BELT: D-4
BELT: E-5
DRILLING SPEED TABLE (rpm)
Wood
Alum., Zinc, Brass
Iron, Steel
Material
1/16
1/8
3/16
1/4
5/16
3/8
1/2
3,200
2,100
1,500
1,100
750
3,200
2,100
1,500
1,100
Fig. Q
Drill bit
diameter
(Inches)
3,200
2,100
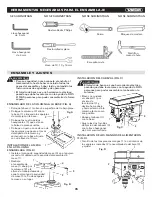
ON / OFF SWITCH PANEL (FIG. R)
The “ON / OFF” switch has a removable, safety key. With the
key removed from the switch, unauthorized and hazardous
use by children and others is minimized.
• To turn the drill press “ON,” insert the key (1) into the slot
of the switch (2), and move the switch upward to the “ON”
position.
• To turn the drill press “OFF,” move the switch downward.
• To lock the switch in the OFF position, grasp the sides of
the safety switch key, and pull it out.
• With the safety key removed, the switch will not operate
to power the drill press on.
• If the safety key is removed while the drill press is running,
it can be turned “OFF” but cannot be restarted without
inserting the safety key.
• Your tool is equipped with a laser guide. The laser beam
will enable you to preview the drill bit path on the
workpiece to be drilled before you begin your operation.
To turn the laser “ON,” press the rocker switch (3) to
the “ON” position. To turn the laser “OFF,” press the
rocker switch to the “OFF” position.
• Never leave the drill press unattended. Turn the power
switch “OFF” and wait until it comes to a complete stop,
and remove the safety key to prevent unauthorized starts.
WARNING
ALWAYS lock the switch “OFF” when the drill press
is not in use. Remove the safety key and keep it in a
safe place. In the event of a power failure, blown fuse,
or tripped circuit breaker, turn the switch “OFF” and
remove the safety key, preventing an accidental
startup when power comes on.
3
Fig. R
1
2
INSTALLING DRILL BIT IN CHUCK (FIG. S)
• With the switch “OFF” and the safety key removed, open
the chuck jaws (1) using the chuck key (2). Turn the chuck
key counterclockwise to open the chuck jaws (1).
• Insert the drill bit (3) into the chuck far enough to obtain
maximum gripping by the jaws, but doesn’t touch the
spiral grooves (flutes) of the drill bit when the jaws are
tightened.
• Make sure that the drill is centered in the chuck.
• Turn the chuck key clockwise to tighten the jaws.
WARNING
To avoid injury or accident by the chuck key ejecting
forcibly from the chuck
when the power is
turned “ON”, use only
the self-ejecting chuck
key supplied with this
drill press. ALWAYS
recheck and remove
the chuck key before
turning the power
“ON”. Place the chuck
key into its storage
holder when not
in use.
2
1
3
Fig. S
Содержание KN DP-2000N
Страница 1: ...KN DP 2000N Bench drill press8 Taladro de columna de banco 203 2 mm ...
Страница 18: ...EXPLODED VIEW 17 Bench drill press8 Taladro de columna de banco 203 2 mm KN DP 2000N ...
Страница 36: ...Bench drill press8 Taladro de columna de banco 203 2 mm KN DP 2000N DIAGRAMA DE ENSAMBLADO 35 ...
Страница 37: ...NOTES NOTAS 36 ...
Страница 38: ...NOTES NOTAS 37 ...
Страница 39: ...NOTES NOTAS 38 ...
Страница 40: ...www knova com mx ...


