


User's Manual
LINE 212-6 / LINE 212-9
KLING & FREITAG GMBH ©2003 - 2005
Version 5.0, 23.03.2006
Seite 15 von 37
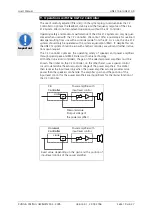
7.
Coverage Pattern of the Line 212 Systems
The Line 212 can be operated in a vertical or horizontal position. The coverage pattern
of the speaker can be adapted to special needs by a 90° rotatable horn.
The following graphics demonstrate how to recognize how the built-in horn emits in a
standing speaker: To determine the coverage pattern of the high frequency horn,
shine a flashlight through the front covering at the level of the horn. You will find a
silver stripe that determines the position and coverage angles of the horn.
DEFINIT
DEFINIT
DEFINIT
DEFINITIIIION:
ON:
ON:
ON:
Standing speaker:
Model
Model
Model
Model
Horn not rotated
Horn not rotated
Horn not rotated
Horn not rotated
Horn r
Horn r
Horn r
Horn ro
o
o
otated
tated
tated
tated
Line 212-6
65° h x 50° v
50° h x 65° v
Line 212-9
90° h x 50° v
50° h x 90° v
7.1
Changing the Coverage Pattern
The front grille of the Line 212 is divided into two sections (except the version ‘Outdoor
Installation’). Changing the coverage angle is possible by only removing the upper sec-
tion of the grille. To turn the horn, follow these steps:
1)
Remove the four grille mounting screws from the top on the sides of the speakers
with a 3 mm Allen key and remove the grille from the speaker enclosure. It may be
necessary to use a screwdriver in the middle of the top grille edge to pry up the
grille. There is a groove in the grille in this position (under the locking profile) just
for this purpose.
2)
Remove the 6 screws from the high frequency horn (also using a 3 mm allen key).
Loosen the high frequency horn by using both hands, palms to the outside, to
grasp into the horn and lift the horn with even pressure from the palms of your
hands towards the outside. Never use a screwdriver or similar objects to reach be-
hind the edge of the horn, as this could damage it.
3)
Rotate the horn 90° and screw the horn on tightly again (do not force it!).
4)
Screw the grille on tightly.
5)
You will notice twelve fastening screws under the front foam of the 'Outdoor In-
stallation' version. Lift up the front foam carefully and loosen the screws with a
screwdriver for cross-recessed screws. Remove the grille from the speaker enclosure.
Continue with step 2).
If the coverage angle needs to be changed often, make sure that the horn is not always
rotated in the same direction, as the connecting cables may cause the contacts of the
driver to become loose.